Gambro Prismaflo IIS Manuale d'uso rapido
Sfoglia online o scarica il pdf Manuale d'uso rapido per Apparecchiature mediche Gambro Prismaflo IIS. Gambro Prismaflo IIS 2.
Prismaflo
Description
The Prismaflo IIS blood warmer is an accessory
device for use with the Gambro control units
using Prismaflex system sets.
The Prismaflo IIS blood warmer is used to warm the return
blood flow.
electricity from the socket to the control unit
5. Connection Cable Heating Sleeve: Connection between
control unit and changeable heating sleeve
6. Adaptor of Heating Sleeve: Connection between heating
sleeve and cable
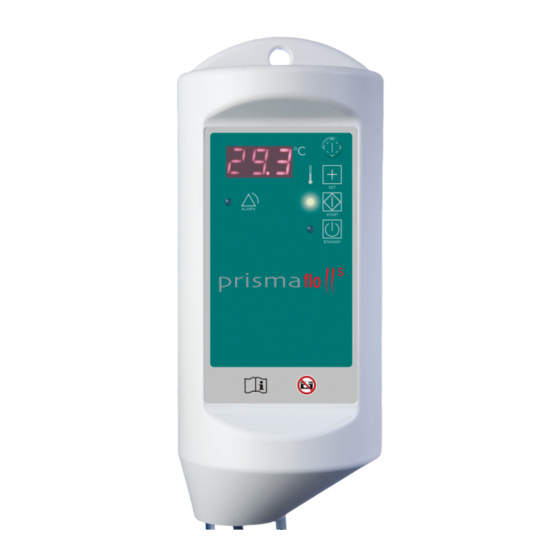
Control panel
1. "Standby" LED: Turns on automatically when the device is in
"Standby" mode.
2. "Standby" Button: Press to switch from "Standby" mode to
"On" mode.
3. "Start" LED: Flashes when the device is in "On" mode
(heating not yet started). Permanently illuminates when heating
("Start" Button is pressed)
7
5
3
1
6. "Set" Button: Press to view actual set temperature.
Press repeatedly to select temperature (while in "On" &
"Heating" mode).
7. Temperature display: Indicates the current temperature
of the heating sleeve
8. "Test" Button Press to switch to "Test" mode
®
IIS: Quick User Guide
1. Attachment Device: Attaches
the Prismaflo IIS Blood Warmer to
the holder which is mounted on the
backside of the Prismaflex control
unit
2. Control Panel: Control buttons
and indicators
3. Flexible Heating Sleeve
Transfers heat from the internal
heating wire to the medium to be
warmed via the inserted blood
return line
4. Power Supply Cord: Supplies
4. "Start" Button: Press
8
to start heating, when the
device is in "On" mode or
6
"Alarm" mode
5. "Alarm" LED:
4
Illuminates during an
alarm (audio alarm
2
beeps automatically if an
alarm condition exists).
"On" mode control panel
"On" mode: Warmer is turned on
Actions: Press the "Standby" Button to switch the device from
"Standby" mode to "On" mode.
Characteristics:
• The LED "Standby" turns off.
• The device conducts a self-test. All segments of the display
and all LEDs are flashing. The acoustic alarm signal beeps
once to confirm that the control unit works properly.
• The "Start" LED flashes and the display flashes the set
temperature for approximately 3 seconds.
• After that the current temperature of the heating sleeve is
displayed.
• If current temperature is below 18°C (64.4 °F), the display
indicates L.
• If current temperature is above 48°C (118.4 °F), the display
indicates H.
"Heating" mode control panel
"Heating" mode: Warmer is started
The device can be started 3 seconds after being plugged in.
Actions: Press the "Start" Button to switch the device from "On"
to "Heating" mode to begin heating of the heating sleeve
Characteristics:
• "Start" LED turns on.
• A self-test is performed. During this test the excessive
temperature and cable break alarms are activated once to
check the function of the cut offs.
• Temperature regulation is activated.
• The display shows the current temperature of the heating
sleeve.
• If current temperature is below 18°C (64.4 °F), the display
indicates L.
• If current temperature is above 48°C (118.4 °F), the display
indicates H.