BriskHeat XtremeFLEX HSTAT101006 Manuale di istruzioni - Pagina 3
Sfoglia online o scarica il pdf Manuale di istruzioni per Unità di controllo BriskHeat XtremeFLEX HSTAT101006. BriskHeat XtremeFLEX HSTAT101006 5. Silicone rubber heating tapes with adjustable thermostat control
SPECIFICATIONS
Operating conditions:
Maximum Exposure Temperature: 450°F (232°C)
Adjustable Thermostat Control 50-425°F (10-218°C)
Power Density: 6.0 watts/in
2
(0.009 watts/mm
Suitable for Electrically Conductive Surfaces
Width
Length
Total
in (mm)
in (mm)
Watts
0.5 (13)
24.0 (610)
72
0.5 (13)
48.0 (1220)
144
0.5 (13)
72.0 (1830)
216
0.5 (13)
96.0 (2440)
288
0.5 (13)
120.0 (3050)
360
1.0 (25)
24.0 (610)
144
1.0 (25)
48.0 (1220)
288
1.0 (25)
72.0 (1830)
432
1.0 (25)
96.0 (2440)
576
1.0 (25)
120.0 (3050)
720
2.0 (51)
24.0 (610)
288
2.0 (51)
48.0 (1220)
576
2.0 (51)
72.0 (1830)
864
2.0 (51)
96.0 (2440)
1152
2.0 (51)
120.0 (3050)
1440
3.0 (76)
24.0 (610)
432
3.0 (76)
48.0 (1220)
864
3.0 (76)
72.0 (1830)
1296
3.0 (76)
96.0 (2440)
1440
3.0 (76)
120.0 (3050)
1440/1800
4
BriskHeat
HSTAT Silicone Rubber Heating Tapes
120 or 240VAC Models
2
)
Moisture and Chemical Resistant
120VAC model includes NEMA 1-15 plug
Part Number
Part Number
120VAC
240VAC
(No plug)
HSTAT051002
HSTAT052002
HSTAT051004
HSTAT052004
HSTAT051006
HSTAT052006
HSTAT051008
HSTAT052008
HSTAT051010
HSTAT052010
HSTAT101002
HSTAT102002
HSTAT101004
HSTAT102004
HSTAT101006
HSTAT102006
HSTAT101008
HSTAT102008
HSTAT101010
HSTAT102010
HSTAT201002
HSTAT202002
HSTAT201004
HSTAT202004
HSTAT201006
HSTAT202006
HSTAT201008
HSTAT202008
HSTAT201010
HSTAT202010
HSTAT301002
HSTAT302002
HSTAT301004
HSTAT302004
HSTAT301006
HSTAT302006
HSTAT301008
HSTAT302008
HSTAT301010
HSTAT302010
®
Corporation. All rights reserved.
OPERATING INSTRUCTIONS
STEP 1
Remove heater from box. Visually inspect heater. Do not use if torn or damaged.
STEP 2
Installing your heating tape:
The fl exible heating tape can be installed on both a fl at and/or curved surface.
For a fl at surface, lay the heating tape onto the surface to be heated. For a
curved surface, wrap the heating tape onto the surface to be heated. Attach the
heating tape to the surface by using aluminum tape, fi berglass tape, or a
mechanical clamping device which will not cause damage to the heating tape.
• The length of one entire side of the heating tape must be in full contact
with the surface. Ensure the heating tape is not kinked, twisted, or any
portion of the tape hanging free from the surface (A).
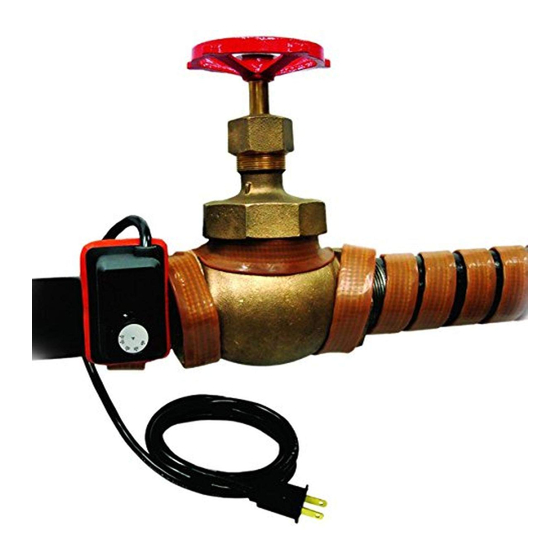
• Thermostat sensor must be in full contact with object to be heated.
Sensor is located underneath temperature controller box (B).
• Do not overlap heating tape on itself (C).
(A)
Incorrect
Installation:
Heating tape hanging
free from the surface
(C)
Incorrect
Installation:
Heating tape
overlapped on itself
STEP 3
For 120VAC: Plug power cord into appropriate outlet.
For 240VAC: Terminate power cord to appropriate electrical power supply. The
power cable consists of two color-coded conductors, black and white. The black
wire should be connected to Line 1. The white wire should be connected to Line
2. The power connections must be adequately rated to electrically support the
voltage and amperage of the heater. The identifi cation label located on the power
cord displays voltage and amperage requirements.
STEP 4
Adjust dial to desired setting between 50-425°F (10-218°C).
Temperature controller dial and enclosure will become very hot after use.
Always unplug heater and allow to cool prior to handling.
BriskHeat
®
Corporation. All rights reserved.
HSTAT Silicone Rubber Heating Tapes
Read and understand this entire manual
before operating this electric heating tape.
(B)
Correct
Installation: