JamHub TourBus Manuale d'uso - Pagina 7
Sfoglia online o scarica il pdf Manuale d'uso per Mixer musicale JamHub TourBus. JamHub TourBus 12.
Anche per JamHub TourBus: Manuale d'uso (12 pagine)
Diving into the SoleMix controls
The SoleMix controls found on each JamHub section and on
the SoleMix remote are easy to understand and use once you
know the basic layout and design
of a JamHub system.
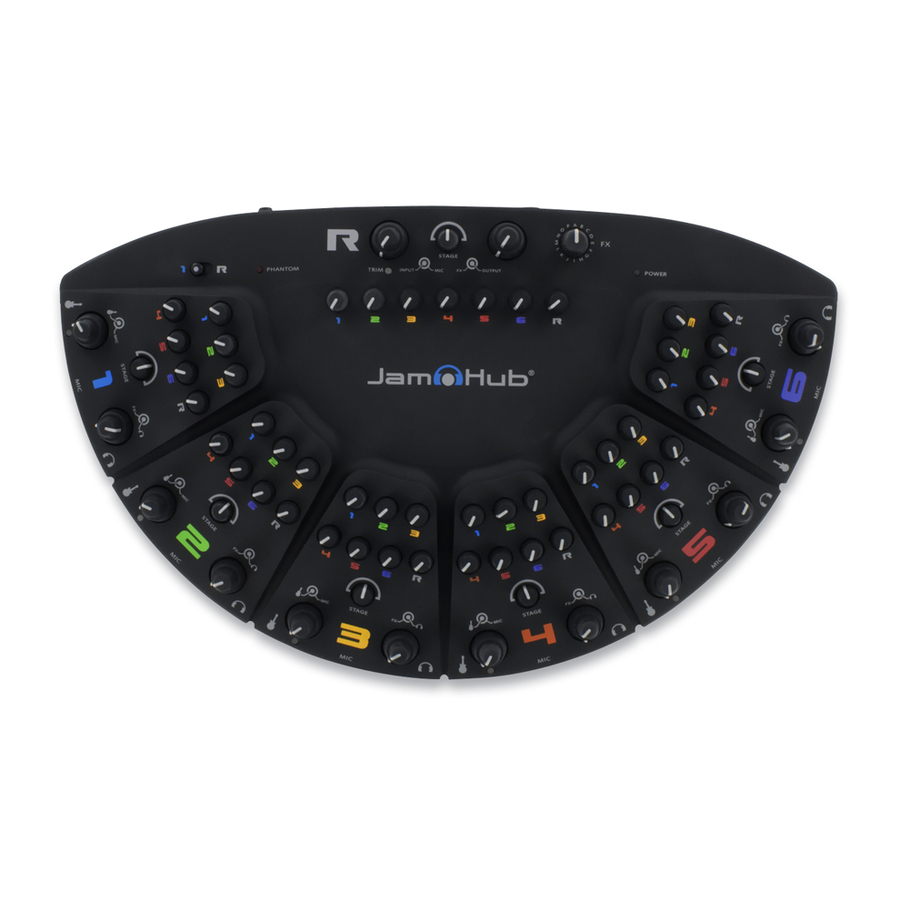
First, look at your JamHub from the top. You'll see that there
are 4 or 6 numbered sections and they are color-coded. (We'll
get to the "R" section in a minute, so hang in there.)
Typically you'll want to use one section per musician. If you
are the guitar player, you connect your mic and amp modeling
device into section 1. Now everyone in the band can use their
SoleMix controls to balance your sound in their headphones
by simply turning up or down the control marked "1" on their
SoleMix section. The same applies to the "2", "3" and "4"
controls.
And don't forget about the effects return knob. This allows
you to decide how much of the effects engine you want to
hear. The "dry" signal comes through each person's numbered
SoleMix controls and the "wet" signal comes through the "FX"
control (under the headphone volume).
What's cool about a JamHub is that once you know one section
of the product, you know all the sections of the product.
Pretty easy, huh?
What's up with the "R" section?
"R" section layout
Here's a little secret. The R section (for "rear" or "recording") functions exactly the same as all the other SoleMix sections. While it may
look a little different, take a closer look. You'll see that all the knobs are the same. The only difference is how they are laid out on the
JamHub.
Want to jam along with your favorite tune, or need to learn a new song? Plug your MP3 player into the R section. Then each musician
can decide how much of the song to hear by turning up (or down) the R knob in their SoleMix section.
The R section is also designed for recording. Just like one musician's mix is different from another's, a recording mix is unique.
Can you use it for another musician? Sure! Remember, it is simply another section of the JamHub. But instead
of a number on the label, we put an R.
Just set up a computer or a portable recorder and create a mix for recording. Make sure whoever you want in charge of the recorded
mix is also plugged into section 1. Read on to find out why.
12
SoleMix section layout
The 1 - R switch for auditing your recording mix
The 1 - R switch is for listening to the mixes coming from section 1 and the R section.
If you're the person responsible for the recording mix, you'll need to hear both the
R mix as well as your own mix on channel 1. So we designed the JamHub with
a handy little switch that allows you to quickly flip back and forth between these
two sections.
Left Brain:
This switch takes the output of the R section and redirects
it to section 1 headphone jack. When the switch is in the
1 position, the SoleMix output for section 1 is sent to the
headphone jack that is part of section 1. When the switch
is in the R position, the output that is being sent to the
R headphone jack is rerouted to the headphone jack in
section 1.
Effects engine and settings
The effects engine in your JamHub silent rehearsal studio allows you to create
a "room" inside the unit and decide how much of it you want to hear. Or, you can
try one of the pure effects like flanger or phaser for something a little different.
Each section, and each remote, can decide how much of the effects engine they
would like in their mix. It's part of the SoleMix controls so that each player can decide
how much they want to "wet out" the vocals.
The effects engine is connected to the mic inputs only. We did this because most
modeling amps, keyboards and electronic drums have their own built-in effects.
If you've ever heard one reverb put on top of another reverb, you understand why
we avoided mixing the two.
Left Brain:
The stereo effects engine is coupled to a set of 24-bit 48kHz
audio codecs to ensure great sound quality. The effects engine
has 16 preset algorithms which cover all of your basic needs
and a few unusual effects thrown in for fun. The codecs are
wide bandwidth (100dB) and low noise (s/n of 105dB).
Right Brain:
If you're in charge of the recording mix, you need to hear your
mix for playing and the mix for recording. To do this, you can
disconnect your headphones from your section's headphone
jack and plug them into the R section's headphone jack to
hear the recording mix. Or, make section 1 your mix, leave
your headphones plugged in, and use the 1—R switch to
quickly alternate between your mix and the recording mix.
Right Brain:
The effects options cover a variety of styles and lets each
musician use the effects knob to control how much or how
little of them they want to hear.
13