Garmin APPROACH S40 Manuale d'uso - Pagina 6
Sfoglia online o scarica il pdf Manuale d'uso per Guarda Garmin APPROACH S40. Garmin APPROACH S40 14.
Anche per Garmin APPROACH S40: Manuale d'uso (10 pagine), Manuale d'uso (16 pagine)
Big Numbers Mode
You can change the size of the numbers on the hole view
screen.
Hold the button, and select Golf Settings > Big Numbers.
TIP: When using big numbers mode, you can press the button
and select Hazards and Layups or Move Flag.
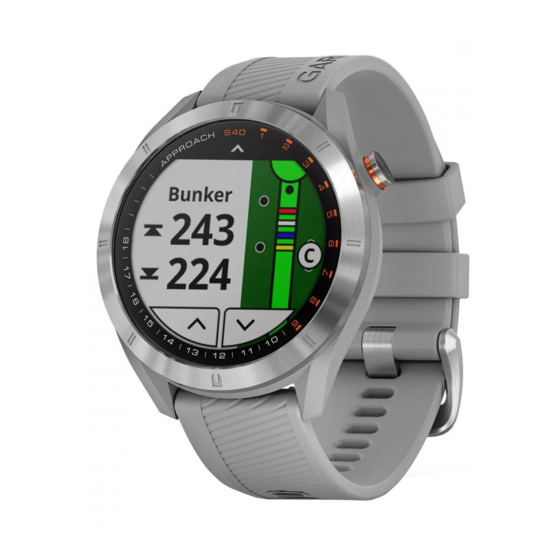
The current hole number
The par for the current hole
The distance to the back of the green
The distance to the middle of the green or selected pin position
The distance to the front of the green
Viewing the Green
While playing a game, you can take a closer look at the green
and move the pin location.
1
Select the green.
2
Tap or drag
to move the pin location.
3
Press the button to set the pin location.
The distances on the hole information screen are updated to
reflect the new pin location. The pin location is saved for only
the current round.
Changing Holes
You can change holes manually from the hole view screen.
1
While playing golf, press the button.
2
Select Change Hole.
3
Select
or
.
Viewing Hazards, Layups, and Doglegs
You can view distances to hazards, layups, and doglegs along
the fairway for par 4 and 5 holes. Hazards that affect shot
selection are displayed individually or in groups to help you
determine the distance to layup or carry.
1
Select an option:
• From the hole view screen, select
• When using big numbers mode, press the button and
select Hazards and Layups.
• The hazard type, layup and distance, or dogleg and
distance
is listed at the top of the page.
• The distances to the front and back
hazard, layup, or dogleg appear on the screen.
NOTE: If your hazard has a single point, the distance to
the center appears on the screen.
2
2
Viewing the Golf Menu
During a round, you can view saved shots and locations, round
information, sunrise, sunset, and twilight times, and the
scorecard. You can also change holes and end a round.
Measuring a Shot with the Garmin
AutoShot
Your Approach S40 device features automatic shot detection
and recording. Each time you take a shot along the fairway, the
device records your shot distance so you can view it later
(Viewing Shot History, page
TIP: Automatic shot detection works best when you wear the
device on your leading wrist and make good contact with the
ball. Putts are not detected.
1
2
3
Adding a Shot Manually
You can manually add a shot if the device doesn't detect it. You
must add the shot from the location of the missed shot.
1
2
.
3
Keeping Score
1
2
3
4
Setting the Scoring Method
You can change the method the device uses to keep score.
1
2
3
of the nearest
About Stableford Scoring
When you select the Stableford scoring method
Scoring Method, page
number of strokes taken relative to par. At the end of a round,
• The green is represented as a half circle
the screen. The line below the green represents the center
of the fairway.
• Hazards, layups, and doglegs
green in approximate locations relative to the fairway.
Select
or
to view other hazards, layups, or doglegs for
the current hole.
During a round, press the button to view the golf menu.
™
Feature
3).
Begin playing a round.
When the device detects a shot, your distance from the shot
location appears in the banner
TIP: You can tap the banner to hide it for 10 seconds.
Walk or drive to your ball.
Hit your next shot.
The device records the distance of your last shot.
While playing golf, press the button.
Select Last Shot > Add Shot.
Follow the on-screen instructions.
While playing golf, press the button.
Select Scorecard.
Select a hole.
Select
or
to set the score.
Hold the button.
Select Golf Settings > Scoring Method.
Select a scoring method.
2), points are awarded based on the
at the top of
are shown below the
at the top of the screen.
(Setting the
Playing Golf