Epson LabelWorks LW-Z900FK Manuale d'uso - Pagina 2
Sfoglia online o scarica il pdf Manuale d'uso per Etichettatrice Epson LabelWorks LW-Z900FK. Epson LabelWorks LW-Z900FK 2.
Anche per Epson LabelWorks LW-Z900FK: Manuale d'uso (2 pagine)
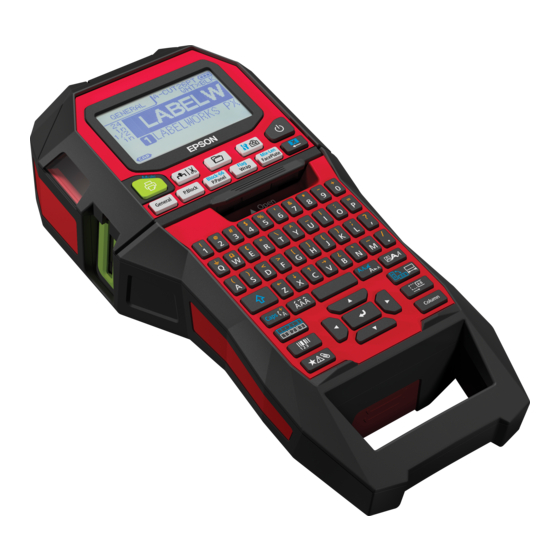
Part Names and Functions
Symbol Description
On/Stand-by
Hot surface
Polarity of D.C. power
Direct current
connector
Start Here
1. Installing the Li-ion battery
Before using the printer for the first time, charge
the Li-ion battery (C52CE97010). Read also the
safety precautions for the rechargeable battery
described previously in this manual.
For details on the handling of Li-ion battery, see
"C52CE97010 Lithium-ion Battery Pack User's
Manual".
1. Open the battery cover.
2. Install the Li-ion battery in the
correct orientation.
Charging the Li-ion battery
You can charge the dedicated Li-ion battery (C52CE97010) with
the printer.
To charge the battery, connect the AC adapter to the printer
with the Li-ion battery installed.
Charge LED
Charging
Charging completed
Charging error
MEMO
• The Li-ion battery cannot be charged while printing.
• When the power of the charged Li-ion battery seems to run out
quickly, replace it with new ones.
• There is likely to be a charging error or battery error in the
following cases. Contact Epson customer support center.
- The charge LED flashes during charging.
- New Li-ion battery takes significantly longer to charge than the
estimated charging time (less than 3 hours).
Using alkaline batteries
You can use alkaline batteries
instead of Li-ion battery. When
using alkaline batteries, install
them in the correct orientation.
CAUTION
When you have printed continuously for 30 minutes using alkaline
batteries, leave the printer for at least one hour to allow the
batteries to cool down.
2. Installing a tape cartridge
CAUTION
• Make sure that the power is turned off.
• You cannot use tape other than LK-tape.
• Make sure the top cover is closed firmly.
• If you opened the top cover while a tape cartridge is
installed, check that the tape end is put into the tape
eject slot before beginning operation.
• Take care to keep the label for detecting the tape
cartridge and the sensor of the printer clean.
Otherwise, tape may no longer be detected correctly.
• Do not touch the sensor directly with your fingers.
Label for detection
Sensor
1. Feeds and then cuts the tape.
2. Tape eject slot
3. Prints a label. Hold down
and press this to print with a
special print function.
4. Creates a general label, or escapes from special label mode.
5. Character keys
6. Shift
7. Enters a character with an accent.
8. Changes the input method of the character keys. Hold
down
and press this for caps lock.
9. Creates a label with a sequence number. Hold down
and press this to create with block sequence numbers.
10. Creates a barcode label.
11. Enters a symbol.
12. Cursor keys
13. Confirms the settings.
14. Adds a block.
15. Sets the margins.
16. Sets the tape length. Hold down
and press this to
change the text orientation.
17. Sets the format and style.
18. Changes the font size. Hold down
and press this to
change the font type.
19. Space
20. Creates a special label.
21. Delete. Hold down
and press this to clear all text and/
or setting.
22. Turns the printer on and off.
23. Previews the created label. Hold down
display preference.
24. Saves and recalls the label.
25. Display
WARNING
Be sure to use the dedicated Li-ion battery (C52CE97010) . Using a battery
other than the one specified may cause fire, explosion, leakage, overheating
or ohter damage.
CAUTION
When disposing of used batteries, make sure to follow the regulations.
3. Close the battery cover.
Connecting the AC adapter
Connect the AC adapter as shown below.
Using Label Editor
Label Editor is an application software for editing label.
When this software is installed on your computer, you
can transfer the created label data to the printer.
For how to install and operate the software, see
"Label Editor User's Guide".
1. Connect the USB cable to the printer.
2. Connect the other connector of the USB cable to
the computer.
MEMO
For how to transfer label data, see LW-Z900 Instruction
Manual (PDF) which can be downloaded from your local
Epson website.
1. Rewind the ink ribbon.
3. Install a tape cartridge.
Use a pen
or a pencil.
Put the tape end
into the tape eject
slot.
2. Open the top cover.
4. Close the top cover.
Top cover
Display
The display shows the current settings and characters
you have entered.
You can change the language shown on the setting
screen and menu.
"Language" of "Changing the Printer Settings"
1. Form name
2. Set tape width and length
The unit can be switched between inch and cm.
"inch:cm" of "Changing the Printer Settings"
3. Symbol input mode
4. Caps Lock ON
5. Block number
6. Row number
7. Cursor
8. Color of text to be printed
9. Set tape color
10. Remaining battery level
and press this to
11. Font size
12. Label cut method
13. Set tape type
3. Turning the power on
1. Press
.
Auto power-off
If there is no key operation within five minutes, the printer
automatically turns off. (The characters you have entered in
the current session are stored.) Furthermore, if there is no key
operation within an hour while connected to a computer,
the printer automatically turns off.
4. Entering text
1. Press
+
.
2. Press
.
3. Press
.
A list of characters appears.
4. Select a character with
press
.
"â" is entered.
5. Press keys: , ,
"Câble" appears on the screen.
6. Press
+
.
"#" is entered.
7. Press keys: , ,
Save the created label:
Change the font:
"Changing the Font"
Change the font size:
5. Printing label
1. Press
.
Setting the label auto cut to Off
"Auto cut" of "Changing the Printer Settings"
Printing with special print functions
"Utilizing Print Functions"
Checking the print image
1. Press
.
The print image scrolls on the entire screen.
When the preview ends, the editing screen reappears.
6. Attaching label
1. Peel off the backing paper.
7. Turning the Power Off
1. Press
.
The characters you have entered in
the current session are stored even
after the printer is turned off. They are
displayed when it is turned on again.
2. Open the battery cover and then
remove the Li-ion battery.
If the AC adapter is connected,
disconnect the AC adapter from
the printer.
Cleaning
CAUTION
Turn off the printer and remove the batteries before cleaning.
If the AC adapter is connected, disconnect the AC adapter cable from
the printer.
Exterior
Wipe the dirt off with a soft cloth.
If it is very dirty, use a cloth wrung out of water.
CAUTION
Never use chemicals or solvents such as benzine, thinner, or alcohol, or
use a chemical duster.
Printhead
Clean the printhead with a cotton swab.
Initializing the Settings
Initialize the settings if the printer does not operate normally such
as the display is interrupted.
Attention
This function initializes the settings. Take extreme care before initializing
it. All the created text will be lost and the settings you made will be reset.
1. If the power is on, press
2. Press and hold
3. When a message appears, press
The settings will be initialized.
MEMO
To cancel initialization, press a key other than
Feeding the tape
CAUTION
Be sure to feed the tape every time after you install a
tape cartridge.
1. Press
2. Select a function with
press
Tape feed
Feeds the tape.
Feed and cut
Feeds the tape and then cuts the tape.
Deleting text
1. Press
A character is deleted backward.
Deleting all text
1. Press
/
and
2. Select a function with
then press
Text Only
Deletes all text.
Text &Setting
Deletes all text and restores the font size and
other settings to the initial settings.
All Format
Deletes all text and displays the General editing
screen. Depending on the label type you create,
"All Format" may not be displayed.
"Saving Frequently Used Labels"
"Changing the Font Size"
CAUTION
• Do not insert your fingers into the tape eject slot.
• Do not pull the tape until the printing is completed.
Attention
• "Insert tape" will appear on the display if the tape
cartridge is not loaded or not correctly set.
• Length of the label shown on the display is a guide
and may not match the length of the printed label
exactly.
• Label over 16m in length cannot be printed.
MEMO
• To cancel the printing, press
• Depending on your margin setting or the label type,
tape may be fed and cut before printing.
CAUTION
Depending on the environment where you use labels
2. Attach the label and
and the nature of the adherend surface, the labels may
rub it firmly.
be peeled or discoloured, and the adhesive may
remain on or damage the adherend surface. Be sure to
check the environment and the nature of the adherend
surface before use. Epson takes no responsibility for
any damage or loss due to the above mentioned
causes.
CAUTION
• "Powering off." is displayed while turning off this
printer. Do not remove the Li-ion battery or
disconnect the AC adapter until this message
disappears.
• When you don't use the printer for a long period
of time, remove the batteries (Li-ion battery or
alkaline batteries), disconnect the AC adapter, and
remove the tape cartridge from the printer.
to turn it off.
+
, and press
.
.
.
.
/
and then
.
.
+
.
/
and
.
.