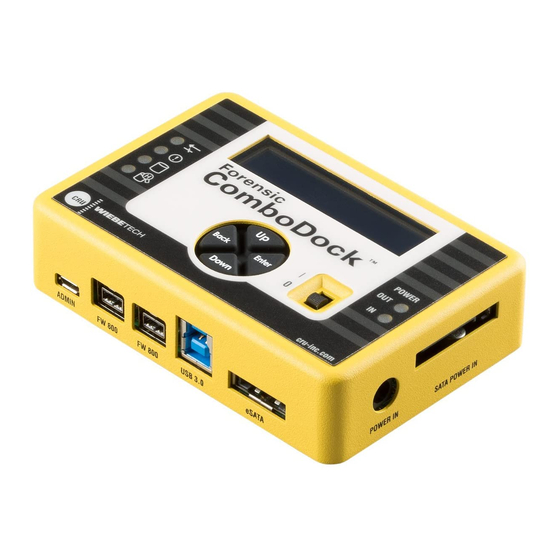
CRU WiebeTech Forensic ComboDock Manuale di avvio rapido - Pagina 2
Sfoglia online o scarica il pdf Manuale di avvio rapido per Hardware di rete CRU WiebeTech Forensic ComboDock. CRU WiebeTech Forensic ComboDock 2.

2
CRU WiebeTech Forensic ComboDock Quick Start Guide
Download a copy of the complete User Manual at
wiebetech_forensic_combodock_v5/
FORENSIC DEVICE USER ADVISORY
Before using this tool for accessing sensitive data, verify the write-blocking function of the
product. You can do so by downloading and installing the Forensic Software Utility from CRU's
website and following the instructions in its User Manual for performing a write-block test.
Download here:
www.cru-inc.com/support/software-downloads/forensic-software-utility/
1 INSTALLATION STEPS
a. Use the provided screws to attach the protective metal plate to the bottom of your 3.5" hard
drive. This step is optional. The purpose of the bottom plate is to provide protection to the
drive electronics of your hard drive.
b. If you're attaching an IDE/PATA drive, configure the jumpers on the rear of the drive to Master.
Consult the instructions on your hard drive's label.
c. Connect the Forensic ComboDock to the drive (or adapter), using the IDE ribbon and Molex
power cables for IDE/PATA drives or the unified SATA data/power cable for SATA drives.
d. If you're using an adapter, connect the drive to the adapter.
e. Connect the eSATA, FireWire, or USB cable from your computer to the corresponding port on
the Forensic ComboDock.
f. Provide power to the Forensic ComboDock. Connect the included AC adapter or a SATA
power cable from the inside of your computer case.
g. Turn on the power switch.
h. The "Select Mode" screen will display on the top LCD panel. Press the
tons to select between "write-blocked" or "read-write" modes and then press Enter. "Write-
blocked" will always be the default mode.
You are now ready to use the Forensic ComboDock to access the drive. If the hard drive is already
formatted, it can be used right away. If the hard drive is brand new, or its format is not compatible
with your computer, the drive will need to be formatted before being used. Make sure that the
Forensic ComboDock is in Read-Write Mode before attempting to format a drive attached to it.
Note that formatting a drive will erase all data on the drive, so be sure to back up your data
before beginning this operation.
Protecting Your Digital Assets
TM
www.cru-inc.com/products/wiebetech/
Up
Down
or
but-
CRU WiebeTech Forensic ComboDock Quick Start Guide
2 HOW TO USE THE LCD INTERFACE
Use the LCD and 4-button navigation interface to view information about the attached drive and
the Forensic ComboDock. On the 4-button interface,
options, while
Enter
selects an option and
MENU ITEM
View Drive Info
Displays a submenu of items that display information about the attached
drive, including temperature, capacity, serial number, firmware revision,
S.M.A.R.T. information, and more.
View Dock Info
Displays a submenu of items that display information about the Forensic
ComboDock, including the product name, unique ID number, firmware ver-
sion, and whether the dock is in Write-Blocked or Read-Write mode.
Create HPA/DCO
Allows you to create an HPA (host protected area) or a DCO (device con-
figuration overlay) of the size you specify. Works in Read-Write mode only.
3 HPA/DCO HANDLING
The Forensic ComboDock will check to see if any HPA's (host protected areas) or DCO's (device
configuration overlays) are present after you have selected Write-Blocked or Read-Write mode on
startup. If an HPA or DCO is detected, the Forensic ComboDock will indicate that one has been
found and ask what you want to do with it. Use the
Enter
options, shown below, and then press
DCO FOUND
Keep DCO
– Keeps the DCO
Remove DCO
– Removes the DCO, exposing
any hidden data within that area
4 UPDATING FIRMWARE
CRU provides free firmware updates for the Forensic ComboDock through our Configurator appli-
cation. Download it and the documentation here:
configurator-software-download/
Up
and
Down
allow you to scroll through
Back
goes back to the previous screen.
ACTION
Up
Down
and
buttons to scroll through the
to select an option.
HPA FOUND
Keep HPA
– Keeps the HPA
Remove HPA Temp
– Temporarily removes
the HPA
Remove HPA Perm
– Permanently removes
the HPA
www.cru-inc.com/support/software-downloads/
3
CRU Mark
10.25.12
PMS 711
2 cyan
85 magenta
76 yellow
