Custom Crimp D165NP Series Manuale dell'operatore - Pagina 5
Sfoglia online o scarica il pdf Manuale dell'operatore per Strumenti Custom Crimp D165NP Series. Custom Crimp D165NP Series 11. Hydraulic hose crimper
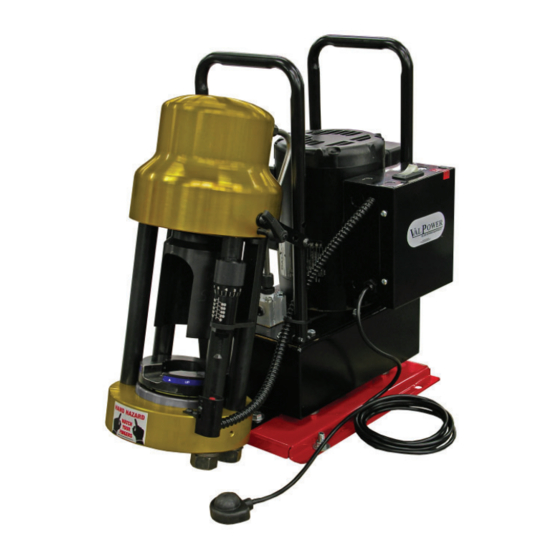
QUICK START GUIDE
FOLLOW THESE STEPS BEFORE USING THE CRIMPER FOR THE FIRST TIME
•
Remove reservoir plug and replace with Oil Fill and Vent
Cap. The Oil Fill and Vent cap and the work light bulb are found in
the accessories box.
•
Place the crimper on a sturdy bench in a well lit area, and
plug the crimper directly into a 115 V 15 Amp wall outlet.
run the crimper on an extension cord as low voltage can damage
the motor.
•
The oil level in the pump should be approximately
1-1/2 inches below the fi ll plug. If necessary,
replenish with ISO Viscosity Grade 46 hydraulic
oil.
Note: The crimper is calibrated prior to shipment, but
a calibration check is recommended prior to using
the crimper for the fi rst time.
•
Lubricate all contact surfaces and place
the Cone Insert, any Small Series die set and
the Standard Pusher in the crimper in the order
shown. Note that a hose and fi tting are not required for
an initial calibration check.
contact surfaces can cause the Cone Insert and/or the dies
to seize in the cone base.
•
Slide the Pusher onto the stud on the hydraulic ram.
•
Set the Micro-Crimp adjuster at "95"
•
Press and hold the start switch bulb.
•
If the ram extends and the crimper shuts off approximately
1 second after the dies are completely closed and the pump starts
to build pressure, the crimper is correctly calibrated.
•
If the time to shut off is not approximately 1 second, the
crimper must be recalibrated. Recalibrate per instructions in this
manual
Note: failure to lubricate all
Page
5
Do not
STANDARD
MICROMETER