Custom Dynamics CD-FORK-BCM-SC Istruzioni per l'installazione - Pagina 2
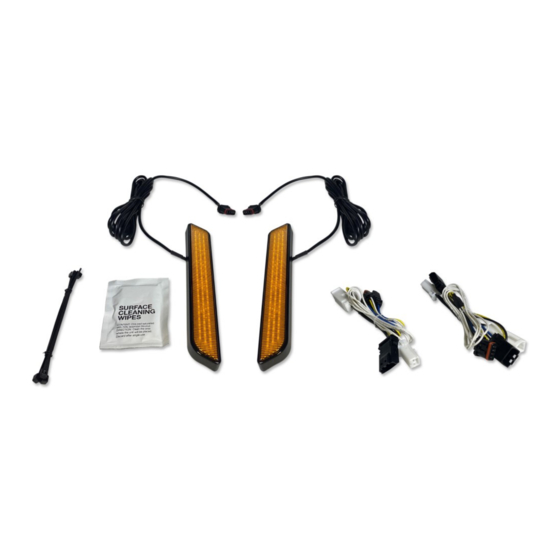
Sfoglia online o scarica il pdf Istruzioni per l'installazione per Accessori per moto Custom Dynamics CD-FORK-BCM-SC. Custom Dynamics CD-FORK-BCM-SC 5. Dynamic led fork reflectors
2
3
4
5
Questions? Call us at: 1 (800) 382-1388
Installation Instructions - Page 2
3. Repeat steps 1 and 2 on the opposing side turn signal assembly.
4. Remove the 3 top T27 Torx Bolts from the outer fairing as shown in Pic-
ture 4. Remove the windshield and store it in a safe place for reinstalla-
tion later.
5. Reinstall the center T27 Torx Bolt only that was removed in Step 4.
Lightly tighten the center bolt to secure the fairing while you remove the
remaining 4 inner fairing bolts.
6. Remove the 2 T27 Torx bolts from the left and the right side of the inner
fairing as shown in Picture 5. Save the bolts for reinstallation.
7. While standing in front of the bike and holding the fairing, remove the
center outer fairing T27 Torx bolt and pull the fairing slightly away from
the bike.
8. With the fairing slightly pulled away from the bike, disconnect the con-
nector from the headlamp. Lay the fairing on a protected flat surface to
prevent damage.
9. Using one of the BCM Adapter harnesses, plug the black male connect-
or of the pass-through into the female connector of the turn signal wiring
harness.
10. Push the female 4 pin JAE connector of the pass-through harness into
the hole in the fork. Plug the 4 pin JAE connector from the turn signal
into the Pass-through harness, then reinstall the turn signal onto the fork
frame and secure with the original nuts. Repeat for the other side.
11. On the left side BCM Adapter Harness, plug the 2 pin female connector
into the male 2 pin connector of the right side BCM Adapter Harness.
12. Locate the 2 pin fairing connector to the lower left (looking at the fairing)
of the fairing vent. See Photo 6.
13. Remove the connector plug from the 2 pin fairing connector on the mo-
torcycle by pushing the center tab in and pulling the plug out. Save the
plug for reinstallation later. Refer to Photo 7.
14. Plug the BCM Adapter Harnesses into the fairing 2 pin fairing connector,
ensure that it snaps in. Make sure to reinstall the plug removed in the
previous step into the right side BCM Adapter Harness pass-through
connector.
15. Using the provided wire ties, secure the BCM Adapter Harnesses to pre-
vent the wires from being damaged during fairing installation.
16. Remove the OEM fork reflector from the lower fork leg. Clean the reflec-
tor area removing any debris or tape from the OEM Reflector.
17. Wipe the reflector area down with the provided Isopropyl Alcohol Wipe
and let dry.
18. Remove the protective red film from the back of the LED Fork Reflec-
tors. Align the LED Fork Reflectors in the reflector area and press into
place. The LED Fork Reflector should be mounted in the same location
as the OEM reflector with the wire exiting the top, rear side of the light.
M-TH 8:30AM-5:30PM / FR 8:30AM-5:30PM EST
04-2020