- ページ 4
水ポンプ Dresser iCIP 200 SeriesのPDF インストレーション&オペレーション手順書をオンラインで閲覧またはダウンロードできます。Dresser iCIP 200 Series 14 ページ。 Intelligent chemical injection pump
Solar Panel Maintenance
Very little maintenance is necessary other than the periodic
cleaning of the Solar Panel screen. This will optimize the
charging capabilities, by enhancing the light transmission.
Use a mild soap solution, warm water and a clean soft towel
to remove dust, bird dropping, etc. Use of any greasy
substances or sharp tools might scratch the protective
covering.
Handle the solar panels with care. The cells can easily be
damaged do the fragile nature of the multicrystalline silicon
cell structure. Irreparable damage can be caused by any
impacting, twisting, or bending action of the panel
assemblies. Do not drill or weld the frame if possible.
Solar Panel Wiring
Panels Provided with Unit: Using a piece of cardboard,
keep the Solar Panels covered while making any electrical
connection to the "Solar Panel Junction box. Follow the
instructions and wiring diagram (reference figure 16) for
proper polarity connectivity. Always use insulated tools to
avoid high voltage and current produced by the solar panels.
Install the cable glands as needed into the side of the solar
panel junction box. Position a screw driver on the diameter
of the circular plastic plug to remove the knockout. Install
the cable gland, avoiding over tightening. Slide power cable
through the cable gland and hook up white wire to
positive contact and the black wire to negative contact.
Where multiple panels are used, unless only one solar panel
cable is protruding from the battery enclosure, all Solar
Panels are to be wired to a unique solar panel cable
assembly. In some instances, two panels will be wired in
parallel (connecting Positive to Positive and Negative to
Negative). Close the junction box and secure the lid using
the captive screws provided.
A simple plug/socket assembly has been provided to isolate
or to disconnect the power from the "Solar Panels" to
the electrical charging system for safety and general
maintenance. Do not plug in until all other connections have
been completed. After all connections have been made,
remove the cardboard cover.
Panels Provided by Customer: Using a piece of cardboard,
keep the Solar Panels covered while making any electrical
connection to the "Solar Panel Junction box. Follow the
instructions and wiring diagram (reference figure 21-24) for
proper polarity connectivity. Always use insulated tools to
avoid high voltage and current produced by the solar panels.
Route the solar panel wiring through the enclosure opening
(Figure 7). Install and tighten the cable gland connector into
the side of the enclosure. Each solar panel wiring assembly
should be routed through a unique opening.
In some instances, two panels will be wired in parallel
(connecting Positive to Positive and Negative to Negative).
A simple plug/socket assembly has been provided to isolate
or to disconnect the power from the "Solar Panels" to
the electrical charging system for safety and general
maintenance. Do not plug in until all other connections have
been completed. After all connections have been made,
remove the cardboard cover.
For Safety purposes, the battery and solar panels should
not be connected until all other assembly steps have been
completed.
Route the
solar panel
cable through
enclosure
opening
Motor
Connection
Figure 7
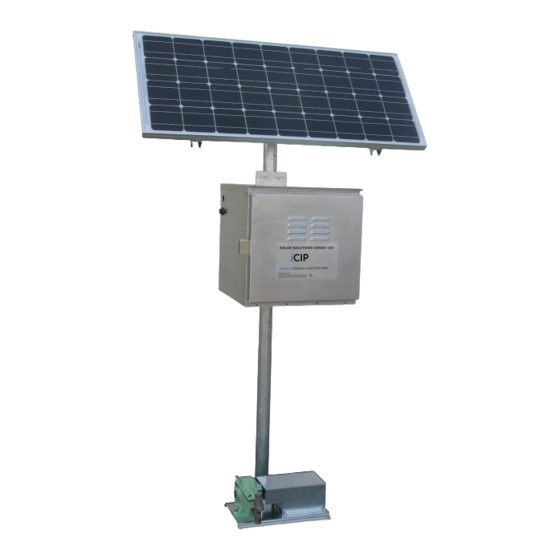
Motor Controller Enclosure
NEMA 4X Rated
Figure 8 – Enclosure: Battery, Motor Controller, and Solar
Converter
Battery Enclosure
The Battery Enclosure is contrasted from a marine grade all
aluminum exterior shell, neoprene door seal,
4
Solar Converter
Sub Panel
Gel Cell
Battery