- ページ 4
楽器アンプ DV Mark MULTIAMPのPDF オーナーズマニュアルをオンラインで閲覧またはダウンロードできます。DV Mark MULTIAMP 17 ページ。

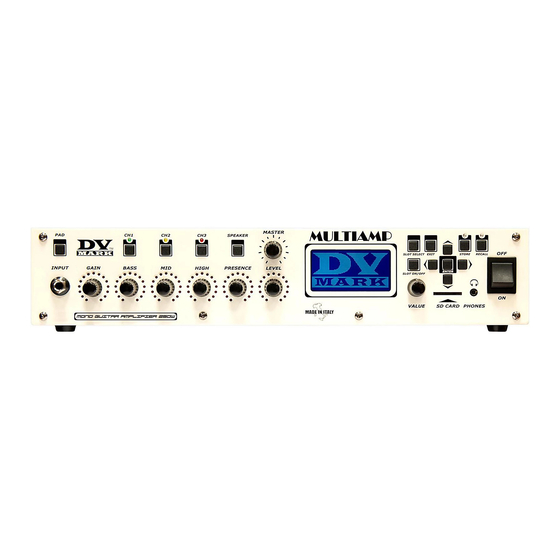
FRONT PANEL
1) INPUT Connect your guitar to this input using a standard ¼" shielded instrument cable.
2) PAD This switch pads the input (1) at -6dB, 0dB, +6dB, or +12dB to compensate for higher output sources, such as guitars
with high-output pickups or active electronics.
3) Ch1 Ch2 Ch3 Push these buttons to select the models of AMP's for each slot.
4) SPEAKER This button allows to have quick access to the Cabinet Simulator parameters.
5) MASTER This control is the master feed of the power stage, it controls the volume to the speaker and headphone outputs
and it has no influence on the XLR Balanced Outputs.
6) GAIN, BASS, MIDDLE, hIGh, PRESENCE, LEVEL AMP simulator preamp section controls. They reproduce the same
functions of the control pots of the selected AMP model.
7) BANK The display shows the selected BANK PRESET.
8) PRESET The display shows the name and number of the selected PRESET.
9) SLOT The Multiamp features 7 SLOTs where you can put the AMP models and the effects, and 1 SLOT for the CAB models.
10) SYSTEM Use this function to set stereo/mono option or to recall the Memory Bank from an SD Card or to transfer the
Memory Bank onto an SD Card.
11) STEREO Shows the output mode: STEREO (250W + 250W @ 4ohm, 150W + 150W @ 8ohm, 85W + 85W @ 16 ohm) or
mono BRIDGE (500W@8ohm, 300W@16ohm).
12) PAD Shows the selected input pad (-6dB/O/+6dB/+12dB).
13) VALUE This control will increase/decrease the selected value.
14) SLOT SELECT Enable/Disable the selected SLOT.
15) EXIT Push to exit from the function in use.
16) UP scroll button.
17) DOWN scroll button.
18) LEFT scroll button. When BANK function is selected this button allows you to scroll UP 8 presets at time (quick search).
19) RIGHT scroll button. When BANK function is selected this button allows you to scroll DOWN 8 presets at time (quick
search).
20) STORE Push to memorize a preset to the internal memory.
21) RECALL Push to recall a preset from the internal memory.
22) ON/OFF This switch delivers AC power to the unit. Make sure the unit is grounded; all three terminals of the AC power plug
must be connected to avoid any injury to the user or damage to the unit. DV Mark Multiamp is manufactured to be used in the
country where it has been sold, and is factory preset to that country's voltage. So make sure you're sending the correct voltage
to your Multiamp before you connect it
2
to AC power.
23) SD CARD Insert an SD Card (fat32
formatted) in this slot to memorize/
PAD
recall preset/s and for firmware update
function.
24) PhONES Headphones mini plug
INPUT
(1/8") input.
25) ENTER Send/confirm button for a
selected function.
1
4
3
CH1
CH2
CH3
SPEAKER
PRESENCE
GAIN
BASS
MID
HIGH
6
PANNELLO FRONTALE
1) INPUT Ingresso chitarra.
2) PAD Regolazione livello del segnale in ingresso.
3) Ch1 Ch2 Ch3 Tasti per la selezione dei modelli per lo slot AMP.
4) SPEAKER Tasto di accesso veloce ai parametri del Cab Simulator.
5) MASTER Manopola della regolazione del volume di uscita speaker e Cuffia. Questo controllo non influenza le USCITE
BILANCIATE XLR.
6) GAIN, BASS, MIDDLE, hIGh, PRESENCE, LEVEL Controlli dello stadio di preamplificazione dell'AMP simulator.
Questi controlli assumono le stesse funzioni delle manopole di controllo del modello di Ampli selezionato.
7) BANK ll display visualizza il BANCO del PRESET selezionato.
8) PRESET Il display visualizza il nome e il numero del preset selezionato.
9) SLOT Il Multiamp ha 7 SLOT dove poter inserire gli amp modelling e gli effetti e 1 SLOT dove inserire i vari tipi di cabinets.
10) SYSTEM Questo comando serve per l'impostazione della macchina in modalita' stereo o mono, per il richiamo dei banchi
di memoria da una SD card e per il trasferimento dei banchi di memoria ad una SD card.
11) STEREO Visualizza le modalita' di uscita STEREO (250W + 250W @ 4ohm, 150W + 150W @ 8ohm, 85W + 85W @ 16 ohm)
o mono BRIDGE (500W@8ohm, 300W@16ohm).
12) PAD Visualizza il guadagno di ingresso selezionato.(-6dB/O/+6dB/+12dB).
13) VALUE Manopola di incremento/decremento dei valori selezionati.
14) SLOT SELECT Attiva o disattiva lo SLOT selezionato.
15) EXIT Pulsante di uscita funzione.
16) Pulsante scorrimento cursore verso l'alto.
17) Pulsante scorrimento cursore verso il basso.
18) Pulsante scorrimento cursore verso sinistra. Nella schermata di selezione BANK questo tasto consente di saltare verso
l'alto i preset di 8 per volta (ricerca veloce).
19) Pulsante scorrimento cursore verso destra.Nella schermata di selezione BANK questo tasto consente di saltare verso il
basso i preset di 8 per volta (ricerca veloce).
20) STORE Tasto per la memorizzazione di un preset sulla memoria interna.
21) RECALL Tasto per il richiamo di un preset dalla memoria interna.
22) ON/OFF Questo switch eroga corrente AC all'unità. Assicurarsi che l'unità sia messa a terra; tutti e tre i terminali della
spina di alimentazione AC devono essere collegati per evitare lesione all'utente o danni all'unità. Il DV Mark Multiamp è
realizzato per essere utilizzato nel paese in cui è stato venduto, ed è settato per la tensione di quel paese. Assicurarsi che si sta
4
5
7
8
MULTIAMP
MASTER
LEVEL
10
11
12
9
14 15 16
20 21
OFF
SLOT SELECT EXIT
STORE
RECALL
25
ENTER
22
SLOT ON/OFF
18
19
ON
VALUE
SD CARD
PHONES
17
13
23
24
usando la giusta tensione per il vostro
Multiamp prima di collegarlo alla rete
elettrica.
23) SD CARD Inserire una scheda
SD (formato FAT32) in questo slot per
memorizzare / richiamare i preset e per
eseguire l'aggiornamento del firmware
24) PhONE Ingresso mini jack per
cuffia.
25) ENTER Pulsante di invio o di
conferma di una funzione selezionata.
