Jandy
4.2
Conduct Pressure Test
WARNING
When pressure testing a system with water, air is often
trapped in the system during the filling process. This air
will compress when the system is pressurized. Should
the system fail, this trapped air can propel debris at a
high speed and cause injury. Every effort to remove
trapped air must be taken, including opening the bleed
valve on the filter and loosening the pump basket lid
while filling the pump.
WARNING
Trapped air in the system can cause the filter lid
to be blown off, which can result in death, serious
injury, or property damage. Be sure all air is properly
purged out of the system before operating. DO NOT
USE COMPRESSED AIR TO PRESSURE TEST OR
CHECK FOR LEAKS.
ELECTRICAL SHOCK HAZARD
Do not pressure test above 35 PSI. Pressure testing
must be done by a trained pool professional. Circulation
equipment that is not tested properly might fail, which
could result in severe injury or property damage.
When pressure testing the system with water, it is very
important to make sure that the pump basket lid is
completely secure.
1. Fill the system with water, being careful to
eliminate trapped air.
2. Pressurize the system with water to no more than
35 PSI.
3. Close the valve to trap pressurized water in the
system.
4. Carefully observe the system for leaks and/or
pressure decay.
4.3
Start-up
To avoid risk of property damage, severe personal
injury or death, verify that all power is turned off before
starting this procedure.
If this is a new pool installation, make sure all piping
is clear of construction debris and has been properly
pressure tested. Check the fi lter for proper installation,
verifying that all connections and clamps are secure
according to the manufacturer's recommendations.
Pro Series VS PlusHP Pumps
®
WARNING
WARNING
WARNING
|
Installation & Operation Manual
Never run the pump without water. Running the
pump "dry" for any length of time can cause severe
damage to both the pump and motor and will void the
warranty.
1. Release all pressure from the system and open the
fi lter pressure release valve.
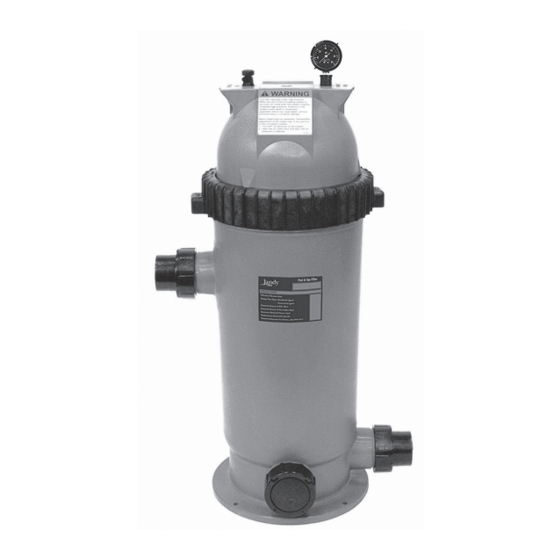
Figure 11. Purge Air from system
2. Take one of the following actions:
a. If the pump is located below the water level of
the pool, open the fi lter pressure release valve
to prime the pump with water.
b. If the pump is located above the water level,
remove the lid and fi ll the basket with water
before starting the pump.
3. Prior to replacing the lid, check for debris around
the lid o-ring seat. Debris around the lid o-ring
seat will cause air to leak into the system, and
make it diffi cult to prime the pump.
4. Hand-tighten the lid to make an air tight seal. Do
not use any tools to tighten the lid: hand-tighten
only. Ensure that the lid is secure. Make sure all
valves are open and the unions are tight.
5. Restore power to the pump and then turn it on.
6. Once all the air has left the fi lter, close the fi lter
pressure release valve.
7. The pump should prime. The time it takes to
prime will depend on the elevation and length of
pipe used on the suction supply pipe. If the pump
does not prime and all the instructions to this point
have been followed, check for a suction leak. If
there is no leak, repeat Steps 2 through 7.
8. For technical assistance, call Zodiac
Support at 1.800.822.7933.
Page 13
ENGLISH
CAUTION
*
Open pressure relief valve
When all air has been purged
there will be a water discharge.
*
Pressure relief valve displayed is typical for
Jandy Cartridge Filters. Be sure to check with
your filter manufacturer if the pressure relief
valve on your filter differs from the one displayed.
Technical
®