- ページ 4
芝生とガーデン用品 Gardena 1805のPDF 取扱説明書をオンラインで閲覧またはダウンロードできます。Gardena 1805 11 ページ。 Water timer electronic
5. Summary of Operating Instructions
1. Insert the battery.
Only use a 9 V alkali-manganese (alkaline) battery type IEC 6LR61.
Check the polarity (+/– markings).
2. Setting the watering
frequency
The following watering cycles
can be selected using the
Frequency control knob:
3. Setting the watering time / starting time (Run Time)
You can select the watering time using the Run Time control knob
You can select 13 positions between 1 and 120 minutes.
The times you enter are accepted 5 seconds after you have
finished entering the data. The time this happens is the future
watering starting time.
4. Delaying the starting time (Start Time)
The Start Time can be delayed up to 5 seconds after you have selected
the Run Time. Each time you press the Start Time key
Time is delayed by 1 hour from the original time set.
5. Manual On / Off operation (Man)
3
Turning the Run Time knob
to Off or to the required watering time, closes the valve. The starting
time you originally programmed remains unchanged.
6. Reset
3
Turning the Run Time knob
and watering time. The watering valve is not opened.
7. Bad weather operation (Man / Off)
3
If Run Time
is set to Off, your garden will not be watered automati-
cally. e.g. during a rainy period. If, at the end of the rainy period, you
turn the knob back to the required watering time, the starting time you
selected remains unchanged.
6
Setting
Watering Cycle
th
7
every 7 days
rd
3
every 3 days
nd
2
every 2 days
24 h
daily
12 h
twice a day
8 h
three times a day
4
, the Start
to On opens the valve, turning it back
to Reset deletes the starting time
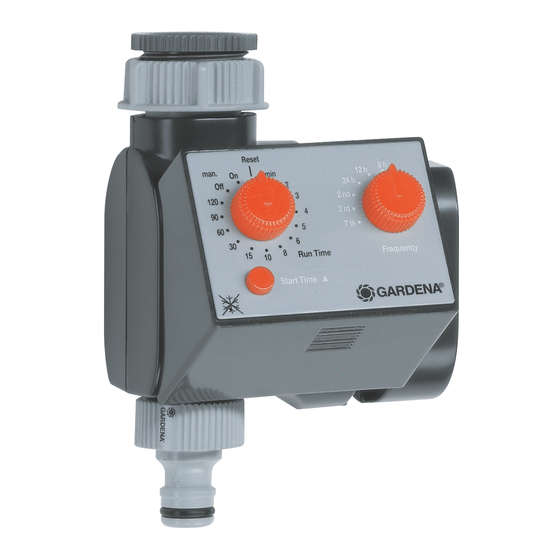
6. Operating Parts
1
Complete housing
2
Watering cycle control knob
(Frequency)
3
Watering time control knob
(Run Time)
4
Key for starting time (Start Time)
5
Battery compartment
6
Control unit connection plug
7
Release button for control unit
8
Connection socket for Soil
Moisture Sensor / Rain Sensor
9
Control knob markings
0
Control unit
A
Sleeve nut
7. Features of the Water Timer
3
.
7.1 Operating elements (Fig. C)
Frequency
Run Time
Start Time L L
7.2 More Functions
Sleeve nut with adaptor
GARDENA threaded tap connector
Connection
Battery compartment
Accompanying accessories
B
G ¾ adaptor for sleeve nut
C
GARDENA threaded tap
connector
Option
D
Anti-theft protection
To set the watering cycle.
To set the watering time (Run Time), watering
starting time and to open and close the water flow
by hand.
The starting time is delayed by an hour from the time
you set the timer, each time you press the key.
To connect the Water Timer to the tap.
Fits GARDENA System hoses.
For GARDENA Soil Moisture Sensor (Art. No. 1187)
and GARDENA Rain Sensor (Art. No. 1189).
To insert a 9 V battery.
7