- ページ 2
マザーボード EPC EPC9087のPDF クイック・スタート・マニュアルをオンラインで閲覧またはダウンロードできます。EPC EPC9087 6 ページ。 Half-bridge with gate drive, using epc2037
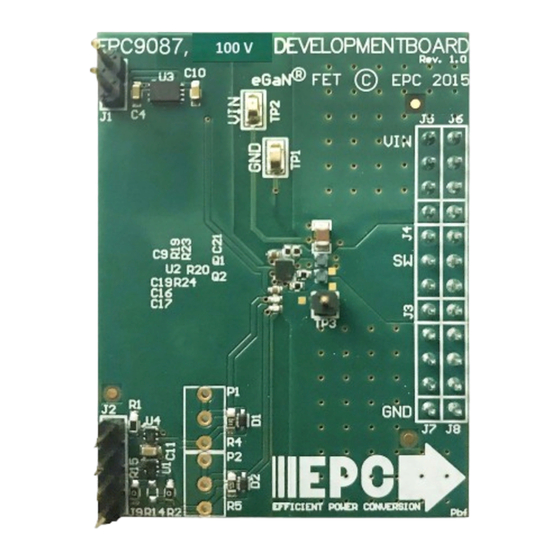
QUICK START GUIDE
DESCRIPTION
The EPC9087 development board provides a half bridge configuration
with onboard gate drives, featuring the EPC2037 eGaN® field effect
transistors (FETs). The purpose of this development board is to simplify
the evaluation process of the EPC2037 eGaN FET by including all the
critical components on a single board that can be easily connected into
any existing converter.
The EPC9087 development board is 2" x 1.5" and contains two
EPC2037 eGaN FETs in a half-bridge configuration using the Texas
Instruments LM5113 gate driver, supply and bypass capacitors.
The board also contains all critical components and layout for optimal
switching performance. There are also various probe points to
facilitate simple waveform measurement and efficiency calculation.
A block diagram of the circuit is given in figure 1.
For more information on the EPC2037 please refer to the datasheet
available from EPC at www.epc-co.com. The datasheet should be read in
conjunction with this quick start guide.
QUICK START PROCEDURE
Development board EPC9087 is easy to set up to evaluate the perfor-
mance of the EPC2037 eGaN FET. Refer to figure 2 for proper connect and
measurement setup and follow the procedure below:
1. With power off, connect the input power supply bus to +V
ground / return to –V
(J7, J8).
IN
2. With power off, connect the switch node (SW) of the half bridge OUT
(J3, J4) to your circuit as required (half bridge configuration).
3. With power off, connect the gate drive input power to +V
ground return to –V
(J1) as shown in figure 2.
DD
4. With power off, connect the input PWM control signal to PWM (J2) and
ground return (J2) as shown in figure 2.
5. Turn on the gate drive supply – make sure the supply is between 7.5 V
and 12 V range.
6. Turn on the controller / PWM input source.
7. Turn on the bus voltage starting at 0 V and slowly increase to the
required value (do not exceed the absolute maximum voltage) and
probe switching node to see switching operation.
8. Once operational, adjust the PWM control, bus voltage, and load within
the operating range and observe the output switching behavior,
efficiency and other parameters.
9. For shutdown, please follow steps in reverse.
2 |
Table 1: Performance Summary (T
Symbol
V
DD
V
IN
I
OUT
V
PWM
*
Maximum current depends on die temperature – actual maximum current with be subject to
switching frequency, bus voltage and thermal cooling.
(J5, J6) and
IN
(J1) and
DD
NOTE. When measuring the high frequency content switch node,
care must be taken to provide an accurate high speed measurement.
Switch node measurement points are located on the top and bottom
sides of the EPC9087 board. It is recommended, if possible, to
install the measurement point on the backside of board to prevent
contamination of the top side components.
For information about measurement techniques, please review
application note AN023: Accurately Measuring High Speed GaN
Transistors:
http://epc-co.com/epc/DesignSupport/ApplicationNotes.aspx
| EPC – EFFICIENT POWER CONVERSION CORPORATION |
Demonstration System EPC9087
= 25°C)
A
Parameter
Conditions
Gate Drive Input
Supply Range
Bus Input Voltage
Range
Switch Node Output
Current*
PWM Logic Input
Input 'High'
Voltage Threshold
Input 'Low'
Minimum 'High' State
V
rise and fall time
PWM
Input Pulse Width
< 10 ns
EPC9087 board.
WWW.EPC-CO.COM
Min Max Units
7
12
V
80
V
1*
A
3.5
6
V
0
1.5
V
25
ns
| COPYRIGHT 2017