Free The Tone PA-1Q Series 소유자 매뉴얼 - 페이지 3
{카테고리_이름} Free The Tone PA-1Q Series에 대한 소유자 매뉴얼을 온라인으로 검색하거나 PDF를 다운로드하세요. Free The Tone PA-1Q Series 6 페이지. Programmable analog 10 band eq graphic equalizer

Controls and Indicators
Rear Panel
INPUT LEVEL select switch
This switch is used to select PA-1Q series input
level according to the output level of the device
connected to the INPUT terminal. If you are connec-
ting an instrument level device, set the switch to the
INPUT terminal side. Or to connect a line level device,
set it to the OUTPUT terminal side.
INPUT terminal
Used to connect
a guitar/
bass, another
OUTPUT terminal
instrument, effects
unit, etc. This
Use this terminal to connect
terminal has the
to your amplifier/mixer , etc.
HTS circuit that
keeps sound
texture the same
when the effect is
turned on and off.
4
POWER DC9V IN terminal
For connecting an AC adapter
with DC 9V center negative
polarity. Requires at least 200mA
of available current.
MIDI IN & OUT/THRU terminals
Used to send/receive MIDI signals
to/from a connected external MIDI
device. The external MIDI controller
can switch PA-1Q series presets
and receive/send preset data from/
to the PA-1Q series.
Recalling a Preset p.6
Transmitting Data to/from an
External Device p.7
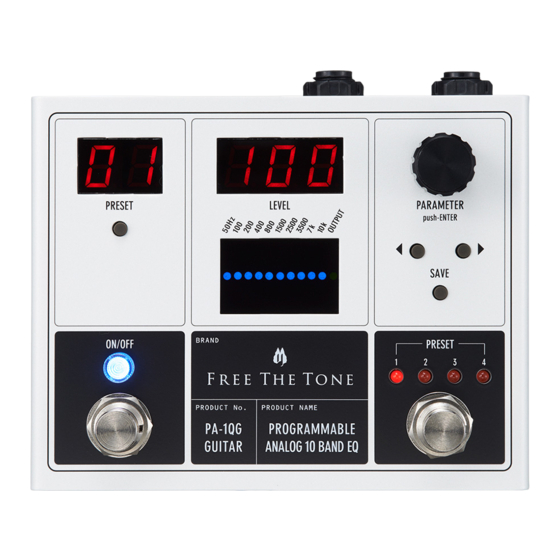
Adjusting Equalizer
You can create your favorite tone by adjusting various parameters.
To adjust the equalizer:
1. Press the ON/OFF switch to turn on the LED above it.
2. Press the cursor key switch to select the frequency to be adjusted (blue dot) in the equalizer display.
3. Turn the PARAMETER encoder to adjust the boost amount of the selected frequency.
NOTE
The boost amount of the selected frequency is adjustable in the range of ±12 dB. The selected frequency is shown in the equalizer
display. The boost amount for the selected frequency is shown in the LEVEL display.
Double-clicking the PARAMETER encoder resets the boost amount of the selected frequency to zero. The previous value returns by
double-clicking the encoder again.
To adjust preset's volume:
1. Press the ON/OFF switch to turn on the LED above it.
2. Press the cursor key switch to select the OUTPUT (green dot) in the equalizer display.
3. Turn the PARAMETER encoder to adjust the volume for the preset.
NOTE
The preset's volume is adjustable from 0 to 127. The preset's volume is shown in the LEVEL display. When all of the frequencies of the
equalizer are set to boost amount 0, unity level is obtained with the LEVEL value 100, and when the value is 127, the volume can be
increased up to +12 dB.
Double-clicking the PARAMETER encoder resets the volume back to 100. The previous value returns by double-clicking the encoder
again.
Editing/Writing Preset Contents
1. Press the ON/OFF switch to turn on the LED above it.
2. Press the cursor key switch to select the parameter to be adjusted.
3. Turn the PARAMETER encoder to adjust the selected parameter.
4. Press the SAVE switch.
5. The LEVEL display shows the destination preset number.
6. Turn the PARAMETER encoder to select the desired preset number.
7. Press the PARAMETER encoder to store the preset to the selected numbered location.
NOTE
When a preset's parameter is changed, the dot at the PRESET display's lower right corner illuminates. This dot turns off when the
save operation is confirmed by pressing the PARAMETER encoder and the parameters are written to the preset.
If the SAVE switch is pressed again after pressing it, then the write operation is canceled.
5
