Gardebruk DBLL001 매뉴얼 - 페이지 6
{카테고리_이름} Gardebruk DBLL001에 대한 매뉴얼을 온라인으로 검색하거나 PDF를 다운로드하세요. Gardebruk DBLL001 15 페이지.
Unplug immediately if the power
10
cord or plug becomes damaged!
Technical data:
Model
DBLL001
Voltage
220-240V
Frequency
50 Hz
Power
3000W
Protec�on
Klasse II
No load speed:
15000/min
Net weight:
2,65Kg
90.2dB(A) KpA:
Sound pressure level
3,0 dB(A)
Guaranteed sound
105 dB(A)
power level
4.27m/s
Guaranteed vibra�on
K=1,5m/s
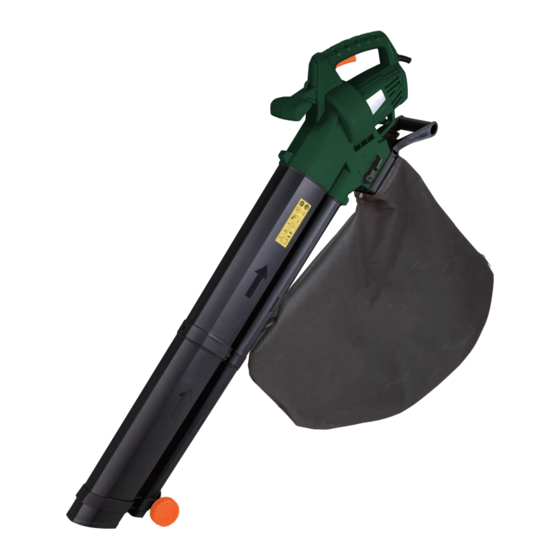
Description (Fig. 1)
1.Mains cable
2.Handle
3.On/Off switch
4.Front handle
5-1. Top pipe Tube Sec�on
5-2. Bo�om pipe Tube Sec�on
6.Motor housing
7.Func�on switch
8.Waste collec�on bag
9.Guide wheels
10.Shoulder strap
Proper use
The applica�on should only be used in the
following two ways: as a vacuum cleaner for dry
leaves and pieces of paper or as a blower for
gathering together piles of dry leaves or for
moving leaves from inaccessible areas (e.g.
from beneath cars).
When working as a vacuum, the applica�on also
acts as a shredder, reducing the size of the
leaves by a ra�o of 10:1. This allows the volume
to be reduced and the prepara�on of the leaves
for use as compost. Any other use not stared in
this instruc�on manual may damage the
applica�on and can be dangerous for the user.
To maintain your rights under the warranty and
in the interest of products safety, please
observe the safety regula�ons.
www.DeubaXXL.de
Safety regulations
Cau�on! The safety instruc�ons must be
observed when using the applica�on. For your
own safety and the safety of others, please
read this informa�on carefully and keep it in a
safe place for reference.
●Always check the applica�on, the power cable
and the plug before use. Only ever use the
applica�on if it is in perfect, undamaged condi-
�on. Damaged parts are to be repaired or
replaced by a qualified electrician.
●Always pull the plug out of the power socket
before carrying out any work on the applica-
�on, before changing the tool and in periods of
2
non-use.
2
●The applica�on must not be used by anyone
under the age of 16.
●Always wear goggles and protec�ve gloves
when working with the applica�on.
●To prevent injury, wear �ght-fi�ng clothes
and safety boots.
●To prevent damage to your hearing, wear ear
muffs; helmets with a visor are par�cularly
advantageous.
●Make sure you have a firm foo�ng when
working with the applica�on.
●To prevent electric shock, avoid contact with
earthed parts.
●Only plug in when the applica�on is switched
off.
●Hold the applica�on firmly in both hands
when working with it.
●Make sure the applica�on is stored in a place
inaccessible to children.
●Never expose the applica�on to rain and bad
weather. Make sure there is enough light at the
working place. Do not use power tools in the
vicinity of combus�ble liquids or gases.
●Always run the power cable away from the
back of the applica�on to guard it from
damage.
●For outdoors work use only suitably approved
extension cables with a min conductor cross
sec�on of 1,5mm2. The plug connectors must
have earthing contacts and be rain-wa-
ter-proof.
●Use original accessories only.
●Do not use the applica�on to pick up humid
material, water, liquids, pieces of glass, iron,
stones or �n cans, this could be very dangerous
for you and the applica�on.
●Do not use the applica�on to pick up hot
embers or material which is burning, smoking
or shoulder. Do not use the applica�on to pick
up material which has been contaminated by
inflammable or explosive substances. Do not
use the applica�on to pick up lighted cigare�es.
Do not suck in highly inflammable fumes.
Always make sure that the material picked up
by your applica�on is not inflammable, toxic or
explosive.
●Do not use suc�on mode without the dust bag
in place.
●Always keep the area to be cleaned free from
wires, stones, debris, �n cans and other obsta-
cles.
●Avoid collisions with hard objects which could
damage your applica�on.
●Keep bystanders and animals at least 5 m
away from the working area.
●Do not manually insert objects into the
suc�on pipe.
●Make sure that the switch is in posi�on "0"
(off), the electricity supply is disconnected and
all the rota�ng parts are stands�ll before
cleaning, carrying out inspec�ons or moving
from one place to another.
●Do not put part of your body such as hands
and fingers in the vacuum opening or exhaust
opening.
●Do not switch the applica�on on in enclosed
or poorly ven�lated spaces or in the presence
of inflammable and/or explosive substances
such as liquids, gas and powders.
Assembling
Suction/blowing pipes (Fig. 2-5)
The suction/blowing pipes must be
assembled before the application is
used.
●Push two sec�ons firmly together un�l the clip
in the moulding engages(Fig.2).
●Slide the suc�on/blowing pipe into motor
housing 1(Fig.3).
●Tighten the 2 screws A (Fig.2 and 3).Make
sure the suc�on/blowing pipes are firmly
Closed with the motor housing(Fig.3).
●Assemble the Wheel Bracket: Insert the
wheel bracket from the end Lower tube �ll
It reach the rib posi�on and can not forward
again(Fig.4).
●Locate one screw in the screw hole on wheel
bracket �ghten the screw firmly(Fig.5).
Waste collection bag (Fig. 6)
●Attach the Vacuum bag to the hook on the
suction/blowing pipes.
●Attach the push-on collection bag connec-
tor to the outlet tube of the housing.Push
The
tting of the collection bag directly
onto the outlet until it "clicks" into position.
●To remove the collection bag. Disconnect
the attachments in the reserve order.
●When removing the tting on the outlet,
rst depress the tow buttons on either side
Of the plastic connector,and then pull.
Fitting the shoulder harness
(Fig.8)
The Vacuum-Blower is provided with a shoul-
der harness this is attached to the top.
Of the Vacuum-Blower as shown.The shoul-
der harness is provided to reduce fatigue
And
aid
comfort
when
using
vacuum-Blower. Never carry the belt diago-
nally over shoulder and chest. Wear the strap
only on one shoulder, in this way you can
remove the device in case of danger fast.
Cable connection(Fig.9)
Attach the extension to one side of the
cable hook as shown in Fig. 9.
Operation
Starting the Vacuum-Blower
www.DeubaXXL.de
11
the