ALIBI ALI-QVR4008H Series 빠른 설정 매뉴얼
{카테고리_이름} ALIBI ALI-QVR4008H Series에 대한 빠른 설정 매뉴얼을 온라인으로 검색하거나 PDF를 다운로드하세요. ALIBI ALI-QVR4008H Series 4 페이지. Analog and ip camera recorder
ALI-QVR4000H Series 8/16-Channel AHD, HD-TVI, Analog and IP Camera Recorder Quick Setup Guide
This guide provides instructions to initially setup the ALI-QVR4000H series digital video recorder (DVR) for AHD, HD-TVI, analog and IP
cameras. The ALI-QVR4008H DVR supports up to 8 analog cameras plus 2 IP cameras (10 total). The ALI-QVR4016H DVR supports up to
16 analog cameras plus 2 IP cameras (18 total). For information about using your DVR and its extensive capabilities, refer to the ALIBI
Embedded Network Video Recorder Firmware V3.4.x User Manual provided at www.alibisecurity.com/resources.
For more information, refer to these documents - available from your equipment vendor:
ALIBI™ Tools Utility Installation and User Manual
•
ALIBI™ Witness Smartphone App - Quick Start Guide
•
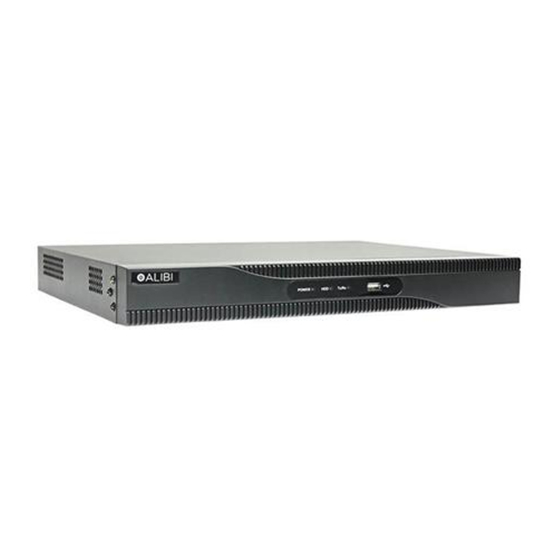
DVR Front Panel
Power LED
ALI-QVR4008H, ALI-QVR4016H front panel
Item
Usage
Power LED
Indicator turns green when DVR is powered up.
Status
STATUS indicator lights in red when HDD is reading / writing.
TX / RX
LED indicator blinks green when network connection is functioning properly.
USB Interface
This port can be used for a USB mouse or USB flash memory devices.
DVR Back panels
1
2
5
6
7
1
1
Status TX / RX
USB Interface
3
4
12
11
8
9
10
ALI-QVR4008H backpanel
2
3
4
5
6
7
8
9
10
11
ALI-QVR4016H backpanel
Item
1
VIDEO IN
2
VIDEO OUT
3
AUDIO IN
4
ON / OFF switch
5
USB
6
HDMI
7
VGA
8
AUDIO OUT
9
LAN
10
RS-485 terminations
11
12 Vdc
12
Alarm terminations
13
GND terminal
Alarm terminations
Item
Description
D+ and D- pins connect to R+ and R- pins of PTZ receiver respectively.
RS-485 (D+, D-)
For cascading devices, the first DVR's D+, D- pin should be connected with the D+, D- pin of the next DVR.
Alarm inputs (ALI-QVR4008H: 1 .. 8, ALI-QVR4016H: 1 .. 16). Alarm input is tied to ground through the alarm sensor. See "Step 3. Connect
ALARM IN
alarm devices to the DVR" on page 2.
ALARM OUT
Alarm outputs 1 - 4 with ground terminations. See "Step 3. Connect alarm devices to the DVR" on page 2.
(1-G through 4-G)
13
Mouse control
A standard 3-button (left / right / scroll-wheel) USB mouse can also be used with this DVR. To use a USB mouse:
1.
Plug the USB mouse into the either the front panel or back panel USB connector of the DVR.
2.
The mouse will be automatically detected. If the mouse is not detected, the mouse may not be compatible with the DVR. Please refer
to the recommended device list from your provider.
12
13
Description
BNC connectors for camera video channels in. Number of channels is dependent on the model of the DVR.
CVBS
RCA connector for audio in cable.
Switch for powering the DVR on and off
Use for a USB mouse or USB memory device such as a flash drive or DVD burner. A USB port is also located on the front panel.
Connector HDMI monitor cable.
Connector VGA monitor cable.
RCA connector for audio out cable.
RJ-45 connector for Ethernet drop cable.
Connector for RS-485 devices. Connect the D+ and D- terminals to T+ and T- of PTZ receiver respectively.
Plug for 12 Vdc power adapter (provided).
See Alarm terminations below.
Ground terminal post.
ALI-QVR40xxH_SQ
180305