DieHard 200.71219 소유자 매뉴얼 - 페이지 5
{카테고리_이름} DieHard 200.71219에 대한 소유자 매뉴얼을 온라인으로 검색하거나 PDF를 다운로드하세요. DieHard 200.71219 12 페이지. Battery charger/maintainer 2 amp, 12 volt 4 amp, 6 volt fully automatic with float-mode monitoring

It.is.important.to.understand.the.charger's.requirements..This.section.explains.the.
charger's.electrical.requirements.and.how.to.prepare.a.battery.for.charging.
PLUggINg IT IN
Your.charger.requires.a.120V.AC.electri-
cal.outlet.installed.according.to.all.local.
codes.and.ordinances.
USINg AN EXTENSION CORD
The.use.of.an.extension.cord.is.not.
recommended..If.you.must.use.an.ex-
tension.cord,.please.make.sure.that.you.
follow.these.guidelines:.
•. Make.sure.that.pins.on.plug.of.exten-
sion.cord.are.the.same.number,.size,.
and.shape.as.those.of.plug.on.charger..
•. Check.that.the.extension.cord.is.
properly.wired.and.in.good.electrical.
condition.
•. Make.sure.that.the.wire.size.is.large.
enough.for.its.length.and.for.the.AC.
ampere rating, as specified in the
chart.below.
MINIMUM RECOMMENDED EXTENSION CORD
Length of Cord, in Feet
AWg* Size of Cord
*AWG=American Wire Gauge
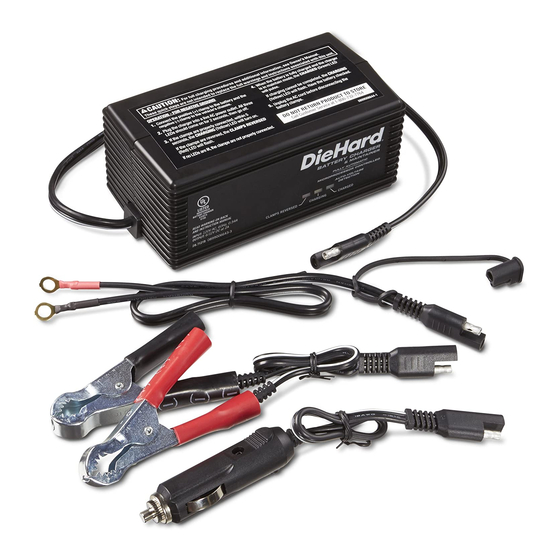
vERSATILE QUICK-hARNESS
Snap.any.of.the.three.connectors.into.
place.in.seconds:
50 AMP BATTERy CLAMPS
Connect.the.end.of.the.charger.
power.cord.and.the.end.of.the.50.Amp.
Battery.clamps.together..Follow.the.
Operating.Instructions.to.connect.the.
output.clamps.to.the.battery..After.a.
solid.electrical.connection.is.made.to.
the.battery,.plug.the.power.cord.into.a.
3-prong.grounded.110V.AC.electrical.
wall.outlet.
BEFORE USINg yOUR BATTERy ChARgER
25.
50.
100. 150
18
18
16.
PERMANENT RINg CONNECTORS
The.ring.connectors.permanently.
attach.to.the.battery.providing.easy.
access.to.quickly.charge.your.battery..
This.application.is.appropriate.for.
motorcycles,.lawn.tractors,.ATVs.and.
snowmobiles..To.permanently.attach.
to.a.battery,.loosen.and.remove.each.
nut.from.bolts.at.battery.terminal..
Connect.the.red.POSITIVE.ring.con-
nector.ring.to.the.POSITIVE.battery.
terminal..Connect.the.black.NEGA-
TIVE.connector.ring.to.the.NEGATIVE.
battery.terminal..Replace.and.tighten.
the.nuts.to.secure..Take.care.to.keep.
both.wires.and.plug.away.from.metal.
and.the.engine.hood..Plug.the.power.
cord.into.a.3-prong.grounded.110V.
AC.electrical.wall.outlet.
12v ACCESSORy PLUg
Charge.or.maintain.your.battery.with-
out.lifting.the.hood..
1.. C o n n e c t . t h e . e n d . o f . t h e . 12 V.
accessory.plug.to.the.matching.end.
14
of. the. charger. power. cord.. Make.
sure.connection.is.tight.
2.. Insert.the.12V.accessory.plug.into.
the.12V.accessory.outlet.
3.. R o u t e . t h e.
p owe r. c o r d.
from. charger.
through. the.
vehicle's.open.
window.
4.. Plug. into. an.
110V.AC.electrical.wall.outlet..Make.
sure.to.place.charger.on.a.dry,.non-
flammable. surface,. like. metal. or.
concrete..
5
