Crestron Electronics CSMI-QMTDC Series 빠른 시작 매뉴얼 - 페이지 3
{카테고리_이름} Crestron Electronics CSMI-QMTDC Series에 대한 빠른 시작 매뉴얼을 온라인으로 검색하거나 PDF를 다운로드하세요. Crestron Electronics CSMI-QMTDC Series 9 페이지. Replacement motor
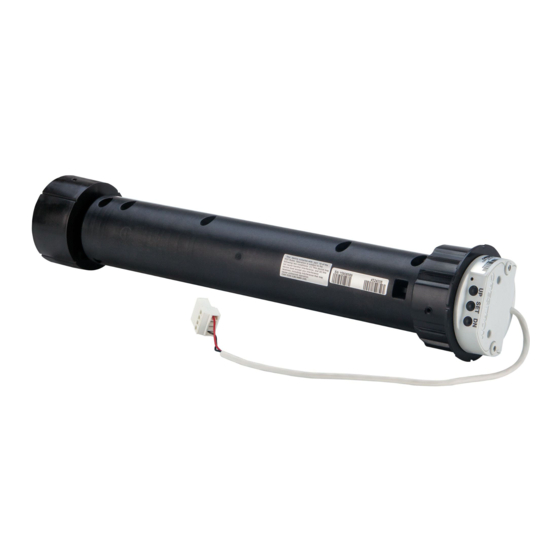
CSM(I)-QMTDC Series Motor Replacement
Replacement Motor
Reinstall the Roller Shade Assembly
After the motor has been fully installed, roll the fabric back onto the tube
(if applicable), and then install the shade assembly according to the
mounting bracket's installation guide.
NOTE:
Limits need to be set after installation. Refer to
Programming
for details.
Motor Wiring
Routing the Cables
To ensure proper functionality and a clean look, consider the following
when routing cables and making connections:
The cables should exit the wall near the motor end of the shade
l
assembly.
Route the cables so that they remain out of sight.
l
The brackets provide a cutout in the upper corner, which allows wiring
l
to be easily run to the motor.
A 2-pin connector may be required for shades with a large roll-up
l
diameter.
Use cable ties to secure the cables to the loop on the bracket.
l
Ensure that the cables and connectors do not make contact with the
l
shade fabric.
Making the Connections
NOTES:
When making the connections, do not use CRESNET-HP cable with
l
the small connector. When using CRESNET-HP cable, replace the
Motor
connector on the motor pigtail with the larger connector that is
supplied with the shade.
All shades should be home run from the power supply (sold
l
separately).
Cresnet QMT® Shade Motor with the Power and Control Coming from the Same
Source
Cresnet QMT Shade Motor with the Power and Control Coming from Separate
Sources
Quick Start
3