Cisco Cisco 7960 참조 매뉴얼

{카테고리_이름} Cisco Cisco 7960에 대한 참조 매뉴얼을 온라인으로 검색하거나 PDF를 다운로드하세요. Cisco Cisco 7960 4 페이지. Ip phone & unity voicemail
Cisco Cisco 7960에 대해서도 마찬가지입니다: 사용자 설명서 (19 페이지), 사용자 설명서 (12 페이지), 맞춤형 사용자 설명서 (2 페이지), 매뉴얼 (35 페이지), 사용자 설명서 (15 페이지), 설치 및 구성 매뉴얼 (10 페이지), 사용자 설명서 (23 페이지), 사용자 설명서 (14 페이지), 참조 매뉴얼 (2 페이지), 빠른 참조 매뉴얼 (2 페이지), 사용자 설명서 (28 페이지), 사용자 설명서 (16 페이지), 빠른 사용 설명서 (2 페이지), 사용자 설명서 (9 페이지), 빠른 시작 매뉴얼 (12 페이지), 매뉴얼 (8 페이지), 빠른 참조 매뉴얼 (12 페이지), 사용자 설명서 (20 페이지), 사용자 설명서 (14 페이지), 빠른 참조 매뉴얼 (12 페이지), 관리자 매뉴얼 (10 페이지), 사용자 설명서 (6 페이지), 빠른 사용 설명서 (2 페이지), 참조 매뉴얼 (17 페이지), 빠른 매뉴얼 (2 페이지), 사용자 설명서 (3 페이지), 빠른 사용 설명서 (2 페이지), 빠른 설치 매뉴얼 (1 페이지), 매뉴얼 (21 페이지), 사용자 설명서 (3 페이지), 시작하기 (50 페이지), 빠른 시작 매뉴얼 (6 페이지), 빠른 시작 매뉴얼 (2 페이지), 빠른 참조 매뉴얼 (2 페이지), 빠른 시작 매뉴얼 (2 페이지), 시작하기 매뉴얼 (27 페이지), 참조 매뉴얼 (3 페이지), 사용자 설명서 (12 페이지), 사용자 설명서 (12 페이지)
Cisco Cisco 7960 참조 매뉴얼
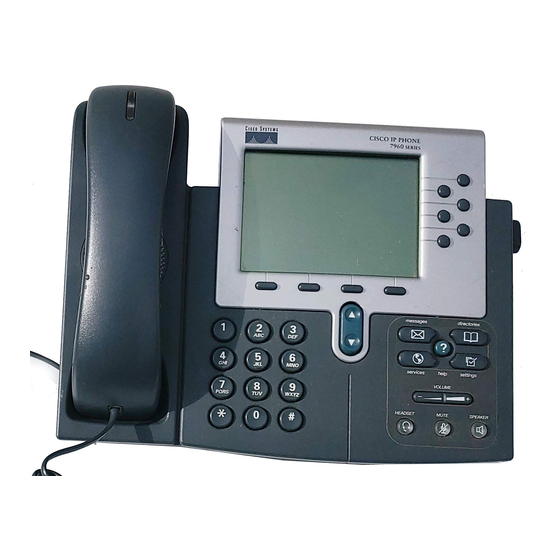
Cisco 7960/7940 Reference Guide
1.
Handset with indicator light—Blinks when phone rings, Stays lit
when there is a message.
2.
LCD screen—Displays features such as time, date and calls.
3.
Cisco IP Phone model type—Model of phone. These are model
7940.
4.
Line or speed dial button—7940 models have 2 lines available.
5.
Footstand adjustment—Raises or lowers the phone. Hold the
button in whiles adjusting.
6.
Directories button—Provides call history.
7.
? button—Provides information on the next key pressed.
8.
Settings button—Change phone ring and contrast here.
9.
Speaker button—Turns the speaker on and off.
10. Mute button—Turns mute on or off.
11. Headset button—Turn headset on or off. (If you have one)
12. Volume button—Increases or decreases the volume.
13. Services button—Provides access to phone services (if available).
14. Messages button—Allows retrieval of your messages.
15. Navigation button—Allows you to scroll through the text on the LCD
screen.
16. Dial pad—Same as a regular phone.
17. Soft keys—These change depending on what is currently
happening on the phone.
Q
uick Reference
C
isco IP Phone
7960/7940 Series
Basic Phone Features
Voice Mail
Volume and Ringer So
und
Basic Phon
e Features
To place a call:
• Lift the handset and dial the number.
• Press the line button for your extensio
• Press the Speaker button, then dial.
• Press the NewCall soft key, then dial
• If you are using a headset, press the H
• If you have established speed dial numbers, press a Speed dial
button.
• If you have selected a number from a directory, press the Dial so
key.
T
o ans
wer a call:
• Lift the handset.
• If you are using a
headset, press the Headset button. If necessary,
press the line button of the incoming call.
• To use the speakerphone, press the Answer soft key or the Speaker
button.
T
o end a
call:
• Hang up the h
andset.
• If you are using a head
set, press the Headset button or the EndCall
soft key.
• If you are using the speakerphone, press the Speaker button or the
EndCall soft key.
T
o redial a numbe
r:
To redial the most rec
ently dialed number, press the Redial soft key.
To put a call on hold:
• Press the Hold soft key.
• To return to the call, pres
s the Resume soft key.
• If multiple calls are on hold, use the Navigation b
desired call before you press Resume.
• If multiple calls on multiple lines are on hold, press the line button for
the line to which you want to switch and use the Navigation button to
select the desired call. Press Resume. Note: Because engaging the
Hold feature generates music or a beeping tone, avoid putting a
conference call on hold.
T
o transfer a call:
During a call, press the Trnsfer soft key. This puts the call on hold.
Dial the number to which you want to transfer the call. As soon as
you hear ringing, or after the party answers, press Trnsfer. Note: If
n, then dial.
.
eadset button, then dial.
ft
utton to select the