Bosch 061130A000 Original Instructions Manual - Page 7
Browse online or download pdf Original Instructions Manual for Power Tool Bosch 061130A000. Bosch 061130A000 30 pages.
OBJ_BUCH-1175-005.book Page 7 Wednesday, July 13, 2016 3:06 PM
Hammer Safety Warnings
Wear ear protectors. Exposure to noise can cause hear-
ing loss.
Use auxiliary handle(s), if supplied with the tool. Loss
of control can cause personal injury.
Hold power tool by insulated gripping surfaces, when
performing an operation where the cutting accessory
may contact hidden wiring or its own cord. Cutting ac-
cessory contacting a "live" wire may make exposed metal
parts of the power tool "live" and could give the operator an
electric shock.
Use suitable detectors to determine if utility lines are
hidden in the work area or call the local utility company
for assistance. Contact with electric lines can lead to fire
and electric shock. Damaging a gas line can lead to explo-
sion. Penetrating a water line causes property damage or
may cause an electric shock.
When working with the machine, always hold it firmly
with both hands and provide for a secure stance. The
power tool is guided more secure with both hands.
Secure the workpiece. A workpiece clamped with clamp-
ing devices or in a vice is held more secure than by hand.
Always wait until the machine has come to a complete
stop before placing it down. The tool insert can jam and
lead to loss of control over the power tool.
Never use the machine with a damaged cable. Do not
touch the damaged cable and pull the mains plug when
the cable is damaged while working. Damaged cables in-
crease the risk of an electric shock.
Products sold in GB only: Your product is fitted with an
BS 1363/A approved electric plug with internal fuse (ASTA
approved to BS 1362).
If the plug is not suitable for your socket outlets, it should be
cut off and an appropriate plug fitted in its place by an author-
ised customer service agent. The replacement plug should
have the same fuse rating as the original plug.
The severed plug must be disposed of to avoid a possible
shock hazard and should never be inserted into a mains sock-
et elsewhere.
Products sold in AUS and NZ only: Use a residual current de-
vice (RCD) with a rated residual current of 30 mA or less.
Product Description and Specifica-
tions
Read all safety warnings and all instruc-
tions. Failure to follow the warnings and in-
structions may result in electric shock, fire
and/or serious injury.
Intended Use
The machine is intended for heavy chiselling and demolition
work as well as for driving in and compacting with the appro-
priate accessories.
Bosch Power Tools
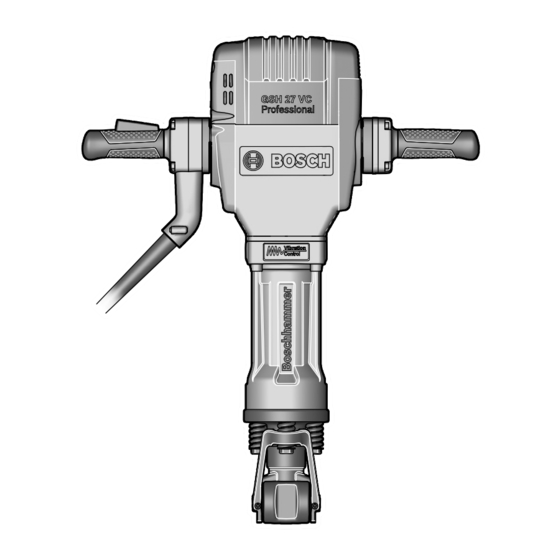
Product Features
The numbering of the product features refers to the illustra-
tion of the machine on the graphics page.
1 On/Off switch
2 Handle (insulated gripping surface)
3 Tool retainer
4 Tool holder
5 Tool shank
6 Shoulder
Accessories shown or described are not part of the standard deliv-
ery scope of the product. A complete overview of accessories can
be found in our accessories program.
Technical Data
Demolition Hammer
Article number
Rated power input
Impact rate
Impact energy per stroke ac-
cording to EPTA-Procedure
05/2009
Tool holder
Weight according to EPTA-
Procedure 01:2014
Protection class
The values given are valid for a nominal voltage [U] of 230 V. For differ-
ent voltages and models for specific countries, these values can vary.
Starting cycles generate brief voltage drops. Interference with other
equipment/machines may occur in case of unfavourable mains system
conditions. Malfunctions are not to be expected for system impedances
below 0.36 ohm.
Assembly
Changing the Tool
Before any work on the machine itself, pull the mains
plug.
Clean the tool shank 5 and apply a light coat of grease.
Tools without Shoulder (see figures A–B)
Pivot the tool retainer 3 upward by approx. 150° and insert
the tool into the tool holder 4.
Pivot the tool retainer 3 down to lock the tool.
Check the latching by pulling the tool.
Tools with Shoulder (see figures C–D)
Tools with an insertion length of 152 mm (6") to the shoulder
can be used.
Pivot the tool retainer 3 upward by approx. 180° and insert
the tool into the tool holder 4.
Pivot the tool retainer 3 back to the tool to lock it. The shoul-
der 6 must be held by the tool retainer 3.
Check the latching by pulling the tool.
English | 7
GSH 27 VC
Professional
3 611 C0A 0..
W
2000
-1
min
1000
J
69
mm
28
1
"
1
/
8
kg
29.5
/II
1 609 92A 1UA | (13.7.16)