Advanced Measurement Technology ORTEC A-576 A-PAD Operating And Service Manual - Page 10
Browse online or download pdf Operating And Service Manual for Amplifier Advanced Measurement Technology ORTEC A-576 A-PAD. Advanced Measurement Technology ORTEC A-576 A-PAD 11 pages. Preamplifier, amplifier, discriminator with bias supply

The complete schematic for the A-576 A-PAD (No.
752500) is included at the back of this manual.
Fig. 5 is a block diagram of the electronics.
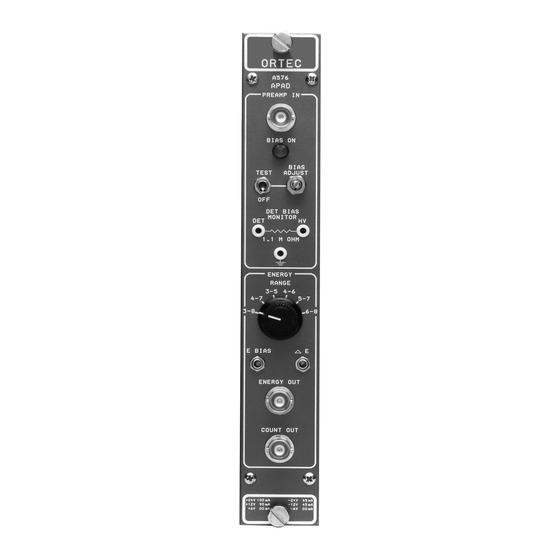
The detector voltage (TEST/BIAS/OFF) switch on the
front panel turns power ON and OFF for the variable
100-V bias power supply. The power is on to the BIAS
supply in both the TEST and BIAS positions.
The polarity is set by Jumper J1, which is actually
three separate jumpers (see schematic). The indicated
polarity is negative, which is appropriate when an
ORTEC Ruggedized detector is used. When the
detector voltage is negative, its output pulses are
positive. When they pass through the inverting charge-
sensitive preamplifier, they are negative, and this is
the polarity that is then selected by the pair of jumpers
(J3) on the PWB. If a conventional surface barrier, or
ion-implanted, detector is used, all five of these
jumpers must be changed to "+" because these
detectors, positively biased, generate negative output
pulses, which are then inverted, resulting in positive
pulses at the J3 location in the circuit.
The 100-V power supply output on the PWB can be
tested for both polarity and amplitude at test point
TP1, which is identified on the PWB. The variable 0 to
100 V bias voltage can be measured at the front-panel
test point jack labeled HV.
The detector leakage current can be measured across
6
the 1.1-M
resistor between front-panel test points HV
and DET, using a 10-M
voltage (in volts) converts to µA of detector current.
The output of the Bias supply is applied through a
high impedance (totaling 11 M
between the detector and the preamplifier.
The output from the charge-sensitive preamplifier can
be checked at TP2. The nominal conversion gain is
45 mV/MeV. The preamplifier gain from the External
Pulser input is nominally "
The pulser switch (TEST/BIAS/OFF) on the front
panel turns power on and off for the test pulser. The
test pulser can be set to furnish the equivalent pulse
5. THEORY OF OPERATION
6
impedance meter. The
6
) to the dc connection
1" at TP2.
6
amplitude for 5, 6, and 7 MeV to the input to the
preamplifier. A screwdriver calibration, included on the
PWB for factory adjustment of the test pulser circuit,
should not be changed by the customer. When the
front-panel toggle switch is set at BIAS, the test pulser
is turned off and does not appear in the output
spectrum.
Pulses from the detector and/or the test pulser are
inverted by the preamplifier and are furnished as the
input to the amplifier that includes the first integration
and differentiation shaping circuits. The amplifier can
be calibrated by a factory-adjusted trim potentiometer
on the PWB. The output is a shaped negative pulse
that can be observed at test point TP3.
The pulse at TP3 is furnished into a fixed-level
discriminator (U3), and through a diode dc-restorer
and integration network. If the amplitude represents
~2.5 MeV or more, the discriminator fires and
generates a positive-shaped pulse that is used to
enable the stretcher. This pulse is also provided as the
COUNT output signal. The pulse from the second
integration shaping circuit is furnished to the stretcher.
If the stretcher is enabled, the peak amplitude is
stretched to improve the measurement accuracy of the
multichannel analyzer, which uses the ENERGY
output for measurement. If the stretcher is not enabled
(because the pulse represents <2.5 MeV), the output
is passed to the biased amplifier without being
stretched. The output of the stretcher is a negative
pulse that can be monitored at test point TP4 on
the PWB.
The biased amplifier accepts the stretcher output and
the bias level selected by the front-panel ENERGY
RANGE switch (low end of range). The bias level, or
lower level, accepted into the bias amplifier can be set
at 3, 4, 5, or 6 MeV by the ENERGY RANGE switch,
which can be adjusted by ±10% by the front-panel
screwdriver control, E BIAS.
The function of the biased amplifier is to subtract the
bias level from the input pulse amplitude and to
amplify the excess amplitude by a factor of 10 on the
&
&
&
3
5, 4
6, 5
7, and 6
&
8 MeV ranges, and by a factor
