3onedata ICS5530-16GS8GC6XS-2P220 Quick Installation Manual
Browse online or download pdf Quick Installation Manual for Switch 3onedata ICS5530-16GS8GC6XS-2P220. 3onedata ICS5530-16GS8GC6XS-2P220 3 pages. Industrial layer 3 ethernet switch
Also for 3onedata ICS5530-16GS8GC6XS-2P220: Quick Installation Manual (3 pages)
ICS5530-16GS8GC6XS-2P220
Industrial Layer 3 Ethernet Switch
Quick Installation Guide
3onedata Co., Ltd.
Address:
3/B, Zone 1, Baiwangxin High Technology
Industrial Park, Song Bai Road, Nanshan
District, Shenzhen, 518108, China
Website:
www.3onedata.com
Tel:
+86 0755-26702688
Fax:
+86 0755-26703485
【Package Checklist】
Please check whether the package and accessories are
intact while using the switch for the first time.
1. Industrial Ethernet switch
2. Quick installation guide
3. Power line x2 (AC
4. Serial port line
products only)
5. Rack-mounting lug x2
6. Foot pad x4
7. Software installation CD
8. Warranty card
9. Certification
If any of these items are damaged or lost, please contact our
company or dealers, we will solve it ASAP.
【Product Overview】
The product is managed industrial Ethernet switch. The
model is ICS5530-16GS8GC6XS-2P220 (6 10Gigabit SFP
(10 Gigabit/Gigabit self-adaption) + 8 Gigabit Combo + 16
Gigabit SFP).
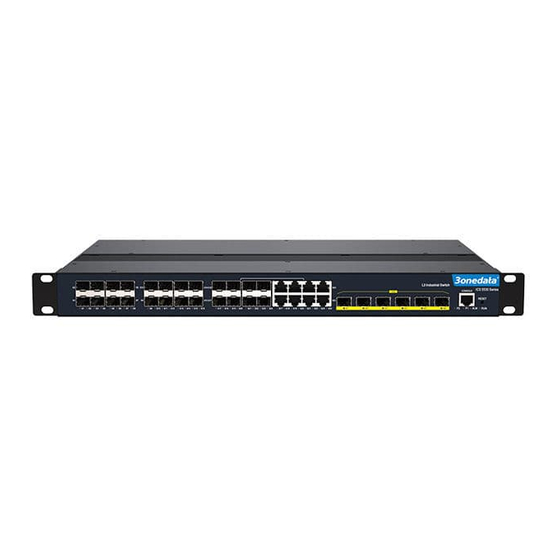
【Panel Design】
Front panel
Rear panel
1.
Ethernet port indicator
2.
Gigabit Ethernet SFP
3.
1000M Combo port
4.
10
Gigabit
SFP
+
port
self-adaption)
5.
Console port
6.
Power indicator (P1/P2)
7.
Alarm indicator
8.
Device running status indicator
9.
Restoring factory setting button
10. Lugs
11. Relay output terminal blocks
12. AC power input
13. Grounding screw
【Mounting Dimension】
Unit: mm
(10Gigabit
/
Gigabit
【Rack-mounted】
This product adopts rack-mounting, mounting steps as
below:
Step 1
Step 2
Notice before mounting:
Don't place or install the device in area near water or
moist, keep the relative humidity of the device
surrounding between 5%~95% without condensation.
Before power on, first confirm the supported power
supply specification to avoid over-voltage damaging
the device.
The device surface temperature is high after running;
please don't directly contact to avoid scalding.
Select the device mounting location to ensure
enough size.
Adopt 4 bolts to install the mounting lugs in the
device position as figure below.