Dura Electric Curtis Stone Usage Instructions - Page 5
Browse online or download pdf Usage Instructions for Electric Pressure Cooker Dura Electric Curtis Stone. Dura Electric Curtis Stone 10 pages. Airfryer pressure cooker
AIRFRYER MODE
NOTE: AIRFRYER mode does note use KEEP WARM function and DELAY
TIME function. When selecting the AIRFRYER mode, the temperature is
displayed. After starting the cooking time will be displayed.
PRESSURE
COOK
SAUT
É
SLOW COOK
STEAM
ADJUST
PRESSURE
TIME/TEMP
DELAY
TIME
TIME
ADJUST
TIME
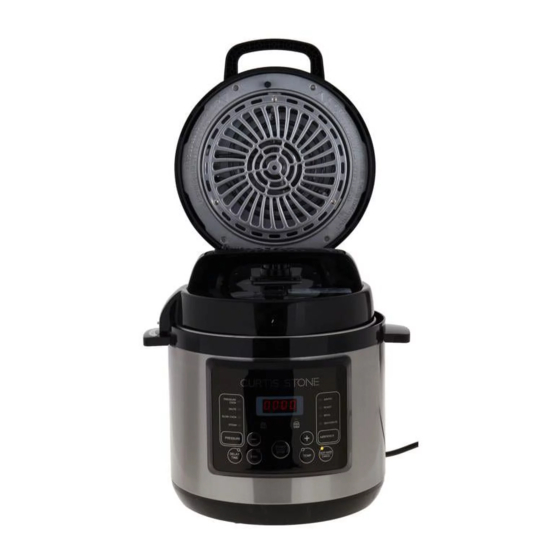
HOW TO USE AIRFRYER MODE
1.
Insert the Airfryer lid into the LID
CONNECTOR SOCKET on the back side
of the base (see Figure 1).
NOTE: Make sure the Aifryer lid is fully
inserted then grasp the front handle and
fully close the lid to the BASE.
2.
Put the STEAMER RACK inside the
INNER POT, then open the AIRFRYER LID
and place the INNER POT into the BASE.
AIRFRYER
MODE
INDICATOR
AIRFRY
AIR FRYER
ROAST
MODE
BROIL
FUNCTIONS
DEHYDRATE
ADJUST
AIRFRYER
TIME/TEMP
START
STOP
CANCEL
KEEP WARM
TEMP
CANCEL
START/STOP
ADJUST
TEMP
FIGURE 1
1. INSERT
AIRFRYER LID
3.
Place your food in the AIRFRYER BASKET, do not exceed the top edge of the Air frying
basket. Then place the AIRFRYER BASKET into the INNER POT and rest on top of the
STEAMER RACK. Position carefully so that the AIRFRYER BASKET has an even gap
around the outer edge and the inside of the INNER POT to ensure good airflow for best
cooking results. Finally close the Air fryer lid.
NOTE: Ensure the AIRFRYER LID is closed otherwise you will not be able to select
Airfyer mode on the front control panel.
4.
Insert the power cord into the socket on the back side of the BASE, then insert the end
of the plug into a power socket. When the power in connected , the product will emit a
beep and enter the standby state. The display shows "— — — —".
NOTE: (The Airfryer indicator lights up, indicating that it switches to the air fryer mode,
at which point the electric pressure cooker function is not available).
5.
Select a cooking mode. Press the Airfryer button to cycle through the four cooking
modes, AIRFRY, ROAST, BROIL and DEHYDRATE. A light will illuminate next to the
cooking mode to show you which mode you are on.
6.
Adjust your settings. Press "TIME" to adjust the cooking time, then press "+" and "-"
keys to adjust the time. Press "TEMP" to adjust the cooking temperature then press
"+" and "-" keys to adjust the temperature. For the adjustable TIME and TEMP range
for each mode, please refer to (Table 1). Note: you can still adjust "TIME" and "TEMP"
settings after pressing "START".
7.
To start, press the "START" button, the Airfryer will beep and start cooking your food.
When the timer reaches Zero you will hear a beep, and the Airfryer will stop working.
Gently lift the lid upwards OR remove the lid. Using heat protected Gloves remove the
AIRFRY BASKET from the INNER POT. Be careful not to touch the underside of the
Airfryer lid as it will be very hot.
TABLE 1
FUNCTION
DEFAULT
TIME
AIRFRY
20min
ROAST
15min
BROIL
15min
DEHYDRATE
6hrs
8
9
ADJUST
DEFAULT
ADJUST
TIME
TEMPERATURE (˚F)
TEMPERATURE (˚F)
1min — 1hr
390
300 to 400
375
1min — 1hr
250 to 400
1 — 30min
Temperature is fixed at 400°F
1 — 12hrs
160
120 to 195