Bresser 4964130 Instruction Manual - Page 13
Browse online or download pdf Instruction Manual for Accessories Bresser 4964130. Bresser 4964130 20 pages.
Time-Lapse Shooting (from Page 13 to 17)
◎
Mounting on the Tripod
Tripod Mounting Screw
Mount the unit firmly to the tripod.
To mount the unit to the tripod with U3/8 mounting screw, remove the double screw adapter
out from the screw hole with a coin, screwdriver, etc.
To prevent the tripod from falling over, do not extend tripod legs more than necessary.
To adjust the center of gravity of the camera near to the center of the turntable, see
commercially available slide plate.
◎
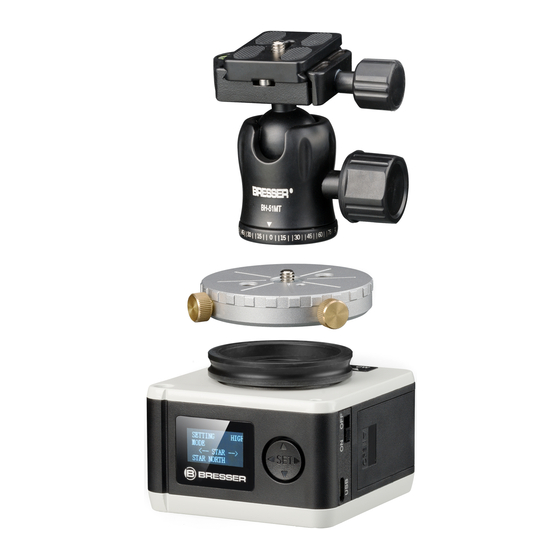
Attaching the pan head
② remove upwards
① loosen the two fixing screws of the turntable
② remove turntable
③ turn the head mounting wing nut to securly install the pan head to the turntable.
④ put the turntable back to the main body and firmly fix the turntable with two fixing screws.
◎
Mounting Camera
Before mounting camera to the pan head, make sure two
fixing screws are firmly tightened. After mounting the
camera to the pan head, move the camera to the direction
you want to shoot.
⚠
Caution
Do not directly mount the camera to the turntable.
It may damage the camera.
The center of gravity of the camera does not need to be the
same as the position of the mounting screw.
If one side of the camera is too heavy, it may rotate
depending on the angle.
Use a commercially available slide plate to correct the
center of gravity of the camera.
Manual_4964130_PM-100-Astro-Photo-Mount_en_BRESSER_v102021a.indd 13
Manual_4964130_PM-100-Astro-Photo-Mount_en_BRESSER_v102021a.indd 13
Head Mount Screw
① loosen
③ firmly screw
④ attach to the
main body
④ firmly screw
13
12.10.2021 15:23:29
12.10.2021 15:23:29