DaytonAudio SA25 User Manual - Page 3
Browse online or download pdf User Manual for Amplifier DaytonAudio SA25. DaytonAudio SA25 4 pages. 25w subwoofer plate amplifier

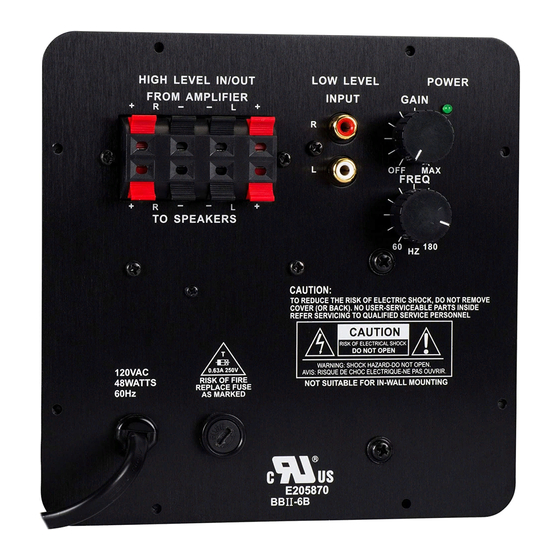
INPUT/OUTPUT CONNECTIONS
1.) Low-Level Inputs (Left/Right)
RCA style jacks that will accept standard line level inputs from a pre-amp level source. They will accept a stereo signal
and internally combine it into mono. (Note: Both left and right input jacks must be connected to the source in order to
drive the amplifier to full output).
2.) High-Level Inputs
Speaker level inputs using spring clip type jacks to permit connection with bare wire. Allows the user to connect the
speaker level output of a full range amplifier to the input of the subwoofer amp using standard speaker wire. A mono
signal is derived from the stereo input, which then feeds the subwoofer amplifier crossover input.
3.) High-Level Outputs
Speaker level passthrough outputs using spring clip type jacks to permit connection with bare wire. Used to connect
from the subwoofer amp to pass signal from the full range amp on to the main L/R speakers. Signal is only present on
this output if the high level input is also used. The signal to the L/R speakers is not filtered. The impedance "seen" by
the full-range source amplifier will be that of the connected speakers only.
4.) Power input
This unit features a hardwired AC power cable and externally-accessible fuse. It is supplied with an 0.75 A, 250V fuse
and USA type polarized 2-pin plug. This unit is not suitable for 230V applications.
CONTROLS/INDICATORS
5.) Power/Gain Knob ("Gain")
This control will match the amplifier's input sensitivity to the output of the pre-amp source. If the source output has a
variable control, we recommend that the user spend a moment or two determining the best balance between the two
controls. When a balance is found between low noise, linear level control, and sufficient level to drive the amp to the
required output, the gain knob can be considered to be the "volume control" for the subwoofer system. To shut the
subwoofer amplifier off, turn the control all the way to the left until it 'clicks'.
6.) Frequency Knob ("Freq")
This control is used to establish the highest frequency that the subwoofer will reproduce and has a range between 60
to 180 Hz with a slope of 24 dB per octave. If you are using the system for music and your main speakers have good
bass capability, you could set the control to a fairly low value, often between 60 and 100 Hz. If the main speakers are
smaller or do not have much bass output, set the control higher. Experiment with the amount of "overlap" that you will
experience when all speakers are playing in the same range. This can be helpful when integrating the subwoofer with
the rest of the system and with the room. Note: When using the amp with a LFE (Low Frequency Effects) output on
a pre-amp or home theatre receiver the internal low pass filter circuitry should be bypassed by turning the frequency
control to maximum (180 Hz). The home theater receiver should be used to control the low pass crossover frequency.
7.) Power LED
When the power switch is moved to the "on" position, the LED will illuminate green, and the amp will be in "On" mode. If
the LED is not illuminated, check that the amplifier is plugged into a power source and that the "Gain" knob is not set to
the "Off" position.
8.) Output Lead for Subwoofer Driver:
This rear mounted output lead connects the amplifier to the subwoofer driver. The output lead is roughly 20" long and
is color coded. The red wire uses an insulated .250" quick disconnect and the black wire uses an insulated .205" quick
disconnect. These connectors can be easily removed if your driver requires another size or type of connector. Be sure
to observe proper polarity when connecting the amplifier to your subwoofer driver (red = positive, black = negative).
(3)
