Galaxy Aqua 4000 si Installation Instructions Manual - Page 5
Browse online or download pdf Installation Instructions Manual for Plumbing Product Galaxy Aqua 4000 si. Galaxy Aqua 4000 si 6 pages. Electric shower
9. Slide the end cap onto the
mounting brackets.
10. Snap the soap dish onto the
rail below the holder assembly.
11. Slide soap dish down the
rail to required position.
12. Firmly attach flexible hose to
the showerhead making sure
sealing washer is in place.
NOTE the adjustable slider grips the
conical end of the hose, not the
handle of the showerhead.
Maintenance:
Clean regularly with a non-abrasive liquid
bathroom cleaner.
9
SECTION
COMMISSIONING THE
SHOWER
1. Make sure that the electrical supply has
been isolated at the double pole isolating
switch.
I
2.
Turn the bottom temperature control
knob anti-clockwise to the full cold position.
I
3. Ensuring the water supply is fully on at
the mains stop cock and isolating service
valve (if fitted), check that water is not
leaking from the bottom of the case.
I
4
. Switch on the electrical supply at the
double pole switch. The 'Power' neon
indicator will light.
5. Press the uppermost COLD power
selector button, this action will also
activate the internal solenoid valve turning
the water On. A neon indicator adjacent to
the button will illuminate to confirm
selection.
I
6. Check that water flows freely from the
shower within a few seconds. The water
from the showerhead will be at full force
and at a cool temperature.
I
7. Rotate the bottom temperature control
knob slowly clockwise fully. This will
gradually reduce the flow with the water
temperature remaining cool.
8. Return the knob anti-clockwise to
maximum flow.
I
9. Now press the middle power selector
button to the 'Low' setting. Allow a few
seconds for the warmer temperature to
reach the showerhead - this shows that
the 'Low' power setting is operating
correctly. Again, a neon indicator adjacent
to the button will illuminate to confirm
selection.
10. Now press the bottom power selector
button to the 'High' setting. With neon
indicator confirming selection.
The temperature at the showerhead will
rise further - this shows that the full power
setting is operating correctly.
I
11. Turn the bottom temperature control
knob clockwise for hotter water and
anti-clockwise for cooler water. Allow a few
seconds between selections - for the
temperature change to reach the
showerhead.
I
NOTE. When the temperature is
changed the flow rate alters.
I
12. Push the STOP button to stop the flow.
I
13. The water will continue flow for a few
seconds when the STOP button is pushed.
This hot water flushing out program is
called 'Phased Shutdown' ensuring that
anyone stepping into the shower
immediately after use does not have a an
unpleasantly hot start to their shower.
I
14. Switch of pull-cord or wall mounted
switch. .
10
SECTION
OPERATING THE SHOWER
1. Switch on pull-cord or wall mounted
switch. The 'Power' neon will illuminate
indicating the switch is on.
2. Select your power setting using one of
the three push button dual purpose
controls. Which when operated also
automatically activates instant water flow.
The shower has three positions 'Cold',
'Low' power and 'High' power.
'Cold' setting:
I
Adjustment of the flow control on
this setting will only alter the flow of
water not the water temperature.
I
'Low' setting:
I
This is the low power setting for
economy during warmer months or
when a cool shower is required.
Temperature adjustment is via the
bottom temperature control.
I
'High' setting:
I
This is the full power setting.
Temperature adjustment is via the
bottom temperature control.
Note: N
eon indicators adjacent to the
buttons will illuminate to confirm selection.
3. Wait a few seconds for the warmer
water to reach the handset.
4. If necessary turn bottom 'Temperature'
control knob slowly to obtain desired
showering temperature. Again, waiting a
few seconds after each adjustment in
temperature to reach the handset.
Note:
To adjust the shower temperature.
The water temperature is altered by
increasing or decreasing the flow rate
of water through the shower unit via
the temperature control.
To increase the shower temperature
Turn the temperature control knob
clockwise, this will decrease the flow
.
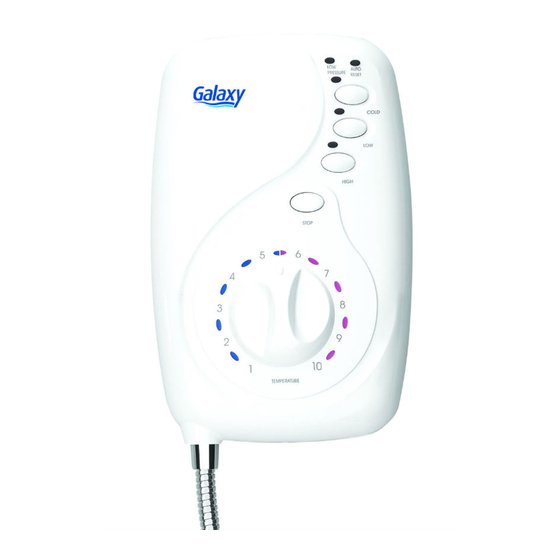
Neon illuminates to confirm Power Selection
COLD
LOW
HIGH
LOW
AUTO
000
Aqua
PRESSURE
RESET
COLD
LOW
STOP
HIGH
STOP
5
6
4
7
3
8
2
9
1
10
TEMPERATURE
COOLER
WARMER
5
6
5
6
7
4
7
4
3
8
3
8
2
9
2
9
1
10
1
10
TEMPERATURE
TEMPERATURE