Green Digital Power-tech BG1F-4 User & Installation Manual
Browse online or download pdf User & Installation Manual for Measuring Instruments Green Digital Power-tech BG1F-4. Green Digital Power-tech BG1F-4 2 pages. Lifepo4 battery fuel gauge
User Installation Manual
Tel:86-755-86582701 Fax:86-755-86582703 Email:[email protected] Http://www.szgrn.com
SPECIFICATION
MODEL:
ISSUE DATE :
COMMON/UNITE
No.
Item
Specification
01
Rating Input Voltage
02
Suitable battery type
03
Max. Charge/Discharge
Current permitted.
04
Current sensor resistor value
recommended. (Series in
negative path)
05
Working Consumed Power
06
OFF Status leakage current
07
Fuel gauge display tolerance
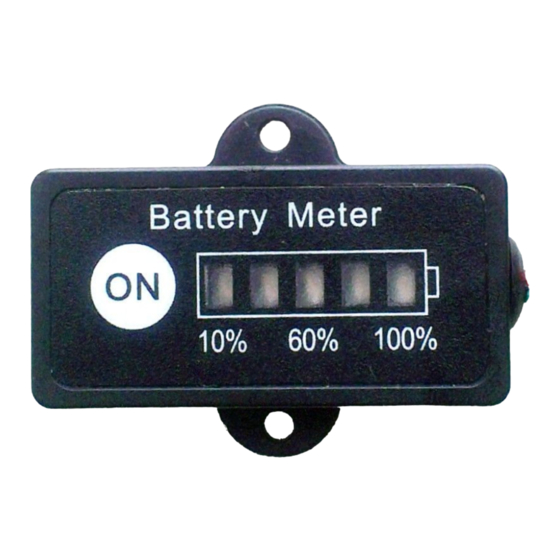
Top View and Illustration
Display
Push ON/OFF
Installation
1. Make sure the battery you wired is 12.8V 4S LiFePo4.
2. Connect the RED WIRE with your battery positive pole,
Connect the BLACK WIRE with your battery negative pole.
3. Series a current sensor resistor between the battery negative pole and the load/charger (also we called output negative).
The recommended value of this current sensor is 0.005~0.05 ohm, depended on your load's working current.
If you have a BMS in your battery-pack, you can use the series current sensor resistor on this BMS, then you do not
need to do above job.
.
4. Connect the GREEN WIRE with the load/charger output negative terminal, after above "current sensor resistor".
End of installation.
Caution:
1. The Black and Green wire should be connected properly, if not the charging and discharging status and fuel gauge will
be reversed and in correct.
2. Please read this manual and understand attached schematic drawing before connect any wire!
Green Digital Power-Tech CO. , LTD.
USED IN:
3/18/2013 9:41:00 AM
DOC. NO:
BG1F-4 12.8V (4S) LiFePo4 Battery Fuel Gauge
Unit
V
DC 8~13V
12.8V 4s LiFePo4
A
No Limitation.
Ω
0.005 for 20A~50A working current.
0.01
for 5A~20A working current.
0.05
for 1A~5A working current.
mA
5
mA
1
%
+- 20%
Battery Fuel Gauge LED
PREPARE
REV.:
Specification
CHECK
APPROVE
1.0
PAGE:
Remark
This value depends on the external
Current sensor wired with battery
negative, see attached drawing.
Push "On" button.
Red: connect battery
Black: connect battery
Green: connect load/charger
1 OF 2
+