Avaya 9630 Deskphone Edition End User Manual - Page 4
Browse online or download pdf End User Manual for Telephone Avaya 9630 Deskphone Edition. Avaya 9630 Deskphone Edition 18 pages. Dc-net
Also for Avaya 9630 Deskphone Edition: User Manual (19 pages), Quick Reference Manual (2 pages), End User Manual (19 pages), User Manual (4 pages), User Manual (6 pages), Quick Manual (5 pages)
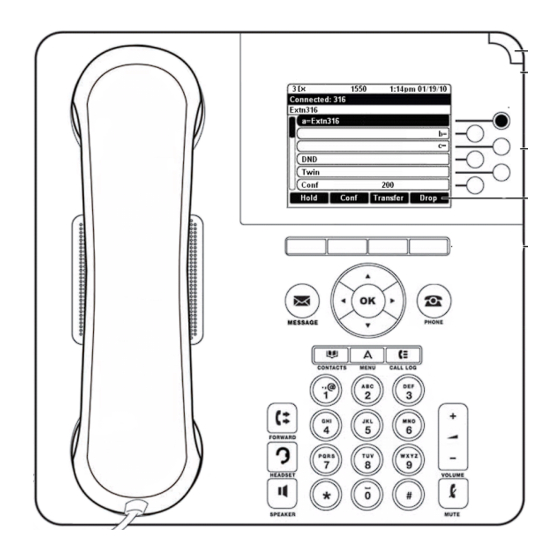
When navigating through the options and features on your telephone display, use the navigation arrows to scroll and buttons to
select lines or options.
Use the up and down navigation arrows to scroll up or down through lists. Use the right and left navigation arrows to go to
other screens when indicated by the Prompt Line or to move the cursor right or left when entering text.
When you scroll to a line on the display, that line is selected. The selected line is highlighted in black with white letters. The
softkey labels will change according to the options available for the highlighted line. The OK button is a shortcut for the default
action. For example, when you select an entry in your Contacts list, pressing OK places a call to that person.
You can also select a line without scrolling by pressing the corresponding line button.
Your telephone can be placed in two positions, a lower position and an upright position. You can adjust the display screen to
different angles. To move the display screen, gently pull from the top of the display screen towards you. As you pull the screen
towards you, you will hear a clicking sound. Each of these clicks is a locking position for the display screen. Gently push on the
display screen to adjust the screen to a previous position.
If your phone is in the upright position, reverse the tab located below the switchhook in the top ear piece pocket (on the front of
the phone). This will keep the handset seated in the correct position. You will need a small screwdriver to lift this tab out.
You can use the Avaya Menu to adjust and customize options and settings for your telephone, access additional Web-based
applications, get information about your phone and network settings, and log out. When you press the Avaya Menu button,
you see the following menus, depending on how your administrator has set up your system and on the applications available to
you:
Conventions Used in the Procedure Descriptions
Feature and Feature xxxxx
LWC CnLWC AutCB Timer
{handset tones}
Special Instructions
Use the following special instructions for operating your telephone.
Scrolling and Navigation
Telephone Stand
Avaya Menu
Sample Menu 1
Sample Menu 2
> Options & Settings
> Your 1st Web Application
> Browser
> Phone Settings
> Network Information
> Log Out
>About Avaya one-X
> About Avaya one-X
Conventions
Each of these represents a button that has a feature assigned to it. The
button is labeled with the feature name, sometimes followed by an
extension number (shown as xxxxx ) or a person's name.
Information that is offset represents the display screen. The second
line appearing on the display will most likely list the features you can
access with the softkeys.
The tone that appears in curly quotes after a step, such as {dial tone},
indicates what you should hear from your handset (or speakerphone)
after successfully performing that step.
Sample Menu 3
> Call Settings
> Application Settings
> Screen & Sound
> Advanced Options
> Network Information
> Log Out
9630 IP Telephone End User Guide | 4 |
P a g e