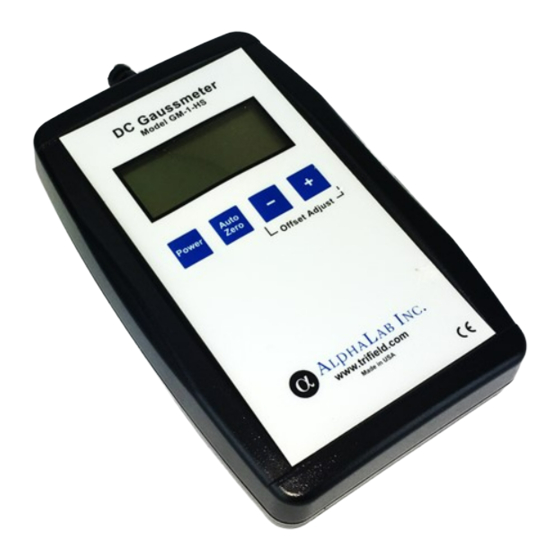
AlphaLab GM1-HS Instructions
Browse online or download pdf Instructions for Measuring Instruments AlphaLab GM1-HS. AlphaLab GM1-HS 2 pages. Dc gausmeter
This magnetometer (gaussmeter) measures DC magnetic field (with polarity) up to + or
This magnetometer (gaussmeter) measures DC magnetic field (with polarity) up to + or - 799.99 gauss.
This magnetometer (gaussmeter) measures DC magnetic field (with polarity) up to + or
Operation:
Turn the meter on by pressing "Power" for at least 1 second. Note that the last few millimeters at the (black) end of the
Turn the meter on by pressing "Power" for at least 1 second. Note that the last few millimeters at the (black) end of the
Turn the meter on by pressing "Power" for at least 1 second. Note that the last few millimeters at the (black) end of the
probe has a square bulge on one side; the other side is flat. Note also that a small section of brass is visible about 15mm
probe has a square bulge on one side; the other side is flat.
from the tip. The brass is on the "flat" side. The center of that square bulge is the location of the Hall
is very small (0.2 x 0.2 mm). Place the flat side of the probe's end (not the square bulge side) against the surface to be
measured. A negative sign indicates that the probe is touching the south pole of a magnetized object; in contrast, a north
gative sign indicates that the probe is touching the south pole of a magnetized object; in contrast, a north
gative sign indicates that the probe is touching the south pole of a magnetized object; in contrast, a north
pole will read positive ("positive" is indicated by the
pole will read positive ("positive" is indicated by the absence of a polarity sign on the display). The actual center of the
sensor is 1.1mm above the flat surface or 1.0mm below the top of the square bulge) and is centered in the center of the
square bulge.
Below 10 gauss, only three digits (such as "-
stronger than +/- 799.99 gauss, the extreme left digit will display.
799.99 gauss, the extreme left digit will display. (It is a "1"). If the display reads "LO BATT", there is
about one hour of battery life remaining. Remove the soft bumper or "boot" if present, and then slide off the battery door
on the back side. Replace with a common 9-
be removed by holding the meter so that the battery can fall out, and then tapping the meter on a table.
be removed by holding the meter so that the battery can fall out, and then tapping the meter on a table. Current drain is
be removed by holding the meter so that the battery can fall out, and then tapping the meter on a table.
7ma and the LO BATT reads if battery voltage remains below 7V for at least one minute.
battery voltage of 5.8V). You may need to press "Power" twice the first time with a new battery. MAKE SURE THE
battery voltage of 5.8V). You may need to press "Power" twice the first time with a new battery. MAKE SURE THE
battery voltage of 5.8V). You may need to press "Power" twice the first time with a new battery. MAKE SURE THE
METER TURNS ON AFTER REPLACING THE BATTERY.
METER TURNS ON AFTER REPLACING THE BATTERY.
Offset Adjustment (only necessary if measuring weak fields):
Adjustment (only necessary if measuring weak fields):
The offset controls allow you to add or subtract
allow you to add or subtract any field to or from the displayed number of gauss.
you are holding the sensor in a certain orientation in space, and you want the display to show "zero", even though some
you are holding the sensor in a certain orientation in space, and you want
field is present. Press "Auto Zero" to do this.
Press "Auto Zero" to do this. Then you can bring in a magnetized object to measure.
equivalent of adjusting the "tare" weight of a weight scale, because there may be an a
equivalent of adjusting the "tare" weight of a weight scale, because there may be an ambient magnetic field that you'll
want to subtract out. When turned on, the display will read approximately zero in zero field, but you can more precisely
adjust the offset to zero if you do one of two things, either:
adjust the offset to zero if you do one of two things, either:
1) Place the sensor in a "zero gauss chamber" (not supplied with this meter, but see www.trifield.com) and
Zero.
2) Place the sensor end flat on a non-magnetic table or desk with the square bulge facing up.
will read the upward-pointing component of the magnetic field.
should then read a negative number.) Note the number on the display.
nd
down. This 2
reading should be the negative
should be 0.40 (gauss). If the two readings are not the negative of each other, then the
a zero reading in zero field. For example, if the 1
gauss (the average of the two readings). Adjust the
of opposite sign. Offset is adjusted by pressing the "+" or "
DC Gaussmeter Model GM1-HS Instructions
DC Gaussmeter Model GM1
The center of that square bulge is the location of the Hall
The center of that square bulge is the location of the Hall-Effect sensor, which
Place the flat side of the probe's end (not the square bulge side) against the surface to be
Place the flat side of the probe's end (not the square bulge side) against the surface to be
the flat surface or 1.0mm below the top of the square bulge) and is centered in the center of the
the flat surface or 1.0mm below the top of the square bulge) and is centered in the center of the
-0.37") will be displayed. For stronger fields, more digits will appear.
Remove the soft bumper or "boot" if present, and then slide off the battery door
Remove the soft bumper or "boot" if present, and then slide off the battery door
-volt rectangular battery. Alkaline is preferred. The old battery can most easily
tery voltage remains below 7V for at least one minute. (Accuracy errors will occur below
Then you can bring in a magnetized object to measure. This is the magnetic
, the display will read approximately zero in zero field, but you can more precisely
, the display will read approximately zero in zero field, but you can more precisely
gauss chamber" (not supplied with this meter, but see www.trifield.com) and
gauss chamber" (not supplied with this meter, but see www.trifield.com) and then press Auto
magnetic table or desk with the square bulge facing up. In this orientation, the meter
ng component of the magnetic field. (If the field is instead downward-pointing there, the meter
Note the number on the display. Then flip the sensor so the square bulge is facing
negative of the 1
If the two readings are not the negative of each other, then the offset is not adjusted perfectly for
st
, if the 1
Adjust the offset knob so that the 1
sing the "+" or "-" buttons. If you hold one button down, the offset amount will
Note also that a small section of brass is visible about 15mm
For stronger fields, more digits will appear. For fields
to or from the displayed number of gauss. This feature is used if
the display to show "zero", even though some
Then flip the sensor so the square bulge is facing
st
reading. That is, if the 1
reading is 1.00, and the 2
" buttons. If you hold one button down, the offset amount will
The actual center of the
If the display reads "LO BATT", there is
The old battery can most easily
(Accuracy errors will occur below
mbient magnetic field that you'll
In this orientation, the meter
pointing there, the meter
st
reading was –0.40 (gauss), then the 2
0.40 (gauss), then the 2
is not adjusted perfectly for
nd
reading is 0.00, then the
reading is 0.00, then the offset is off by 0.50
st
nd
and 2
readings are the same number but
readings are the same number but
nd