Crowcon Flamgard-Plus Instructions - Page 3
Browse online or download pdf Instructions for Gas Detectors Crowcon Flamgard-Plus. Crowcon Flamgard-Plus 5 pages. Flameproof flammable gas detector with non-intrusive one-man calibration
CSA
Resistance (Ohms per km)
2
mm
(awg)
Cable
1.0 (17)
18.1
1.5 (15)
12.1
Table 2: Maximum cable distances for typical cables
Acceptable cross sectional area of cable is 0.5 to 1.5 mm
guidance only, actual cable parameters for each application should be used to
calculate maximum cable distances.
3.4 Electrical connections (4-20mA use)
All connections are made via the terminal board mounted in the base of the
junction box (see Diagram 2). The 3 wires from the 96HD are colour coded
and should be terminated in the corresponding colour coded terminal
(terminals 4,5 & 6). Terminals 1 (0 Vdc), 2 (10-30 Vdc) and 3 (4-20mA signal)
are connected to the control equipment. Flamgard Plus is factory set as a
4-20 mA source device unless specified otherwise when ordering (see Section
2 to change configuration). Diagram 3 summarises the electrical connections.
Note: The junction box and cable armour must be earthed at the
detector and control panel to limit the effect of radio frequency
interference and to maintain electrical safety.
All electrical connections to the optional relays are made via the 6-way
terminal block on the terminal board in the base of the junction box (see
Diagram 2). The relay contacts are rated 1 A @ 30 Vdc.
CONTROL EQUIPMENT
SAFE AREA
+V
0 V
FLAMGARD-PLUS
SOURCE
Diagram 3: Electrical connections to Flamgard Plus
4. OPERATION
WARNING
Prior to carrying out any work ensure local regulations and site
procedures are followed.
Never attempt to open the detector or junction box when flammable
gas is present.
Ensure that the associated control panel is inhibited so as to prevent
false alarms.
Max. distance
Loop
m (ft)
36.2
1000 (3280)
24.2
1500 (4920)
2
. Table 2 provides
CONTROL EQUIPMENT
SAFE AREA
+V
0 V
FLAMGARD-PLUS
SINK
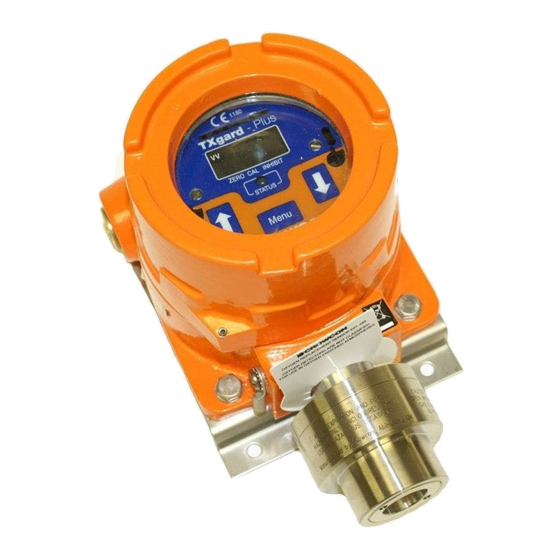
4.1 Commissioning Procedure
a. Open the junction box of the detector by loosening the tamper proof grub
screw and removing the lid by rotating it anti-clockwise.
b. Remove the amplifier and check that all electrical connections have been
made and are correct as per Diagram 3.
c. Replace the amplifier and close the junction box ensuring that all screws
have been re-fitted correctly.
d. Apply power to the detector. The status LED will show a steady green
indicating normal operation.
e. Leave the detector to stabilise for 1-2 hours.
Zeroing the detector (ZERO Mode):
f. Place the end of 'CRO-Mag' over the 'MENU'. Green Status LED will flash.
Decimal point above 'ZERO' will illuminate. Display backlight will illuminate.
Decimal point above 'INHIBIT' may flash if the option has been internally
selected.
g. With no flammable gas present at the detector, place the end of the 'CRO-
Mag' key over the 'UP' or 'DOWN' arrow pads to make the display read
zero.
Calibrating the detector (CAL mode):
h. Place the end of 'CRO-Mag' over the MENU pad. The decimal point above
the word CAL will illuminate. Other indications remain unchanged.
i. Apply calibration gas to the detector at a flow rate of 0.5 litres/min.
Crowcon recommend 50% LEL gas for calibration purposes (contact
Crowcon for the supply of calibration gas.)
j. Allow the gas reading to stabilise.
k. Place the end of the 'CRO-Mag' over the 'UP' or 'DOWN' arrow pads to
make the display read the correct concentration.
l. If the control equipment display requires adjustment consult the operating
manual for the equipment.
Returning to normal operation (NORMAL mode):
n. Place the end of 'CRO-Mag' over the 'MENU' pad. All decimal points will
disappear and the backlight will turn off. The green status LED will be on
steadily (assuming no gas is present at the detector).
o. The detector is now operational.
Note: Always return the detector to NORMAL mode to avoid leaving
the detector in a permanently inhibited state.
4.2 Routine Maintenance
The operational life of the pellistor sensor depends on the application for which
it is being used. Such a device should work satisfactorily for up to 5 years in
ideal conditions. Site practices will dictate the frequency with which detectors
are tested. Crowcon recommend that detectors be gas tested at least every
6 months and re-calibrated as necessary. To re-calibrate a detector follow
steps given in 4.1.
Pellistors can suffer from loss of sensitivity when there is a presence
of poisons or inhibitors such as
halogenated hydrocarbons. Flamgard Plus uses poison resistant pellistors to
maximise operational life. In applications where such compounds are present
continuously, we recommend the use of CIRRUS, Crowcon's fixed point
infrared flammable gas detector, which is immune to such poisons and
inhibitors.
4.3 Sensor Replacement / Servicing of Detectors
WARNING
This work should be carried out by Crowcon or an approved service
centre unless suitable training has been received.
Flamgard Plus uses the 96HD sensor housing which allows the user to replace
the sensors, gaskets and sinter if necessary. An exploded view of the 96HD
sensor housing is given in Diagram 4. The following procedure may be
followed when servicing a Flamgard Plus detector.
a. Switch off and isolate power to the detector requiring attention.
b. Open the junction box of the detector by loosening the tamper proof grub
screw and removing the lid by rotating it anti-clockwise.
3
silicones, sulphides, chlorine, lead or