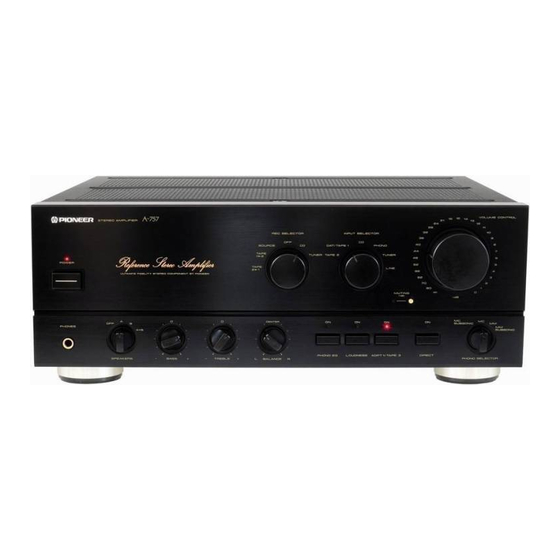
Pioneer A-757 Operating Instructions Manual - Page 9
Browse online or download pdf Operating Instructions Manual for Amplifier Pioneer A-757. Pioneer A-757 13 pages.
Also for Pioneer A-757: Operating Instructions Manual (14 pages)

OPERATIONS
BEFORE BEGINNING OPERATIONS
Set the controls and switches as follows: See page 6.
1. Set the VOLUME CONTROL to minimum. @
2.
Set the POWER switch to ON. ©
3. Set the SPEAKERS switch to A,
BorA+B.@
4
Set
the
BALANCE
control
to
the
center
position. ©
5. Set the DIRECT switch to OFF. @
6. Set the ADPT 1/TAPE 3 switch to OFF. ©
PLAYBACK
PROCEDURES
1. Set the INPUT SELECTOR
or ADPT
1/TAPE 3
switch. @, ©
How to select playback source;
¢ When listening to programs from equipment connected to the
LINE terminals: Set to [LINE].
« When listening to an AM/FM broadcast: Set to [TUNER].
¢ When listening to a record: Set to [PHONO].
PHONO
EQ switch to ON. (A-757 only)
Set PHONO SELECTOR switch to MM (MM SUBSONIC) or MC
(MC SUBSONIC) according to the type of cartridge being used.
* When listening to a compact disc: Set to [CD].
=
« When listening to a tape: Set to [DAT/TAPE 1], [TAPE 2] or
[ADPT 1/TAPE 3].
2. Operate the playback equipment.
3. Adjust playback
volume
with the VOLUME
CONTROL on this unit. @
RECORDING TAPES
1. Select
the
recording
source
with
REC
SELECTOR switch.
« When set to the SOURCE position, the signals from the device
selected by INPUT SELECTOR switch are recorded. (To record
signals from the device connected to the PHONO
or LINE
terminals, set the REC SELECTOR switch to SOURCE and set
the INPUT SELECTOR switch to PHONO or LINE.)
When recording the signal from PHONO terminal, set PHONO
EQ switch to ON position. (A-757 only)
¢ Recording is impossible with the switch set to OFF.
NOTE:
When
this switch
is set at other than
SOURCE
position,
the
equipment selected by REC SELECTOR
switch can be recorded,
regardless
of the setting of INPUT SELECTOR
and DIRECT
switches,
2. When
using the tape deck connected
to the
ADPT 1/TAPE 3 terminals for recording. ©
The source selected with the INPUT SELECTOR will be recorded,
regardless of the REC SELECTOR position.
However, recording will not be possible when the DIRECT switch is
ON.
3. Begin
recording
by operating
the
source
equipment and tape deck.
Refer to the operating instructions for your tape deck for proper
operating procedures.
MONITORING WHILE RECORDING
When recording of the tuner or CD only.
On a 3-head tape deck, sound can be concurrently heard while
recording.
This operation
of checking
the sound
quality and
recording level is called "monitoring." At the time of monitoring, set
the INPUT SELECTOR
switch of this equipment
in the following
way, to match the tape deck on which recording is being done.
When recording on the tape deck of DAT/TAPE 1 terminals:
Set to DAT/TAPE 1.
« When recording on the tape deck of TAPE 2 terminals:
Set to TAPE 2.
* When recording on the tape deck of ADPT 1/TAPE 3 terminals:
ADPT 1/TAPE 3 switch to ON.
COPYING TAPES:
When two decks (or a double cassette deck) are used, you can
record the sounds from one deck onto the other.
Application examples:
* To make a tape copy with contents identical to the original tape.
* To edit a recording of a radio broadcast in order to cut out
unwanted commercials,
reocrding only desired material onto
another tape.
When using two tape decks
1. Load tapes for playback (pre-recorded tape)
and recording into the respective tape decks.
2. Select the tape deck to be copied with REC
SELECTOR switch.
« When copying from the tape deck of DAT/TAPE 1 terminals, to
the tape deck of TAPE 2 terminals: Set to 1 B> 2.
e When copying from the tape deck of TAPE 2 terminals, to the
tape deck of DAT/TAPE 1 terminals: Set to 2 > 1.
NOTE:
The tape selected with REC SELECTOR
switch can be copied,
regardless of the settings of INPUT SELECTOR
and DIRECT
switches.
3. Operate the tape decks to begin copying.
Set the tape deck with the original (playback) tape to the playback
mode, and set the tape deck with the blank tape to the recording
mode.
Playback using graphic equalizer
As to A-757,
it can
deal with
playback
of all sources
when
connecting a graphic equalizer to the ADPT 2 terminals. However,
playback is not possible when the DIRECT switch is ON.
NOTE:
Remove the shorting bars before using these terminals. Always
keep the bars inserted while the terminals are not in use, and take
care not to lose them (A-757 only).
9
<ARB1175>
E
