1010music Toolbox User Manual - Page 5
Browse online or download pdf User Manual for Recording Equipment 1010music Toolbox. 1010music Toolbox 16 pages.
Also for 1010music Toolbox: Quick Start Manual (2 pages)

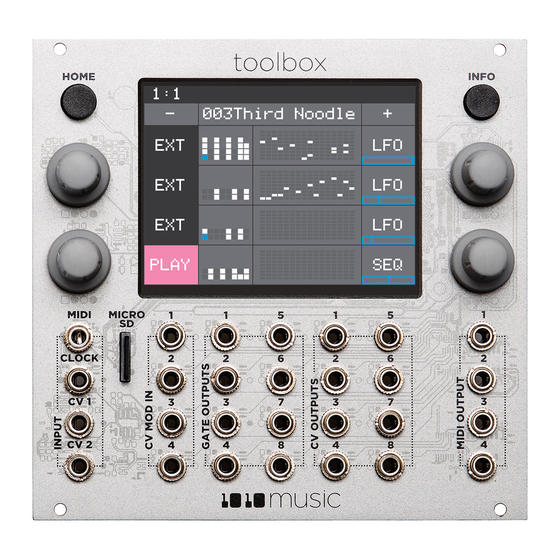
Main Screen Overview
The toolbox Main screen shows a representation of each of the different sequencer and function outputs. The
columns of the screen display are mapped to the input and output jacks below the screen. You can touch the
individual elements on the screen in columns 2 through 4 to access parameter screens for each element. Each row of
input and output jacks corresponds to a row of controls on the screen. You can also touch the
lower left corner to toggle playback of the sequences on and off. The
when the module is playing.
From left to right, the columns display the following:
Column
Name
Description
1
CV Mod In
Displays the state of the external control voltage modulation inputs in rows 1 through 3.
Row 4 displays the state of CV Mod In 4 that controls playback.
2
Gate
Displays a small representation of the four gate sequences. Touch each row to configure
Sequencers
the corresponding sequencer.
3
Note
Displays a small representation of the note sequences. Touch each row to configure the
Sequencers
corresponding note sequence. The left column of output jacks below this column outputs
the gate signal, and the right column outputs the pitch.
4
Function
Displays a representation of the CV voltage currently output by the corresponding function
Generators
generator or sequencer. The LFO range is from -5V to +5V. The SEQ range is 0V to +5V.
Touch an LFO or SEQ button to configure the parameters.
Series Compatibility
Toolbox is not part of the Series 1 group of modules from 1010music. It uses a different hardware platform that is
more focused on providing outputs. Therefore, toolbox cannot run the firmware for Series 1 modules.
11/23/17 10:32 AM
Figure 2: Main Screen Overview
Digital Heart – Analog Soul
Toolbox User Manual
Play
button has a blue bar across the bottom
Play
Copyright 1010music LLC 2017
button in the
P. 5
