Elite Acoustics Engineering A2-5 Handmatig - Pagina 2
Blader online of download pdf Handmatig voor {categorie_naam} Elite Acoustics Engineering A2-5. Elite Acoustics Engineering A2-5 11 pagina's. Acoustic amplifier with 4 channels, mixer, effects, battery powered and bluetooth
Ook voor Elite Acoustics Engineering A2-5: Beknopte handleiding Handboek (5 pagina's)
WHAT IS IN THE BOX
Your A2-5 or A25U package contains the following:
(1) Speaker
(1) 12V AC Power Supply Adapter
1.
Check that the Battery Switch [49] is set to the "Connect" position. (Battery Switch is a
built in circuit breaker to preserve battery life.)
2.
Make sure the SPEAKER VOLUME [3] control is turned all the way down.
3.
Connect microphones and/or instruments. You can use Channel 1 or Channel 2, or
both. If using Channel 1, be sure the Instr-Mic/Line push-switch [22] is not pushed
in when using a mic or line level signal. Microphones are connected to the XLR MIC
IN [29], for 1/4" Line Levels signals use [28], and use [27] for unbuffered instrument
applications (note this is a high gain setting and should not be used for active outputs
such as battery powered guitar preamps).
4.
Turn on the POWER switch [50]
5.
If desired, connect a Bluetooth® [13] device; see Bluetooth® Function on page 3.
6.
Turn on your source signal(s) and adjust level for normal operation. Turn up GAIN [14]
until there is a solid green LED showing "signal" at the desired playing level. The red
"peak" LED, indicating too much signal, should only light for very brief periods, less than
one second, or not at all. Note if you are using an iPhone or iPad via Bluetooth®, set the
volume on your device about halfway. Maximum volume will distort.
7.
Adjust the SPEAKER VOLUME [3] to a comfortable level.
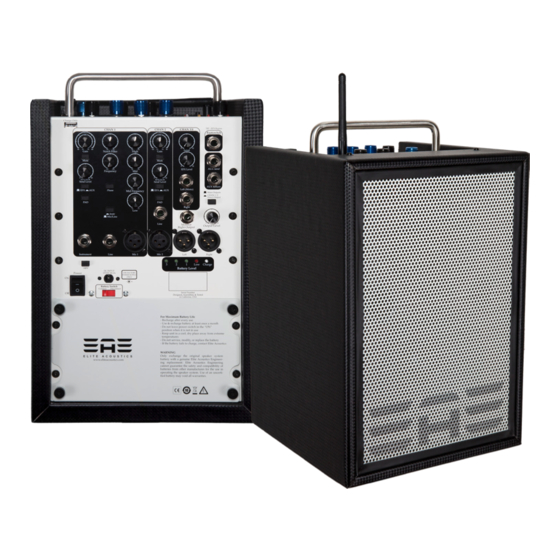
TOP PANEL CONTROLS
LED's:
[1] Power: Blue indicates unit is ON
[2] +48V LED: Orange indicates Phantom Power is on
Monitor Output Controls
[3] Speaker Volume: Control speakers' volume level
[4] Mono: Changes speaker output from Left Only to Mono
[5] Equalizer: Adjust High, Mid, and Low Frequency response
[6] Peak LED: RED indicate Signal Clip
[7] Signal LED: GREEN indicate Signal Present
[8] Aux Input/Level: Connect audio source with 1/8" jack from MP3/CD player, etc.
Effects Controls
[9] Effects Mix: Amount of effect being added to output
[10] Rate/Decay: Controls the duration of the effect
[11] Effects Knob Selector: Select effect of choice
[12] EFX Bypass: Turn effects on or off (When LED is on, the effects are turned off)
[13] Bluetooth: Activate Bluetooth function
1
Refer to Page 2 and 4, for the following Controls