Autonics ADS-SE Handmatig - Pagina 3
Blader online of download pdf Handmatig voor {categorie_naam} Autonics ADS-SE. Autonics ADS-SE 6 pagina's. Door side sensor
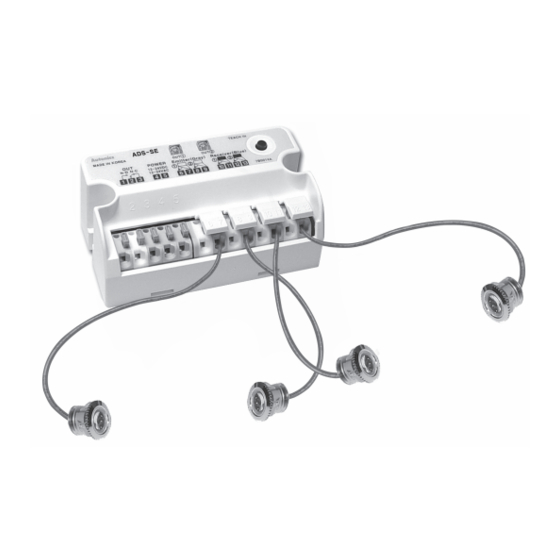
ADS-SE
Installation
Caution for sensor installation
1. Sensing distance is 10m.
Install it in the rated distance.
2. Install the sensor with more than 50cm gap from the bottom and ceiling.
It may cause malfunction by reflected beams from the surface of the
bottom and ceiling.
3. Do not put obstacles between the emitter and the receiver.
It may cause malfunction.
4. This product is for indoor. Avoid the place where exposed in direct
sunlight or is in over rated intensity of illumination.
1. Make a hole on the side post of auto door as
follows.
● When not using the mounting bracket
• Mounting hole of sensor head: Ø12.2
• Panel thickness of sensor head: 1.5
● When using the mounting bracket
• Through hole of sensor head: Ø13 to Ø14mm
• Screw hole for fixing the bracket: M4 Tap or Ø3.5mm
2. Mount the sensor head in the mounting hole
● When not using the mounting bracket
• One push method
Insert the sensor head into
the mounting hole like the right picture.
● When using the mounting bracket
• One push method
1) Install the sensor head at the bracket first.
2) Fix the bracket by screws on the place for installing.
M4 flat head cap screw
Through hole of sensor
Bracket
head: Ø13 to 14mm
(ADS-SB12)
• Screw method
1) Remove nuts and the head holder from the sensor
head.
2) Install the sensor head on the bracket.
3) Fix the bracket on the side post of the door by screws.
①
Bracket
(ADS-SB10)
※ The mounting bracket is sold separately.
If necessary, please purchase it for using.
C-12
±0.1
mm
±0.1
mm
Screw hole:
M4 Tap orØ3.5
②
Through hole of sensor-
head: Ø13 to 14mm
Caution
For mounting hole
• Check the mounting holes for the head of the emitter
and the receiver are in parallel for the optical axes.
• Grind around the mounting holes drilled smoothly.
It may hurt a person by the sharp part and cause
malfunction by sensor head inclined.
Caution
When installing in One push method
• Check the nuts are fixed on the sensor body tightly.
• Install that there is no gap between the nuts and the
side of the door (or bracket). It may cause malfunction
because sensitivity setting is not available as the
optical axes are not matched if sensor body is inclined.
Caution
After installing the sensor head
• Check the damage such as scratches or pollutant on
the lens of the sensor head.
It may cause malfunction in the condition of shading
light or lack of sensitivity by dust.
Caution
For maintenance and mending
• Keep the sensor head clean.
It may not operate normally.
Clean it by a piece of close with a neutral detergent.
Do not use organic solvent.
It may cause damage to lens of the head by organic
solvent.
• Do not wash the head part of the sensor.
Sensor by water, it may cause product damage.