Brita C150KIT-FINEST Installatie-instructies - Pagina 3
Blader online of download pdf Installatie-instructies voor {categorie_naam} Brita C150KIT-FINEST. Brita C150KIT-FINEST 5 pagina's.
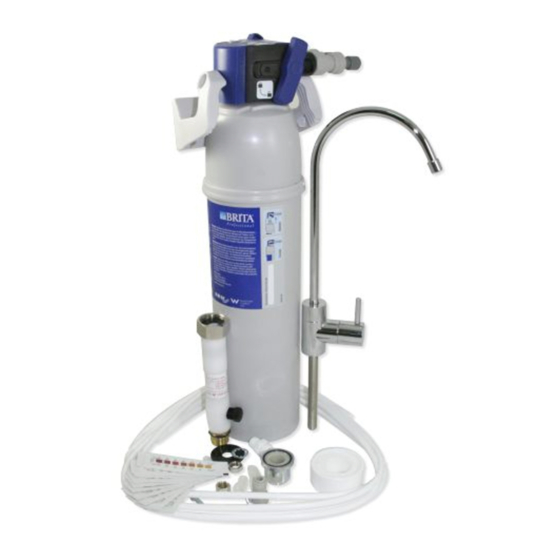
BRITA C150 FINEST
INSTALLATION INSTRUCTIONS
4. Installa�on Instruc�ons
-
NOTE: We recommend moun�ng the water filter system as far away as possible from the dishwasher and hot water pipes to reduce heat
exposure to the system.
-
NOTE: The plumbing installa�on kit supplied with this water filter system provides plumbing fittings that will allow easy installa�on on an
auxiliary under-sink tap. In the rare case that none of these connec�ons are available you will
need a plumber to cut the cold-water supply pipe and install.
-
NOTE: Where thread sealing is required, please use the thread tape supplied.
To Begin:
1.
Turn water supply OFF at mains or other suitable isola�on point. Turn ON cold water tap at sink to check water supply is OFF.
2.
Unpack the water filter system and iden�fy all components as outlined in the Included Parts list.
3.
Mount the filter cartridge ver�cally in the selected loca�on with the moun�ng screws provided. Ensure water flows through the filter
corresponding with arrows on the head of the filter (C) Allow approximately 40mm clearance under the water filter cartridge for ease
of removal.
4.
The first step of the installa�on procedure is to obtain a water supply for the filter system. Check the plumbing configura�on under your sink,
select which of the following installa�on methods is best suited to your plumbing installa�ons.
4.1 Auxiliary Tap Connec�on
NOTE: With this connec�on, the Brass Nipple (j) is not required.
1.
Wrap thread tape around the Hose Quick-Connect Fitting (f) and screw the Hose Quick-Connect Fitting (f) into side outlet port of
Mul�-Func�on Control Valve (g) un�l it is �ght.
Using thread tape, fit black stopper plug to end of mul�-func�on control valve.
NOTE: Posi�on of stopper nut and straight connector are interchangeable and can be reversed if better suited to applica�on.
NOTE: Do not over �ghten hose quick connector as it will protrude too far into mul�-func�on valve and reduce water flow.
2.
Using thread tape, screw Mul�-Func�on Control Valve (g) onto tap, ensuring that rubber washer is fitted into tap entry nut.
Tighten both the
silver nut and the body of Mul�-Func�on Control Valve (g).
3.
Move on to Sec�on 5. Plumbing in Your System.
bomborasupplies.com.au
1300 724 249
PART # C150KIT-FINEST