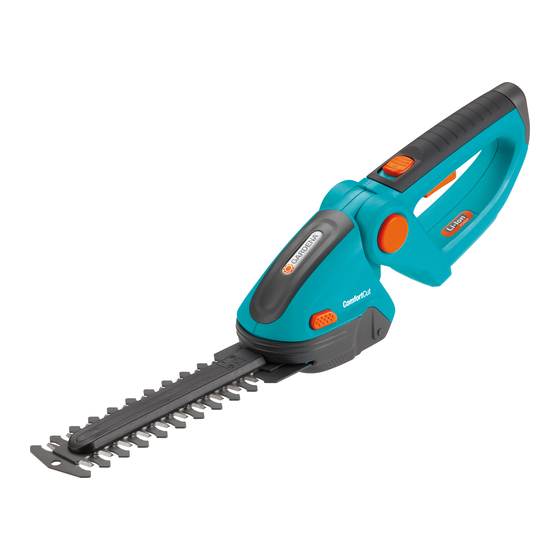
5. Operation
WARNING!
There is a risk of injury if the switching devices installed
Risk of Injury!
on the Shears are removed or bridged (e. g. by fastening the
on switch to the handle). This prevents the Accu Shears
switching off automatically.
v Never remove or bridge the switching devices.
The starting lockout
being switched on unintentionally.
Cut grass / shrubs:
1. Grass Shears:
Clear the area to be cut of stones and other solid objects and
8
remove the blade guard
7
Accu Shrub Shears:
Remove the blade guard
2. Ergonomic design ComfortCut:
5
6
8
7
Press elbow joint
with blade to desired angle.
6
3. Cutting:
Disengage the starting lockout
and press the ON button
5
again.
Telescopic Swivel Handle
The GARDENA Telescopic Swivel Handle Art. No. 8899 for the
Art. 8899 (optional):
Accu Shears can be mounted in 45° steps. The swivel handle is
fully height adjustable (85 – 120 cm) and can be adapted to suit
9
your height.
v Slide blade protection
0°
45°
-45°
Fitting the Telescopic Swivel Handle:
0
90°
v Guide the swivel handle
-90°
135°
holder of the Accu Shears until the lock engages.
-135°
Removing the Telescopic Swivel Handle:
180°
v Press the release button
ß
7a
The starting lockout
no longer function when the swivel handle is mounted.
ß
8a
Cutting with the Telescopic Swivel Handle:
1. Attach the Telescopic Swivel Handle.
2. Loosen the adjusting bolt
3. Set the handle to the correct length and tighten the adjusting
bolt
q
.
4. Disengage the starting lockout
press the ON button
q
5. Release the starting lockout
16
7
prevents your GARDENA Accu Shears from
5
from the cutting blade.
5
from the cutting blade.
6
on both sides and adjust motor housing
7
by pushing it forwards
8
. Release the starting lockout
7
5
onto shear blade.
9
at the desired angle into the handle
0
and pull out the swivel handle.
7
8
and ON button
on the Accu Shears
q
.
ß
by pushing it forwards and
7a
ß
.
8a
ß
again.
7a
Change Shears Set of
Please only use original GARDENA Accu Shears Cutting
Blades:
Blades.
• Grass+Boxwood-Blade Set cutting width 8 cm
• Shrub-Blade Set
• Shrub Blade Set
1. Press both lock buttons
w
blade set
t
2. If necessary clean transmission chamber and lubricate gear
wheels with some acid-free grease (Vaseline).
3. Place the shear blade set
the groove
audibly engaged.
r
4. If necessary, spray the shear blades with Cleaning Spray
Art. 2366. This increases the running time.
When first switching on after changing the blade set, there can be
an audible click when the cam engages with the the shear blade
e
connecting link.
6. Putting into Storage
Storage / Overwintering:
Store your Accu Shears out of the reach of children.
1. Charge battery. This increases the life of the battery.
2. Clean Accu Shears and shear blade with GARDENA Cleaning
Spray Art. 2366 (see 7. Maintenance).
3. Slide blade protection onto the shear blade.
4. Store Shears in a cool, dry place where they are protected from
frost.
Disposal:
The product must not be added to normal household waste.
(in accordance with
It must be disposed of in line with local environmental regulations.
RL2002/96/EC)
Disposal of
The GARDENA Accu Shears contains lithium-ion cells that should
batteries:
not be discarded with normal household waste at the end of their
life.
Li-ion
Please return the lithium-ion cells to your GARDENA dealer or
dispose of them properly at a public recycling centre.
z
1. Discharge lithium-ion cells
completely.
2. Remove lithium-ion cells
from the Accu Shears.
3. Dispose of lithium-ion
cells
z
ClassicCut
cutting length 12.5 cm Art. 2342
cutting length 18 cm
w
at the same time, flip up shear
e
and remove.
e
r
with the snap-in lug
into
t
and snap shut until both lock buttons
w
z
z
properly.
ComfortCut
Art. 2340
Art. 2343
have
17