Epson LABELWORKS PX Gebruikershandleiding - Pagina 7
Blader online of download pdf Gebruikershandleiding voor {categorie_naam} Epson LABELWORKS PX. Epson LABELWORKS PX 14 pagina's.
Ook voor Epson LABELWORKS PX: Gebruikershandleiding (4 pagina's)
THE BASICS - HOW TO
5. Creating a label
Example: ABC
1. Press
while holding down
2. Press the following keys:
,
"ABC" appears on the display.
Refer below for other operations and the labels you can create with this product.
Editing characters, Useful functions, Creating a label with a special form
6. Printing labels
1. Press
.
The length of the label to print and the number of prints appear, and
printing starts.
2. When the tape stops, press the "Cut Button" to cut the tape.
Do not press the "Cut Button" before printing is
complete.
Printing multiple copies
1. Press
.
2. Select "Copies" with
3. Enter a value with number buttons and press
4. When the tape stops, press the "Cut Button" to cut the tape.
A "cut mark" will be printed. Cut the tape with scissors.
Cutting labels one at a time
1. Press
.
2. Select "Set cut mode" with
3. Select "Each label" with
4. Select "Copies" with
5. Enter a value with number buttons and press
Printing starts.
6. When "Press cut button" displays on the display, press the "Cut Button".
Printing starts for the second label.
Adjusting print density
1. When the power is off, press
2. Adjust print density with
MEMO
In general, please set the value to the default; "0".
7. Attaching labels
1. Peel off the backing paper.
2. Attach the label and rub it firmly.
to enter text in capital letters.
,
, and press
.
.
, and press
.
, and press
.
, and press
.
.
+
.
, and press
.
EDITING CHARACTERS
Editing Characters
Press character keys and enter text.
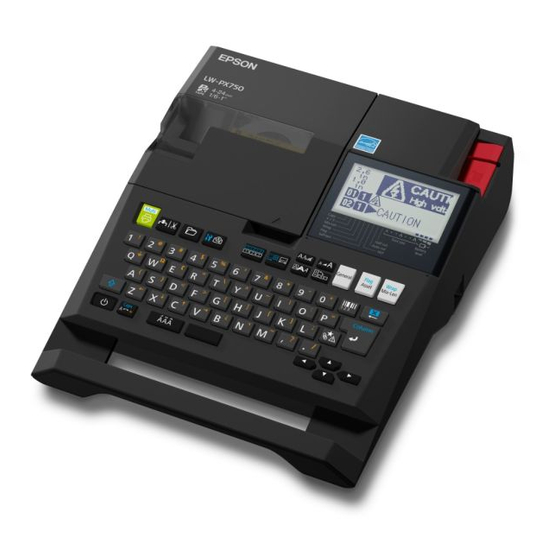
Part Names and Functions
Text is entered from the cursor position.
To keep the already entered text, first move the
cursor to a number to which no text is entered yet
with
+
or
+
, then enter text.
Switching upper case or lower case
J
1. Press
+ .
The setting is indicated on the display. Characters are set to upper case or
lower case.
To capitalize partially: Enter with
Deleting characters
J
1. Press
.
Deletes one character backward.
Breaking lines
J
1. Press
.
Breaks the line from the character next to the cursor.
Deleting text
J
1. Press
+
.
2. When a confirmation message appears, press
Text will be deleted.
Confirming text
J
1. Press
.
Text appears on the display.
You can check the text and the length of the label.
But the print image cannot be confirmed.
Creating labels with serial numbers (Sequence number)
J
1. Press
+
.
2. Enter a number/alphabet for the first label, and press
The number/alphabet increases by one whenever printing is done.
Creating pieces of text
J
You can create multiple pieces of text continuously. Up to 50 pieces can be
created at a time.
You can check which piece of text you are creating with the text number mark
displayed at the beginning.
Creating another piece of text
1. Select the next text number mark with
You can create another piece of text. Do the same for the next pieces.
Printing a selected piece of text
1. Select a piece of text you want to print with
2. Press
.
Adding a punctuation mark to the label
J
Select from the following two methods.
1. Press
.
Each press shows the next mark.
Available marks
1. Press
+
.
Each press shows the next mark.
Available marks
Display
pressed.
.
.
+
or
+
.
+
or
+
.
7