MSI NX8600GTS Diamond Plus Snelle gebruikershandleiding - Pagina 2
Blader online of download pdf Snelle gebruikershandleiding voor {categorie_naam} MSI NX8600GTS Diamond Plus. MSI NX8600GTS Diamond Plus 2 pagina's. Msi nx8600gts diamond plus graphic card: quick start
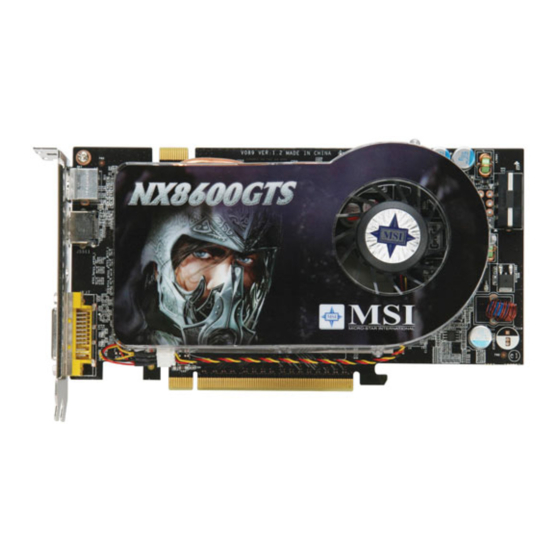
O
verview
1
512MB DDR3 memory or
256MB DDR3 memory or
128MB DDR3 memory
Power Connector
nVIDIA GeForce 8600GTS
PCI Express Interface
SLI Interface
Fan Connector
TV_Out Connector (S)
HDTV-Output integrated
Dual DVI-I Port (yellow)
Dual Dual-Link DVI output
supported
Note: The VGA card shown here may vary from the actual card.
For further information, please visit MSI website at www.msi.com.tw
G
etting Started
2
Unpacking
Please check out the following items to make sure that you get the complete product:
VGA card
Disk: Drivers, documentation, and applications
Consult your dealer immediately if anything is missing or damaged.
System Requirements
To install the VGA card, your computer system needs to meet the following requirements:
R
TM
R
R
Intel Pentium III (and above), AMD K7 (and above), or compatible with expansion slot
128MB of system memory
Installation software requires CD-ROM drive
Operation System Support: visit MSI website for further information
Power supply of 400 (and up) watt is highly recommended for system stability
Card Features
For reference only
MSI Vivid Video Technology Support
MSI Vivid is an easy tool to enhance "image quality." It can help users to get better image
quality in viewing "Digital photos, documents & games."
MSI D.O.T Technology Support
D.O.T.(Dynamic Overclocking Technology) is MSI's important and outstanding
breakthrough in mainboard and add-on cards technologies. Briefly, D.O.T. is an auto-
overclocking function, primarily focusing on detecting the loading of the GPU, and on
adjusting the frequency according to the loading.
MSI Corecell-3D Technology Support
MSI Corecell-3D is a new technology for graphic cards. There are two key parts of
Corecell-3D: Corecell-3D Chip in graphic card & Corecell-3D UI. Corecell-3D Chip key
functions: GPU frequency adjustment/ monitor; Memory frequency adjustment/ monitor;
Fan speed adjustment/ monitor; Electric current control/ monitor. Three key parts in
Corecell-3D UI : Corecell-3D Center; Vx Tune; D.O.T. Express.
NVIDIA
R
unified architecture
Fully unified shader core dynamically allocates processing power to geometry, vertex,
physics, or pixel shading operations, delivering up to 2x the gaming performance fo prior
generation GPUs.
R
R
Full Microsoft
DirectX 10 Support
World's first DirectX 10 GPU with full Shader 4.0 support delivers unparalleled levels of
graphics realism and film-quality effects.
R
TM
NVIDIA
SLI
Technology
Delivers up to 2x the performance of a single GPU configuration for unequaled gaming
experiences by allowing two graphics cards to run in parallel. The must-have feature for
performance PCI Express graphics, SLI dramatically scales performance on today's
R
hottest games.
G
3
etting Started
16x Anti-aliasing
Technology
Lightning fast, high-quality anti-aliasing at up to 16x sample rates obliterates jagged edges.
128-bit floating point High Dynamic-Range (HDR) Lighting
Twice the precision of prior generations for incredibly realistic lighting effects -- now with
support for anti-aliasing.
NVIDIA
R
Quantum Effects
TM
Technology
Advanced shader processors architected for physics computation enable a new level of
physics effects to be simulated and rendered on the GPU -- all while freeing the CPU to
run the game engine and AI.
NVIDIA
R
ForceWare Unified Driver Architecture (UDA)
R
Delivers a proven record of compatibility, reliability, and stability with the widest range of
games and applications. ForceWare provides the best out-of-box experience for every
user and delivers continuous performance and feature updates over the life of
NVIDIA
R
GeForce GPUs.
R
OpenGL
2.0 Optimization and Support
Ensures top-notch compatibility and performance for OpenGL applications.
Dual 400MHz RAMDACs
Blazing-fast RAMDACs support dual QXGA displays with ultra-high, ergonomic refresh
rates -- up to 2048x1536@85Hz.
Build for Microsoft
R
Windows Vista
TM
NVIDIA's fourth-generation GPU architecture built for Windows Vista gives users the best
possible experience with the Windows Aero 3D graphical user interface.
NVIDIA
R
PureVideo
TM
HD Technology
The combination of high-definition video decode acceleration and post-processing that
delivers unprecedented picture clarity, smooth video, accurate color, and precise image
scaling for movies and video.
Discrete, Programmable Video Processor
NVIDIA PureVideo is a discrete programmable processing core in NVIDIA GPUs that
provides superb picture quality and ultra-smooth movies with low CPU utilization and
power.
Hardware Decode Acceleration
Provides ultra-smooth playback of H.264, VC-1, WMV and MPEG-2 HD and SD movies.
HDCP Capable
Designed to meeet the output protection management (HDCP) and security specifications
of the Blu-ray Disc and HD DVD formats, allowing the playback of encrypted movie content
on PCs when connected purchase purcconnected to HDCP-compliant displays.
High-Quality Scaling
Enlarges lower resolution movies and videos th HDTV resolutions, up to 1080i, while
maintaining a clear, clean image. Also provides downscaling of videos, including high-
definition, while preserving image detail.
TM
NVIDIA
R
PureVideo
Technology
R
TM
NVIDIA CineFX
5.0
Shading Architecture
64-Bit Texture Filtering and Blending
R
TM
NVIDIA
Intellisample
4.0 Technology
NVIDIA
R
UltraShadow II
TM
Technology
High-Speed GDDR3 with 128-bit memory intergrated.
Dual Dual-link DVI Support
Able to drive the industry's largest and highest resolution flat-panel displays up to
2560x1600
Q
4
Hardware
Follow the steps
below
to install the VGA card:
1. Remove the computer case.
2. Locate the expansion slot on your mainboard.
Warning: Inserting the VGA card into a wrong
slot may damage your card (refer to your
mainboard manual for more Information).
3. Put the card directly over the
expansion
slot and
press one end of the card into the slot first.
Gently but firmly press the other end until the
card is fully seated in the slot.
R
4. Secure the card with a bracket screw.
5. Install all other cards and devices and connect
all the cables, and then install the case.
6. Connect the monitor. Now, you are ready to
install the software on your computer.
Software
R
To install the driver of the VGA card to your computer,
please follow the steps below:
1. Turn on the computer.
2. Insert the
CD
into the CD-ROM drive. The Autorun program will start the Setup
I
program, and show the setup screen as follows:
TM
TM
nstalling MSI Live Update 3
Tip : If, on your computer, the
Autorun program does not execute
automatically, please 1) enable the
CD-ROM drive Auto-detect function
from Control Panel; or 2) find and
run the setup.exe file manually from
the CD.
3. Click nVIDIA VGA Drivers. Follow the on-screen instructions to complete the installation.
4. After finishing the installation, restart the computer as instructed.
uick Installation