DJ-Tech uSolo Pro Gebruikershandleiding - Pagina 4
Blader online of download pdf Gebruikershandleiding voor {categorie_naam} DJ-Tech uSolo Pro. DJ-Tech uSolo Pro 12 pagina's. Professional usb

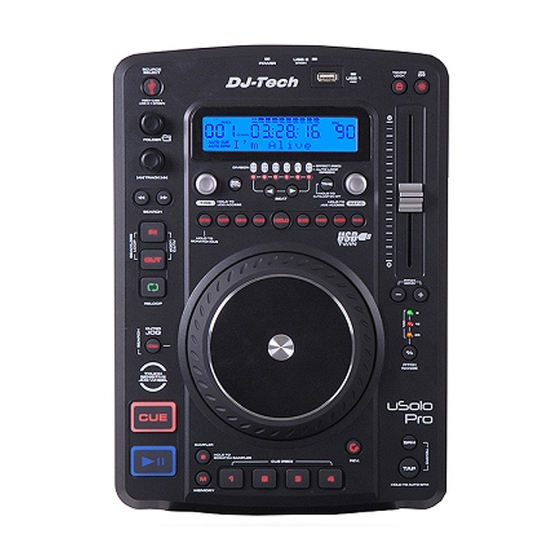
CONTROLS AND FUNCTIONS
1. SOURCE SELECT BUTTON - This button lets you toggle between USB Port 1 and 2 for the MP3 File
source. The color of LED shows which source is activated. Glowing red LED refers to USB 1 port; glowing
green LED refers to USB 2 port. USB Port 1 and 2 can only be selected under pause mode.
2. LCD DISPLAY ─ This high quality LCD display indicates all the information and functions, as they are occurring.
3. FOLDER KNOB
Press FOLDER knob to switch folder and track info to be displayed on the LCD.
Turn FOLDER knob to search the desired folder.
4. SGL/CTN BUTTON - This function allows you to choose between single track play or continuous track
play (all tracks in order).Press and hold the button for 1 second to switch auto cue on/off.
5. TRACK KNOB
The knob is used to select a track. Turning track knob will forward / backward skip to next track.
Holding down and turning track knob will rapidly forward/backward skip through the tracks by 10 tracks
per click.
Press TRACK knob to switch File name/Title (ID3)/Artist (ID3)/Album (ID3)/Genre (ID3) on the LCD.
Press and hold TRACK knob and turn RATIO knob to move LINE NAME on the LCD.
6. TIME KNOB (Parameter) - Turn the TIME knob, press and turn the TIME knob, or press the TIME knob
and turn the jog wheel to adjust the parameter time value.
7. SEARCH buttons
This search button allows you to quickly scan backwards through a track.
This search button allows you to quickly scan forwards through a track.
8. IN BUTTON - This function allows you to set a cue point without music interrupt. This button also sets the
starting point of a seamless loop.
9. OUT BUTTON - This button is used to set the ending point of a loop. A loop is started by pressing the IN
button; pressing the OUT button set the loop ending point. The loop will continue to play until the OUT button
is pressed once again.
10. RELOOP BUTTON - If a seamless loop has been made, but the music is not actively in seamless loop mode
(a loop is not playing), pressing the RELOOP button will instantly reactivate the seamless loop mode. To exit
loop, press the OUT button. "LOOP" will appear in the LCD display when the reloop function is available. When
a seamless loop is playing, "RELOOP" will be flashing on the LCD. During play mode (no loop is stored in the
device), pressing the RELOOP button will instantly return play the last set point without interrupt of music.
11. JOG WHEEL -This wheel has 2 pats: The Outer part and the Touch Sensitive part
A. The outer part has 4 functions:
(1). The jog wheel will act as a frame search control when the music in the pause or cue mode, allowing
you to set a point.
(2). The wheel also works as a pitch bend during playback. Turning the wheel clockwise will increase the
pitch percentage up to 100%, and turning the wheel counterclockwise will decrease the pitch
percentage down to –100%. The pitch bend will be determined on how fast and how long you turn the
jog wheel continuously.
(3). The jog wheel can be used with the help of the TIME and RATIO knob to set effects and samples
parameter adjustment.
(4). When Jog Search mode is on, it can be used to search forward/ backward of the song.
B. The Touch Sensitive part:
The Touch Sensitive part is used for scratching. There are 3 scratch modes including: normal scratch,
scratch CUE and scratch samples.
12. JOG SEARCH BUTTON - Press this knob to toggle the Jog Wheel search function. The button will be
lightened when the function is on. The search function has 4 forward and 4 reverse speeds allowing you to
quickly scan through tracks. The more you turn the wheel in either direction the faster you search.
13. SAMPLER BUTTON
Press this button, then press the desired BANK button to set the sampler mode. When sampler mode is
set, then sampler will mix the music together. The sampler can play even no USB mass storage
connected. The sampler will play only once or continuous depends on SINGLE is indicated or not on the
LCD. And press the SAMPLER button again to cancel sampler function.
When in the playback of sampler loop mode, the TIME PARAMETER is used to adjust pitch and the
RATIO PARAMETER is used to adjust volume.
Press and hold the SAMPLER button until LED blinks to enable the Sample scratch mode; press the
button again to cancel this function.
3
TOP PANEL
