1010 Music Bitbox Snelstarthandleiding
Blader online of download pdf Snelstarthandleiding voor {categorie_naam} 1010 Music Bitbox. 1010 Music Bitbox 2 pagina's.
Ook voor 1010 Music Bitbox: Gebruikershandleiding (11 pagina's)
First things first:
A microSD card must be
inserted into bitbox before
you can get started.
Load files from a microSD
card:
1. Insert the provided microSD
card into the MICRO SD
slot, notched edge down.
Clips are preloaded on the
card.
2. You will see the Main screen
with a grid of clips loaded
into individual cells of the
grid.
Play clips:
There are three ways to trigger
playback of a clip:
1. Touch a cell to play the
corresponding clip. The light
colored cells in the grid hold
clips. The name of the clip
appears in the cell after it is
loaded. Blank cells are empty.
2. Plug a trigger source into one of the CV Trigger jacks. The CV Trigger jacks are mapped to the clip cells on the
touchscreen. The clip that corresponds to the used CV Trigger jack will now be triggered by the CV Trigger input.
3. Plug a MIDI controller source into the MIDI input jack.
a) NOTE: The MIDI input uses a TRS connection compatible with the Arturia BeatStep Pro. Be sure to use a TRS cable.
The clips are triggered on channel 10, which is the drum part on the BeatStep Pro.
b) Bitbox maps MIDI inputs for notes 36 to 51 to the clips in the grid as shown in the table to the
right. The modulators are assigned notes 52 to 55 as shown. Learn more about modulators at
1010music.com/support.
Adjust the parameters of a clip loaded into a cell:
1. Touch the cell you want to modify on the touch screen. The cells that have clips loaded will have text labels.
2. Press the INFO button.
3. You will now see the
modify one of the parameters, turn the knob next to that parameter.
4. Touch the on-screen
HOME button to go back.
Synchronize clips with clocks:
1. Follow the steps above to set the Trigger and other parameters for the cell. Bitbox synchronizes clips when
Quant Size
is set to something other than
2. Plug a clock source into the CLOCK jack or a MIDI clock source into the MIDI jack. You should hear all clips
play synchronized with the input clock or MIDI signal, according to the parameters set up for each clip in the
prior step.
a) Note: The Clock input must use 4 pulses per quarter (PPQs), or a pulse per 16
3. If MIDI and Clock inputs are used together, Bitbox will select the highest priority clock based on the following
order of priority: 1.) Clock Input; 2.) MIDI Input; 3.) Internal Clock.
11/3/16 3:24 PM
Bitbox Quick Start Guide
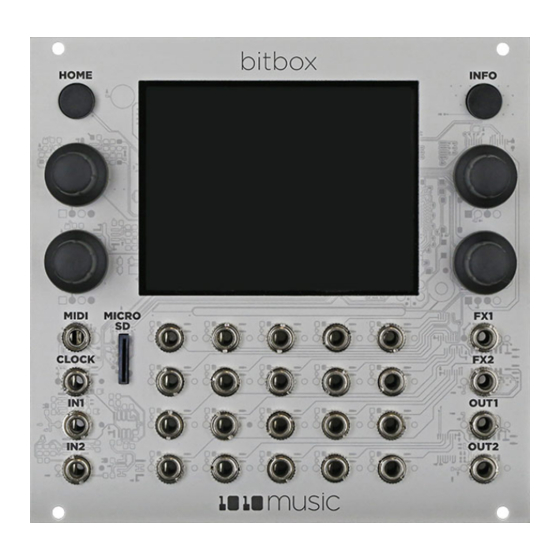
HOME
Context
Sensitive
Control Knob 1
Controls
Control Knob 3
MIDI
CLOCK
IN1
IN2
Input Jacks
Start
,
Length
,
Trigger Mode
More
button, or press the INFO button again to see additional parameters. Press the
bitbox
Home button
Touch Screen
Memory Card Slot
MICRO
SD
, and
Level
None
, such as
Quant Size: 1 bar
INFO
Control Knob 2
Control Knob 4
CV Triggers
CV Modulators
FX1
FX2
OUT1
OUT2
48
44
40
36
parameters on the touch screen. To
.
note.
th
Copyright 1010 Music 2016
Information button
Context
Sensitive
Controls
Output Jacks
49
50
51
55
45
46
47
54
41
42
43
53
37
38
39
52