3M 28365 Instrukcje użytkowania
Przeglądaj online lub pobierz pdf Instrukcje użytkowania dla Systemy filtracji wody 3M 28365. 3M 28365 3 stron. Clean sanding filter bag
3
Instruções para Uso do Conjunto da Mochila da Sacola do
Filtro de Lixamento Limpo da 3M™, PN 28365
ATENÇÃO!
A exposição à POEIRA gerada pela peça e/ou por
materiais abrasivos pode resultar em danos ao
pulmão e/ou outras lesões físicas.
Use captura de poeria ou exaustão local como
indicado na MSDS. Use proteção respiratória e
proteção para a pele e para os olhos aprovada pelas
entidades governamentais.
Não seguir esta advertência pode resultar em graves
ferimentos ao pulmão e/ou lesões físicas.
Leia as Folhas de Dados de Segurança do
Material (Material Safety Data Sheets - MSDS)
antes de usar os materiais.
MSDS
Entre em contato com os fornecedores dos
materiais de trabalho e dos materiais abrasivos
para obter cópias das MSDS caso elas não
estejam disponíveis.
Use o pacote:
O Conjunto da Mochila da Sacola do Filtro de Lixamento
da 3M está embalado e pronto para uso na configuração
de mochila. Você precisará conectar a mangueira de vácuo
vermelha (guardada dentro da mochila) ao pivô no alto
da mochila. NOTA: a mangueira de vácuo e o pivô têm
rosqueamento para a esquerda.
A mangueira de vácuo tem 24,4 mm x 1,83 M de
comprimento e se conecta a todos os modelos da
Lixadeira Orbital Aleatória Auto-Geradora de Vácuo da
3M. A mangueira pode ser encurtada para se adequar
ao comprimento do braço do operador. Para assegurar o
comprimento apropriado, o operador deve:
• Usar a mochila e segurar a lixadeira em sua mão de
operação.
• Posicione a mangueira de vácuo através da alça da
tira de ombro de gancho & alça (tira esquerda para
operadores canhotos e tira direita para operadores
destros).
• Posicione a mangueira de vácuo junto ao tubo de
descarga da lixadeira e marque a mangueira no
comprimento onde ela deve ser rosqueada no tubo de
descarga.
• Encurtar o tubo cortando a mangueira plástica ao
comprimento desejado.
• Colocar uma vedação de mangueira (PN A0778 vem
com a lixadeira) dentro da extremidade da mangueira
de vácuo para evitar que a poeira escape no ponto de
conexão.
• Prenda a mangueira de vácuo à lixadeira rosqueando
a conexão do pivô na mangueira (roscas para a
esquerda).
Conversão da Mochila em Pacote para a Cintura
Para converter o conjunto em um Pacote para a Cintura,
use os seguintes passos:
• Remova as tirar presas ao pacote.
• Prenda os dois flapes inferiores aos quais a tira de
cintura estava presa inserindo as fivelas na alça elástica
na parte posterior do pacote. Conecte as fivelas macho/
êmea. Conecte as alças nos flapes aos ganchos no
pacote.
• Gire o pacote para a posição preferida (para operação
com a mão direita/esquerda).
• Prenda uma extremidade da tira de dejetos ao
equipamento de conexão superior.
• Posicione o pacote na cintura do operador.
• Prenda a segunda extremidade da tira de cintura em
outro equipamento de conexão.
• Segure ambas as extremidade do cinto da tira de
cintura e puxe para apertar o pacote na cintura do
operador.
• Pegue todas as tiras não usadas e guarde-as para usar
o pacote como mochila.
Mudança da Sacola do Filtro
A incapacidade da lixadeira de remover poeira pode indicar
que a sacola do filtro está cheia. Para mudar a sacola do
filtro, use os seguintes procedimentos:
• Remova e abra o zíper da mochila.
• Com uma mão, segure firmemente a sacola e a parte
estriada do bocal enquanto segura o adaptador da
sacola do filtro de borracha com a outra mão.
• Coloque o bocal fora do adaptador usando um
movimento para frente e para fora.
• Coloque um plugue de tampo (ou fita de cobertura)
sobre o bocal para evitar que a poeira escape.
• Descarte a sacola cheia usando o procedimento de
manuseio de dejetos apropriado para o material contido
na sacola.
Para instalar uma sacola novaa:
• Empurre o bocal preto diretamente no adaptador de
borracha.
• Gire o bocal no adaptador para que a nova sacola fique
junto à parte de trás do pacote.
• Feche o flape no pacote e feche com zíper.
Função de Resfriamento de Ar
O pacote apresenta um flape no painel traseiro que pode
ser aberto ou fechado para permitir um fluxo de ar. Com
o flape aberto, ar de saída frio da sacola do filtro será
direcionado às costas do operador. Para eliminar este fluxo
de ar, feche o flape a partir de dentro do pacote prendo
as conexão gancho e alça no painel traseiro. Fazê-lo
redirecionará a saída para as duas aberturas no painel
lateral.
Limpar o Pacote
O pacote é feito de fibra resistente à água e pode ser
limpo com água em um pano descartável. Limpe a poeira
de dentro e fora da mochila e descarte o pano usando o
procedimento de manuseio de dejetos apropriado para o
material que estava sendo lixado.
Descarte
Descarte produtos usados, produtos de dejetos, e produtos
contaminados de acordo com as regulamentações
federais, estaduais, e locais.
3M é uma marca registrada da Companhia 3M
3
Instructions For Using 3M™ Clean Sanding Filter Bag
Backpack Assembly, PN 28365
WARNING!
Exposure to DUST generated from workpiece and/or
abrasive materials can result in lung damage and/
or other physical injury. Use dust capture or local
exhaust as stated in the MSDS. Wear government
approved respiratory protection and eye and skin
protection. Failure to follow this warning can result
in serious lung damage and/or physical injury.
Read the Material Safety Data Sheets (MSDS)
before using any materials.
Contact the suppliers of the workpiece materials
MSDS
and abrasive materials for copies of the MSDS if
one is not readily available.
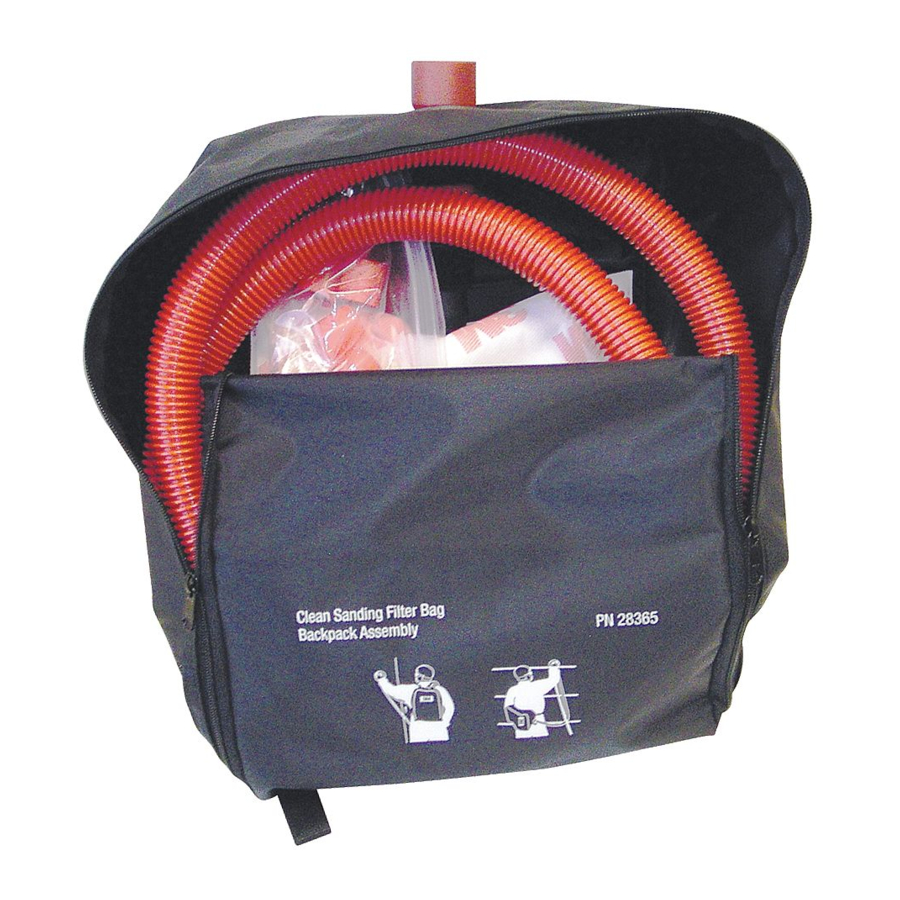
Use the pack:
The 3M Sanding Filter Bag Backpack Assembly is ready to
use in the backpack configuration. You will need to attach
the red vacuum hose (stored inside the backpack) to the
swivel at the top of the backpack. NOTE: the vacuum hose
and swivel have left-hand threads.
The vacuum hose is 1 in. x 6 ft. long and connects to all
models of the 3M Self-Generating Vacuum Random Orbital
Sander. The hose can be shortened to fit the operator's arm
length. To ensure appropriate length the operator should:
• Wear the backpack and hold the sander in his/her
operating hand.
• Position the vacuum hose through the hook and loop
shoulder strap loop (left strap if left-handed, right strap
if right-handed).
• Position the vacuum hose next to the sanders exhaust
tube and mark the hose at the length it should connect
with the exhaust tube.
• Shorten the tube by cutting plastic hose to the desired
length.
• Place a hose seal (PN A0778 comes with the sander)
inside the end of the vacuum hose to keep dust from
escaping at the point of connection.
• Attach the vacuum hose to the sander by screwing the
swivel connection into the hose (left hand threads).
Converting from Backpack to Hip Pack
To convert the assembly to a Hip Pack, use the following
steps:
• Remove straps attached to the pack.
• Secure the two bottom flaps (that waist strap was
attached to) by inserting the buckles into the elastic
loop on the back of the pack. Connect the male/female
buckles. Attach the loops on the flaps to the hooks on
the pack.
• Rotate pack to preferred position (for left/right hand
operation).
• Attach one end of the waist strap to the top attachment
hardware.
• Position pack onto operator's hip.
• Attach second end of waste strap into other attachment
hardware.
• Grab both ends of the waste strap webbing and pull to
tighten pack to operator's hip.
• Collect all of the unused straps and save for using the
pack as a backpack.
Changing the filter bag
The sanders inability to remove dust may indicate the
filter bag is full. To change the filter bag, use the following
procedure:
• Remove and unzip the backpack.
• With one hand, securely grasp the bag and ribbed
part of the nozzle while gripping the rubber filter bag
adapter with the other hand.
• Pull the nozzle out of the adapter using a back and
forth motion.
• Place a cap plug (or masking tape) over the nozzle to
prevent dust escaping.
• Discard the full bag using the appropriate waste
handling procedure for the material contained in the
bag.
To install a new bag:
• Push the black nozzle straight onto the rubber adapter.
• Rotate the nozzle in the adapter so the new bag lays
flat against the back of the pack.
• Close the flap on the pack and zip close.
Air Cooling Feature
The pack features a flap on the back panel that can be
opened or closed to allow air flow. With the flap opened,
cool exhaust air from the filter bag will be directed at
the operators' back. To eliminate this air flow, close the
flap from inside the pack by attaching the hook-and-loop
attachments on the back panel. Doing so will redirect the
exhaust to the two openings on the side panel.
Clean the Pack
The pack is made from water resistant fibre and can be
cleaned with water on a disposable cloth. Wipe dust from
the inside and outside of the backpack and discard the
cloth using the appropriate waste handling procedure for
the material that was sanded.
Disposal
Dispose of used product, waste product and contaminated
product in compliance with all federal, state and local
regulations.
3M Abrasive Systems Division
St. Paul, MN 55144
3M is a trademark of 3M Company
© 3M 2009