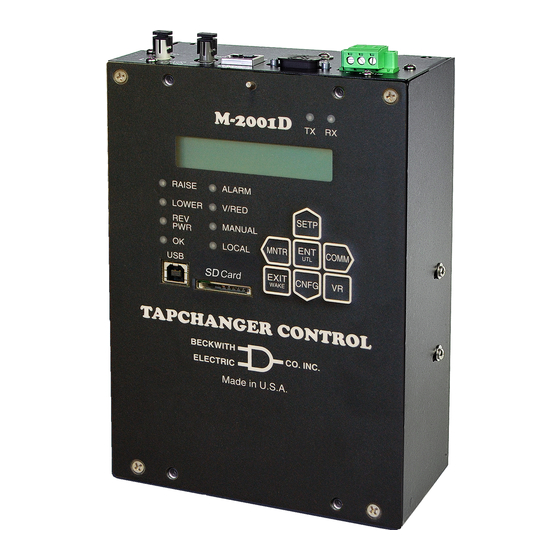
BECKWITH ELECTRIC M-2001D Skrócona instrukcja obsługi
Przeglądaj online lub pobierz pdf Skrócona instrukcja obsługi dla Kontroler BECKWITH ELECTRIC M-2001D. BECKWITH ELECTRIC M-2001D 4 stron. Tapchanger control

M-2001D Tapchanger Control
LCD SCREEN Pressing any pushbutton
will wake up the LCD and display the
heading corresponding to the "Hot Button"
label inside the pushbutton - WAKE, MNTR,
SETP, CNFG, COMM, UTIL, or VR.
EXIT/WAKE Pushbutton The EXIT WAKE
Pushbutton wakes the LCD from sleep
mode and begins scrolling through a list
of user programmed metered/calculated
values.
While navigating through the different HMI
menus the EXIT pushbutton is used to:
- Exit a level to the next higher level
- Cancel data entry
- Clear the screen when at the header level
VR Pushbutton Activates the user defined
Voltage Reduction Steps.
Shortcuts/Arrows
SETP Access to the Setpoints Screens.
MNTR Access to the Monitoring Screens.
ENT/UTL Pushbutton Access to the
Utilities screens and ENTER button.
While navigating through the different HMI
menus the ENT pushbutton is used to:
- Enter the edit mode of a screen
- Store a setpoint or condition in memory
- Enter the sub heading data level
- Reset certain monitoring screens
CNFG Access to the Configuration
Screens.
COMM Access to the Communication
Screens.
RAISE LED Out of Band Low Voltage.
LOWER LED Out of Band High Voltage.
REV PWR LED Indicates reverse power
flow.
OK LED Illuminates to indicate the micro
controller is functioning properly and is
extinguished when a Motor Seal-in Failure
Block is in effect.
Scan this QR Code for direct
access to product software
COM1 TX/RX LEDS Indicates when
and support documents.
control is transmitting and/or receiving data.
ALARM LED Indicates any of the
programmable alarms are activated.
V/RED LED Indicates voltage reduction has
been invoked.
- Continuous illumination and one periodic
flash indicates Level 1 Voltage Reduction.
- Continuous illumination and two periodic
flashes indicates Level 2 Voltage Reduction.
- Continuous illumination and three periodic
flashes indicates Level 3 Voltage Reduction.
MANUAL LED Indicates automatic control is
disabled and in manual mode.
LOCAL LED Indicates control is switched
into Local mode. Cannot command control to
raise or lower via SCADA.
Top View
Control Power
Backup Input
Ethernet over Fiber
Fiber Optic V-Pin
Optic (optional)
Connector
(optional)
BlueTooth
T X
RJ-45 Ethernet over
RS-232 DE9S
Fiber Optic ST
Copper (optional)
Connector
Front
In-Line, 6-Pin Connector
for the M-2025B, C or D
Current Loop Module
Bottom View
24-Pin Blue Connector for
Source Voltage Input
M-2000 Series Adapter
One Aux Output
Panels or Direct Connection
Three Aux Inputs
Death or severe electrical shock can occur.
WARNING:
In no case should the line current circuit be interrupted with the regulator
or transformer energized. Do not remove auxiliary current transformers without
shorting the current inputs.
Exercise care during installation, operation and maintenance procedures
The equipment described in this manual contains voltages high enough to cause serious
injury or death. Only qualified personnel should install, operate, test, and maintain this
equipment. Be sure that all personnel safety procedures are carefully followed. Exercise
due care when operating or servicing alone.
WARNING:
Remove Fuses Before Service.
Quick Start Guide
24-Pin Connector (P2)
Voltage Input (Polarity)
Load Current (Return)
Neutral
Load Current (Polarity)
Circulating Current (Polarity)
Circulating Current (Return)
Tapchanger Raise Output
Motor Power Input
Voltage Reduction Step #2 or
Contact KeepTrack 1R1L/1N Input
Contact "Wetting"
Supply + 12 Vdc
Operations Counter/
Switch Status Input #1
Operations Counter/
Switch Status Input #2
Input 1 Motor Seal-in/
RS-485
Switch Status
Neutral Position Detector #1
Neutral Position Detector #2
Tapchanger Lower Output
Non-Sequential Operation/Auto
Tap Inhibit Input/SCADA Cutout
Voltage Reduction Step #1 or
Contact KeepTrack 1R1L/1N Input
Motor Seal-in Disconnect Output
User-Programmable Alarm
Self-Test Alarm
User-Programmable Alarm
Non-Interruptable
Pwr Supply Input
Self-Test Alarm
Source Voltage Input
Aux Output
Aux Input A1
Or DVAr2 Disable Input
Aux Input A2
Aux Input A3
USB Port Used for Direct TapTalk
Communications Connection.
Smart FlashCard Slot Used for loading
and saving setpoints, saving Datalog files,
SOE files, OSC files, Clone save and
load, load and save DNP files, Firmware
Update, save Wake-up Screens, save ALL
Metering Parameters and can be utilized
as an Access Code Key.
Fuse ¼ Amp
1
Voltage Input (Polarity)
2
Load Current (Return) See Note 2
3
Voltage Input (Return) See Note 2
4
Load Current (Polarity) 0.2 A
5
Circulating Current (Polarity) 0.2A
6
Circulating Current (Return)
MOTOR POWER 120/240 V
AL
See Note 1
INTERLOCK
7
RAISE
FUSE 6 A
8
RAISE
LS
OFF
9
AL
AR
AUTO
10
OFF
11
LOWER
AUX RAISE (AR)
12
13
Note 3
AUX LOWER (AL)
14
15
LOWER
LS
16
AR
17
INTERLOCK
18
19
Motor Seal-in
User-Programmable
20
Alarm (Input)
Self-Test Alarm
21
(Input) See Note 4
User-Programmable
22
Alarm (Return)
23
Self-Test Alarm
24
(Return) See Note 4
P3
WARNING: When an adapter panel is not used, automatic shorting of
CT inputs is not provided by the M2001D/M-2050; the customer must
1
provide a method for shorting the CT's before the control is disconnected.
2
NOTES:
3
1. Motor voltage may be 120 or 240 V to neutral, or 240 V phase-to-phase.
4
2. The customer is to provide an earth ground connection to the CT/VT's
neutral connection, external to the control.
5
3. To Motor Power Seal-In board.
4. If the M-2001D is configured for the SCAMP pushbutton Auto/Manual
Switch type, then the Self-Test Alarm relay is NOT available.
®
MOTOR
R
L
