4ms Company Dual Looping Delay Podręcznik użytkownika - Strona 4
Przeglądaj online lub pobierz pdf Podręcznik użytkownika dla Sprzęt nagrywający 4ms Company Dual Looping Delay. 4ms Company Dual Looping Delay 20 stron.
Również dla 4ms Company Dual Looping Delay: Informacje o wersji (10 strony)

into the Ping jack. The Looping Delay will quantize the external clock to its own
sample rate and output quantized clocks on the Loop Clk Out jack. If there is any
jitter or drift in the external clock, the Looping Delay will track and follow these
discontinuities, which can result in interesting (or noisy!) artifacts. See section on
Using External Clocks section on page 12 for more information.
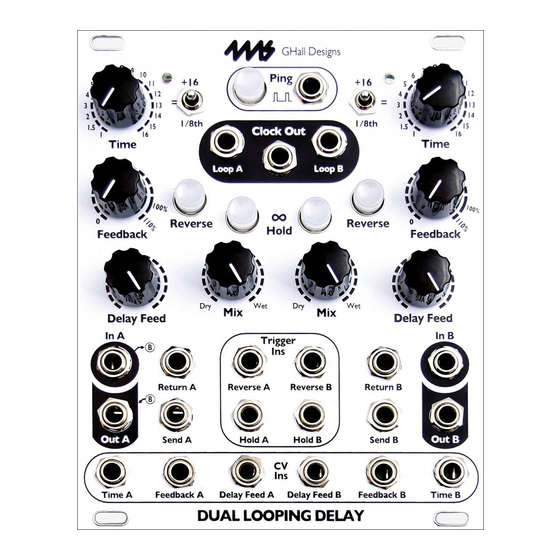
Inf. Hold Button and Hold Jack
The Looping Delay can operate as a delay/echo, or it can play a loop. Pressing
the Inf. Hold button toggles the state of Infinite Hold mode when the button is
released. Similarly, sending a trigger into the Hold jack toggles the state on the
trigger's rising edge. The light on the button indicates whether the mode is on or
off.
Normally (Inf. Hold off), the channel records audio and plays it back after the
delay time has passed. Every sound the channel makes is continuously recorded
into memory. This works like a traditional echo or looping delay by recording and
playing continuously.
When Inf. Hold is on, the channel stops recording and only plays what's already
recorded in memory, cycling through a loop. The size of the loop is set by the
Time parameter. When you activate Infinite Hold mode, the Looping Delay will
start looping what you just recorded. The loop is defined by start and end points in
memory. Wherever the Looping Delay is reading from memory will become the
start of the loop, and where it was writing to memory will become the end of the
loop. You can get a sense of where the read and write positions are by listening to
the Wet and Dry signals, respectively—the Wet signal is what's being read from
memory, and the Dry signal is more or less what's being written to memory
(especially if Delay Feed is up and Feedback is down).
The diagram on the back of this manual (page 20) illustrates the difference in
signal flow when Inf. Hold is on vs. off.
Reverse Button and Jack
Reverse reverses the direction that memory is read and written.
Pressing the Reverse Button toggles Reverse on/off when the button is released.
When reversal is engaged, the Reverse Button will illuminate.
The Reverse CV jack toggles the reverse state on the rising edge of the trigger.
Reverse has slightly different effects depending on whether you are in Infinite
Hold mode or not. In normal mode (Inf. Hold off), toggling Reverse causes
playback and record to reverse direction. The read and write positions are also
swapped. This means that any audio that's already been recorded will be played
backwards, but any new audio will be played forwards (since it's recorded
backwards and played backwards, it comes out sounding forwards). Note that
when Time is very fast, Reverse will seem to have little effect because it only
reverses what's already recorded (which has a short duration when Time is fast).
Time Knob, Switch and CV Jack
The Time knob, switch, and CV jack perform simple arithmetic on the base time to
produce a delay/loop time. The red LED located between the knob and the switch
blinks in time with the current delay/loop time.
The Time knob sets the loop time in number of beats, ranging from 1 to 16.
The Time switch modifies the Time knob setting as follows:
• Center (=): the Time knob directly sets the number of beats for the loop or
delay time. For example, if the Time knob is pointing to 5, the channel will
make an echo (or loop) every 5 beats. Loop/delay time will range from 1 to
16 beats.
• Up (+16): 16 beats are added to whatever the Time knob shows. So if the
Page
4
of
20
