CookTek SinAqua IHW062-64 Instalacja, obsługa i instrukcja obsługi - Strona 5
Przeglądaj online lub pobierz pdf Instalacja, obsługa i instrukcja obsługi dla Urządzenia kuchenne CookTek SinAqua IHW062-64. CookTek SinAqua IHW062-64 11 stron. Induction holding well

ΠΡΟΕΙΔΟΠΟΙΗΣΗ: Ένα εσφαλμένα γειωμένο φις μπορεί να έχει ως αποτέλεσμα
την ηλεκτροπληξία. Παρακαλείστε να συμβουλευτείτε αρμόδιο ηλεκτρολόγο εάν
έχετε τυχόν ερωτήσεις σχετικά με αυτές τις οδηγίες γείωσης.
Πριν ξεκινήσετε:
Βεβαιωθείτε ότι αυτό το ηλεκτρικό καλώδιο είναι σταθερά συνδεδεμένο στη μονάδα
CookTek σας ΠΡΙΝ συνδέσετε το φις της μονάδας σε ηλεκτρική πρίζα και πριν
προσπαθήσετε να θέσετε τη μονάδα σε λειτουργία.
• Μην αγγίξετε την κεραμική πλάκα (ή το άνω μέρος του Cooktop) αμέσως μετά τη
χρήση. Η θερμότητα από την κοιλότητα θα μεταφερθεί στην κεραμική πλάκα. Ως εκ
τούτου, αυτή θα είναι πολύ ζεστή για να την αγγίξετε.
• Οι εργασίες επισκευής του προϊόντος αυτού πρέπει να πραγματοποιούνται μόνο
από εξουσιοδοτημένο αντιπρόσωπο επισκευών ή από προσωπικό της CookTek.
Μην επιχειρήσετε να ανοίξετε τη μονάδα ή να εκτελέσετε οποιαδήποτε εργασία
επισκευής σε αυτήν. Για πληροφορίες σχετικά με τις επισκευές, επικοινωνήστε με
την CookTek στον τηλεφωνικό αριθμό +1 214-379-6000.
• Η συσκευή αυτή πρέπει να είναι γειωμένη. Συνδέστε μόνο σε σωστά γειωμένη
πρίζα. Πριν τη λειτουργία, διαβάστε τις οδηγίες γείωσης και τις απαιτήσεις
ηλεκτρικής εγκατάστασης στη σελίδα 2 του παρόντος φυλλαδίου. Μη
χρησιμοποιείτε καλώδιο προέκτασης (μπαλαντέζα).
Prima di mettere in funzione il piano cottura, eseguire le seguenti operazioni:
● Rimuovere tutto il materiale di imballaggio.
● Collocare l'unità su una superficie asciutta, piana, rigida, stabile e non infiammabile.
● Tenere l'unità lontana da altre fonti di calore e lasciare almeno 5 centimetri di spazio
per consentire la circolazione dell'aria tutto intorno all'unità.
Per la propria sicurezza, non tagliare, rimuovere o disattivare mai il collegamento
elettrico di terra dalla spina. Non utilizzare mai una spina adattatore o un cavo
elettrico di prolunga per collegare il piano cottura.
AVVERTENZA: una spina elettrica non correttamente collegata all'impianto di
terra può provocare scosse elettriche. Rivolgersi a un elettricista qualificato in
caso di domande su queste istruzioni di messa a terra.
Prima di iniziare:
Assicurarsi che questo cavo di alimentazione sia collegato saldamente all'unità
CookTek PRIMA di collegare l'unità alla presa elettrica e prima di metterla in funzione.
• Non toccare la piastra di ceramica (o la superficie del piano cottura) subito dopo
l'uso. Il calore della pentola si trasferisce alla piastra di ceramica, rendendola
estremamente calda.
• Questo prodotto può essere riparato esclusivamente da un tecnico autorizzato
o dal centro di assistenza CookTek. Non tentare di aprire l'unità o di eseguire
interventi di manutenzione di alcun tipo. Per informazioni sull'assistenza, contattare
la CookTek al numero +1 214-379-6000.
ITALIAn
15
GENERAL OPERATION
Plug the IHW into a grounded, single-phase receptacle. Models IHW061-22/24 will
run on 100-120VAC drawing up to a maximum 1300W. Models IHW062-22/24 will
run on 200-240VAC drawing a maximum of 1300W. Models IHW061-34/36/64/66 will
run on 100-120VAC drawing up to 1800W. Models IHW062-34/36/64/66 will run on
200-240VAC drawing up to 1800W. Check the rating plate on the unit to verify correct
voltage and wattage. Voltages below 120VAC or 240VAC can result in less than rated
power and slower heating times. This appliance is designed for holding food products
only. Note: for proper operation, an independent, dedicated circuit should be
used for units installed on a 15amp (120VAC) circuit, 2 1300W units installed
on a 20amp (120VAC) circuit, or up to 3 1300W or 2 1800W units installed on a
20amp (240VAC) circuit.
To operate all models:
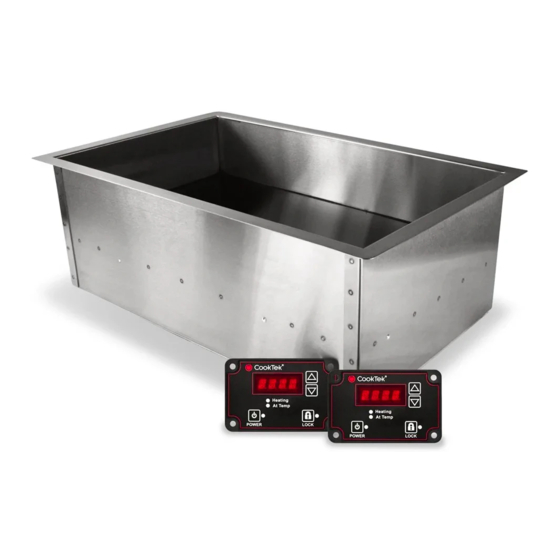
• Press the Power button to turn the unit on. The green LED next to the
power button will illuminate. Press the Power button when you are
finished to turn the unit off.
• To lock the controls, press the Lock button three times. The red LED to
the right of the lock button will illuminate to indicate the unit is locked.
Locking the unit will prevent temperature settings from being changed.
The Power button will continue to function while the unit is locked.
To unlock the controls, press the lock button three more times.
Unplugging the unit when powered on will also unlock the unit.
• Press the Up and Down Arrows to select the desired temperature.
The default preset choices are:
• Fahrenheit Settings: 160, 170, 180, 190
• Celsius Settings: 70, 75, 80, 90
Additional temperature settings are available by changing the temperatre settings
option. See "Changing the Set Temperature" on page 6.
Note: When the unit has been left on for 5 minutes without a pan in the well, the unit will enter Sleep
Mode. When in Sleep Mode, the temperature display will be blank and the POWER LED will flash.
If less than 1 hour has passed since the unit entered Sleep Mode, the unit will automatically exit
Sleep Mode when a pan of hot food is placed in the well. If more than 1 hour has elapsed, press any
button on the control panel to exit Sleep Mode.
SMARTEMP
• Place standard hotel pan(s) of appropriate depth in the unit.
• "F" or "C" will flash in the display window and the Heating LED will turn on.
• When the pan has reached the selected temperature, the "F" or "C"
will stop flashing and remain solid. The Heating LED will turn off and the
At Temp LED will turn on.
• The set temperature can be adjusted at any time while the pan is in the
unit by pressing the Up and Down Arrows.
• When a pan is removed from the unit, the Heating and At Temp LEDs will turn off
and the "F" or "C" will turn on solid in the display. The unit is not heating or holding
the set temperature when both LEDs are off.
• When finished using the unit, press the Power button to turn the unit off.
The Power LED will turn off. Remove then pan(s) from the unit. The unit
will remember the last temperature setting the next time it is powered on.
OPERATION
TM
4
Heating
At Temp
