Green Science SODA CAN ROBUG Podręcznik - Strona 2
Przeglądaj online lub pobierz pdf Podręcznik dla Produkty z zakresu edukacji naukowej Green Science SODA CAN ROBUG. Green Science SODA CAN ROBUG 2 stron.
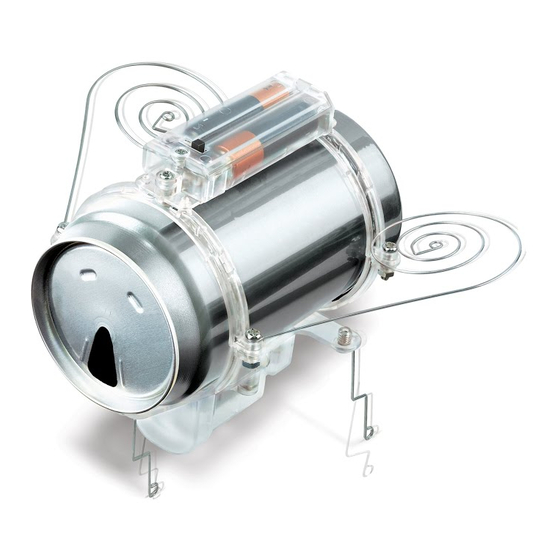
BATTERY CASING & BODY RING ASSEMBLY
1
Thread the two wires extending from the battery casing
through the two holes on either side of the screw stem.
2
Gently pull the wires through the two holes until the
battery casing is drawn to the base of the body half ring and
the two protruding guide pins are inserted into the holes of the
battery case.
3
Use a screwdriver to insert a small screw into the battery
casing and attach it to the body half ring. Note: To avoid
"stripping" the grooving into which the screws are inserted, do not exert unnecessary force. Screws
simply need to be snug.
4
Connect a second body half ring to the first using 2 large screws and bolts. When the two half rings
are connected, they will form a complete circle.
5
Gently insert the wires into the groves located on the inside of the half rings. When done properly,
the red (positive) wire will line one side of the completed body ring and the black (negative) wire will
line the other side of the body ring.
6
Thread each of the two wires through the opening at the opposite end of the body ring. Do not cross
the wires. Set the completed battery casing & body ring side.
SECOND BODY RING ASSEMBLY WITH WINGS
7
Place a wire wing onto the other body half ring. Align the holes of both parts.
8
Insert a large screw through the aligned holes.
9
Connect the second half ring by placing it over the screw; use a nut to secure the two halves
together.
10
Repeat the same with the other side. The two
wings should protrude from the body in the same
direction.
11
Attach the completed section body ring to the
battery casing using a small screw. You should now
have assembled both body rings and attached them to
the battery casing.
CONNECTING BODY RINGS TO THE BODY PLATE
12
Gently thread the two wires (from battery casing) through the
rectangular hole located on the body plate.
13
Afterwards, attach the body plate to both the body rings using the
small screws.
CONNECTING WIRES
You need to connect the wires from the battery casing to those
14
attached to the motor. To do this, place the motor in the housing
located on the underside of the body plate and ensure that it is fully
inserted.
16
15
Then connect wires of same colour (e.g. red to red, black to black).
Place both the black colour wires into one of the holes with metal
eyelet. Press the plastic pin into the eyelet to hold the wires in place.
16
16
Repeat this process for the red colour wires pair. Note: Do not use
the same hole for both sets of wires as this will cause a short-circuit.
ASSEMBLING THE MOTOR HOUSING & CONNECTING LEGS TO THE BODY PLATE
17
Attach the motor casing cover using two screws.
18
Notice that each of the 3 legs has a short "L" shape
17
at one end: you will attach this end to the body plate.
Insert each leg into the body plate grooves and secure
them in place using the small screws.
18
FINAL ASSEMBLY
19
Insert a soda can to the body rings. You may need to loosen a bit the long screws at the wings when
inserting the soda can. Afterwards, tighten them again after the soda can is inserted.
20
Insert 2 AAA size, 1.5 V batteries into the battery casing. Attach the cover by using a screw. Congratula-
tions, your Robug assembly is now complete! Slide the switch to "ON" position and place your Robug onto a
smooth surface (wooden floor or table top etc). It will vibrate and move across.