Pioneer VSX-D510 Instrukcja obsługi - Strona 17
Przeglądaj online lub pobierz pdf Instrukcja obsługi dla Odbiornik stereo Pioneer VSX-D510. Pioneer VSX-D510 40 stron. Audio/video multi-channel receiver
Również dla Pioneer VSX-D510: Instrukcja obsługi (36 strony), Instrukcja serwisowa (14 strony)
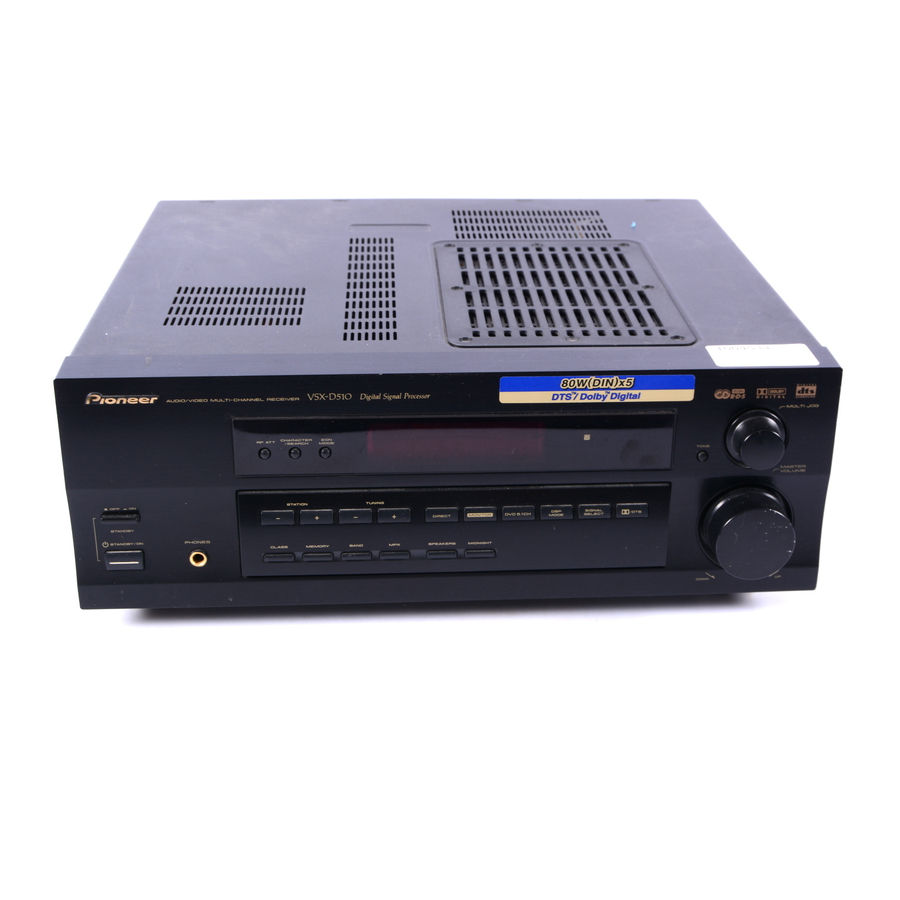
Front Panel
1 — OFF/ _ ON (Main power) button
If the button is OFF (—), the power of the receiver is
shut off and the
STANDBY/ON
receiver or the remote control do not function.
Pressing the button again will turn the receiver ON
(_) and the receiver enters the standby mode. In the
standby mode, you can turn on the receiver using the
button (~) on the receiver or the
STANDBY/ON
remote control.
2 STATION (+/–) buttons (see pages 25, 26, 28)
Selects station memories when using the tuner.
3 RF ATT button (see page 24)
Use to lower the input level of a radio signal that is
too powerful or contain interference thus causing the
receiver to distort
4 CHARACTER/SEARCH button (see pages 26, 28)
Use to search for different program types in RDS
mode. It is also used to input station names.
5 EON MODE button (see pages 28, 29)
Use to search for different programs that are transmit-
ting traffic or news information (this search method
is called EON).
6 TUNING buttons (see page 24)
Selects the frequency when using the tuner.
7 DIRECT button
Use to switch DIRECT playback on or off. This mode
bypasses the tone controls and channel levels for the
most accurate reproduction of a source.
8 MONITOR button
Press to switch tape monitoring on/off.
9 Remote sensor
Receives the signals from the remote control.
0 TONE button
Press this button to access the bass and treble
controls, which you can then adjust with the
dial.
MULTI JOG
MULTI JOG
MULTI JOG
MULTI JOG
MULTI JOG
1
2
3
4
5
N∫m-Û.,?
ST A TION
PHONES
CLASS
MEMORY
=
~ !
@ #
button (~) on the
6
7 8
9
Digital Signal Processor
TUNING
DVD
DSP
SIGNAL
DIRECT
MONITOR
5.1CH
MODE
SELECT
BAND
MPX
SPEAKERS
MIDNIGHT
$
% ^
&
*
(
)
- MULTI JOG DIAL
The
MULTI JOG
Use it to select the function (like DVD or CD) that
you want to play. You can also use it, after pressing
the
button to increase or decrease the amount
TONE
of bass or treble.
= STANDBY indicator
Lights when the receiver is in standby mode (note
that the receiver consumes a small amount of power
(1W) in standby mode).
~
STANDBY/ON button
Switches the receiver between on and standby.(note
that the receiver consumes a small amount of power
(1W) in standby mode).
! PHONES jack
Use to connect headphones. (Use the
button to turn off the speakers if you want to mute
the sound from the speakers.)
@ CLASS button (see pages 25, 26)
Switches between the three banks (classes) of station
memories.
# MEMORY button (see pages 25, 26, 28)
Press to memorize a station for recall using the
STATION (+/–)
$ BAND button (see pages 24, 25, 29)
Switches between station AM and FM radio bands.
% MPX button (see page 24)
If there is interference or noise during a FM radio
broadcast, or the radio reception is weak, press the
button to switch the receiver into mono
MPX
reception mode. This should improve the sound
quality and allow you to enjoy the broadcast.
^ SPEAKER button
Use to switch the speaker system between
.
off
& MIDNIGHT button (see page 22)
Use when listening to movie soundtracks at low
volume. This feature will enable you to hear quiet
sounds and not get jolted by loud or sudden sound
effects.
Displays & Controls
0
-
R
1
MULTI JOG
TONE
MASTER
VOLUME
2
/DTS
DOWN
UP
_
+
dial performs a number of tasks.
SPEAKER
buttons.
(on) and
A
17
En