Askari ALARM I/O Instrukcja obsługi - Strona 2
Przeglądaj online lub pobierz pdf Instrukcja obsługi dla System bezpieczeństwa Askari ALARM I/O. Askari ALARM I/O 2 stron.
PROGRAMMING
The Askari Scout Detector needs to be programmed into both the Askari Alarm I/O and the
Askari Nano for systems using both devices. These functions need to be performed sepa-
rately for each device. If the Askari Nano has already been programmed with Askari Scout
Detectors, it can clone the information to the Alarm I/O. (See the Askari Scout user manual
for Detector data cloning)
There are 3 programming functions for the Askari Alarm I/O:
A. Programming Askari Scout Detectors
B. Deleting zones
C. Programming Askari Nano
Before programming, remove the cover from the Alarm I/O and connect to 12 volts at the
indicated terminal, the power indicator LED will switch on.
A. Programming Askari Scout detectors
1. Remove the battery cover from the Askari Scout you wish to program (or set the
Nano into clone mode)
2. Press and release the Program switch on the Alarm I/O – the Programming/Deleting
LED will light up
3. All programmed zone LED's will light up ( none will light up if nothing is
programmed in )
4. Wait for the Program LED to briefly go off and on again, all programmed zone LED's
will switch off – you are now in programming mode
5. Press and release the required zone button – the zone LED will light up
6. Trigger the tamper switch on the Askari Scout (or trigger the required zone on the
Nano)
7. The Alarm I/O will accept the programming, return to standby mode, and all
programmed zone LED's will be on.
8. Repeat as above for all other zones
B. Deleting zones
1. Press and release the Delete switch on the Alarm I/O – the Programming/
Deleting LED will light up
2. All the programmed zone LED's will light up
3. Wait for the Programming LED to briefly go off and on again, all programmed zone
LED's will switch off
4. Press and release the required zone button
5. The Alarm I/O will accept the programming, return to standby mode and all
programmed LED's will be on, the deleted zone will be off.
C. Programming an Askari Nano
A programmed Askari Nano will be able to arm and disarm the siren output and LED output
on the Alarm I/O, and trigger the panic output relay.
1. Press and release the Program switch on the Alarm I/O – the Programming LED
will light up
2. All the programmed zone LED's will light up
3. Wait for the Programming LED to briefly go off and on again, all programmed
zone LED's will switch off
4. Press and release the zone 1 button
5. The zone 1 led will light up
6. Simultaneously press the Left and the Right side buttons on the Askari Nano.
Release the buttons
7. The Alarm I/O will accept the programming and return to standby mode
8. The Nano will beep once to confirm programming
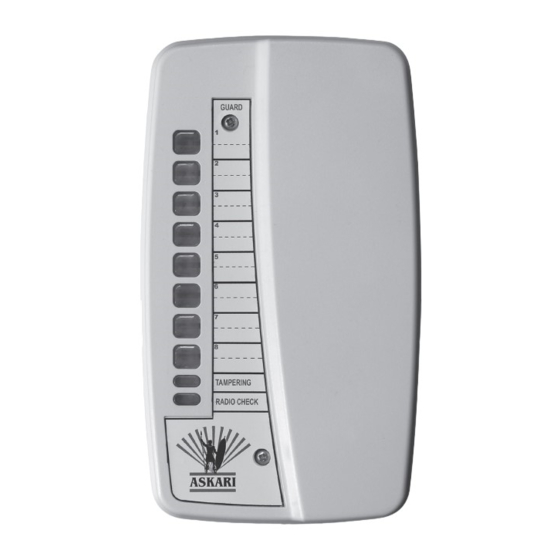
System Operation
The Askari Alarm I/O is an alarm panel interface with the following N/C outputs;
8 separate zone outputs
1 Device tamper outputs
1 Detector tamper outputs
1 Remote (Nano) panic outputs
1 Pulsed Arm / Disarm input
1 Latched Arm / Disarm input
1 Pulsed Arm / Disarm output
1
Latched Arm / Disarm output
To Operate as a stand-alone alarm system (or combined with the alarm panel interface) the
Alarm I/O has the following outputs, controlled by a Programmed Nano
1 Siren output
1 System status LED output
Intruder detection
Zones can be turned on and off with the zone switches. Active zones will have lit LED's
When the zone is active the Led will burn solid, when it has been triggered it will flash
When an intruder signal triggers the zone it will drive the outputs for 2 seconds if the unit
is armed
Autotest
The system conducts auto-test every 20 minutes and will trigger after 3 consecutive test
failures. The auto-test clock will reset after every successful intruder signal. When auto-test
failure triggers the zone, the Sensor Check LED will switch on. To determine which Detector
has failed auto-test, and reset the Sensor Check light, turn each zone off and on, starting
at zone 1, until the failed zone turns the Sensor Check light off. A sound will be heard if a
speaker is connected.
Device Tamper
The Alarm I/O has its own tamper switch and output. The outputs will latch open when the
cover is removed.
Askari Scout Detector Tamper
When the battery cover is removed from the Askari Scout Detector it will transmit a Tamper
signal to the Alarm I/O.
On Receipt of a Tamper signal the Tamper light will switch on and the Tamper output will
trigger for 2 seconds.
To determine which Detector has triggered the tamper signal,
and to reset the Tamper light, turn each zone off and on,
starting at zone 1, until the tampered zone turns the
Tamper light off. (a beep will be heard if the speaker
is connected).