Battery Doctor 20026 Manual do Proprietário - Página 3
Procurar online ou descarregar pdf Manual do Proprietário para Carregador de bateria Battery Doctor 20026. Battery Doctor 20026 4 páginas. 900ma battery charger & maintainer instructions for 6 & 12 volt batteries
VOLTAGE OPTIONS:
6V/900mA
— Use this setting for charging 6 volt batteries
12V/900mA
— Use this setting for charging 12 volt batteries
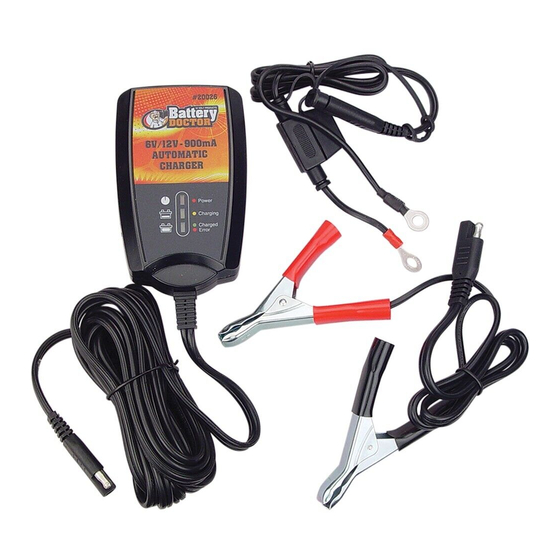
6V / 12V - 900mA
1
SIDE VIEW
9.
FEATURES
1. Battery Voltage Select Switch
2. Power 'On' LED
3. Battery Charging LED
4. Battery Charged LED - Green
Error LED - Red
5. Ring Terminal Assembly
6. Alligator Clip Assembly
AUTOMATIC
CHARGER
2
3
4
6
Before using review all safety and connection directions before using charger. Failure to do so can damage battery and cause
serious injury or death.
10.1 Charging:
•
Connect the charger to the battery per instructions in sections 6 or 7; depending on the battery set-up.
•
Connect the charger to AC outlet.
•
Choose battery type by sliding the voltage select switch to the correct battery voltage.
•
If the charger does not detect a properly connected battery, the "Error LED" will light until a battery is detected. Charging will not begin
while the Error LED is on. When the charging begins, the "Charging LED" will light up.
•
When charging is complete, the "Charged LED" will light up. Unplug the charger first from the AC outlet.
•
Remove the negative connection first, then the positive connection.
10.2 Automatic Charge Mode:
Stage One -
Diagnosis: The charger's smart technology will perform a series of steps to analyze the battery's charge state and determine
which stage the battery charger needs to begin with. It will also determine if the battery is good or hooked up improperly.
Stage Two -
Charging battery at a current of 900mA until the battery reaches full charge. In 12V mode, the 20026 will shut off at 14.4
volts. In 6V mode, the battery charger will shut off at 7.2 volts.
Stage Three - Pulse Float level / Automatic On-Off Monitoring. The charger DC output will shut off and monitor a battery. The 20026 will
send pulse charges to keep the battery stable between 13.4-14.0V for 12V batteries and 6.7-7.0V for 6V batteries. Always
make sure to randomly inspect the battery and charger while hooked up for long periods of time.
Follow all safety instructions and precautions for charging the battery. Wear complete eye protection and clothing
protection. Charge the battery in a well-ventilated area.
NOTE: During extremely cold weather, charge the battery for 5 minutes before cranking the engine. If the engine fails to start, charge the battery for
5 more minutes before attempting to crank the engine again. After the engine starts unplug the AC power cord before disconnecting the battery clips
from the vehicle.
5
•
Use the following table to more accurately determine the time it will take to bring a battery to full charge. First, identify where the battery fits into
the chart.
•
The times given are for batteries with a 50% charge prior to recharging. Add more time for severely discharged batteries.
Small Batteries (6 Volt)
Cars/Trucks (12 Volt)
Marine/Deep Cycle (12 Volt)
10.
OPERATING INSTRUCTIONS
11.
CALCULATING CHARGE TIME
Battery Size/Rating
6 - 12 AH
Motorcycle, Garden, Tractor, Etc.
12 - 32 AH
200 - 315 CCA
40 - 60 RC
315 - 550 CCA
60 - 85 RC
550 - 1000 CCA
80 - 190 RC
80 RC
140 RC
160 RC
180 RC
Charge Rate/Charging Time
900mA
7 - 14 hrs
14 - 36 hrs
22 - 28 hrs
28 - 40 hrs
40 - 80 hrs
44 hrs
70 hrs
88 hrs
90 hrs