DSE DK-V2-4G Manual do utilizador - Página 2
Procurar online ou descarregar pdf Manual do utilizador para Câmara digital DSE DK-V2-4G. DSE DK-V2-4G 4 páginas. Camera and video recorder car black box with 4g
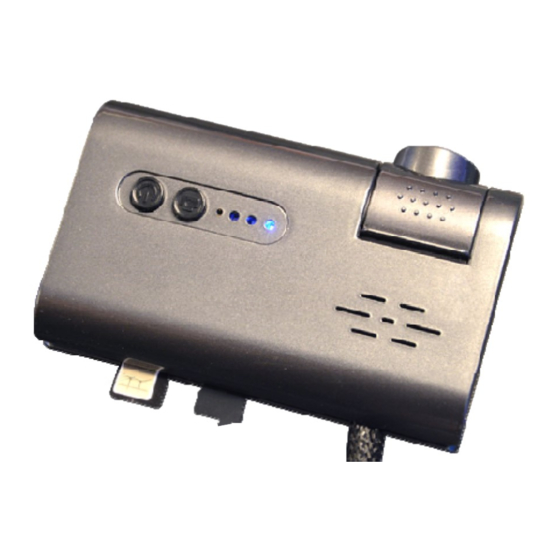
USER MANUAL
GREEN LED – Steady when all functions are normal
Insert the micro SD card
The first thing to do, if you want to make recordings, is to insert the
micro SD card in the appropriate slot on the DVR (TF)
It is possible to use micro SD cards with capacity up toto 128GB in
CLASS 10or higher. The SD card is not included in the package.
As an indication, consider that one minute of continuous recording
at 1080P occupies about 90MB, therefore a 128GB SD card can
contain about 24 hours of continuous recording.
Once the SD card has been inserted into the slot, the red led
signaling anomalous recording switches off and an audible
confirmation of inserted SD card is emitted.
Insert the 4G SIM
If you want to be able to control the dashcam through the WEB, you
need to insert a 4G sim card into the SIM slot. The camera supports
the MicroSIM format. If you have a smaller format SIM, NanoSIM,
you will need an adapter (not included). Insert the card until you
hear the locking click. Once the SIM card has been inserted, if there
is a 4G data network from your provider, the flashing blue LED,
which signaled the disconnected network, turns off and the
message: Network OK is played.
Registration
The camera starts recording automatically on start-up and saves
video files in 1920x1080 30 f/s resolution, complete with audio, on
the SD card. The files saved on the SD card are H264 videos in .TS
format with a duration of 2 minutes each.
When the vehicle is stationary, in parking mode, the camera only
records if the vehicle is hit.
Buttons
The camera has two buttons: Power and Camera.
DSE srl - Digital Surveillance Equipment – www.dse.eu
Document:DK-V2-4G 2B3
DK-V2-4G Dash Cam Car Camera
CAMERA BUTTON - The camera has a camera button that you can
press at any important moment to highlight and protect from
overwriting the recorded footage of that moment. Movies
protected with this button are stored in a separate folder for easy
identification.
Pressing this button TWICE will enable/disable the camera alert
voice. LONG press this button to enable/disable wifi.
ON/OFF BUTTON – By pressing this button, the camera vocally
indicates the status of Wifi, GPS, 4G SD card. Pressing this button
for 3 SECONDS restores the factory settings. This button is also
used to confirm pairing to the cloud app.
Protection of recorded files
Normally the camera records until the memory runs out, then
overwrites the recorded files starting from the oldest. It is possible
to protect the file being recorded from being overwritten by
pressing the key with the camera icon on the camera. The camera
also automatically protects the recorded files from overwriting
following the intervention of the collision sensor.
Using the free Cloud DVR app
The camera is controlled with the free appCLOUDDVR extension
which can be used to check the framing of the camera and to
manage the recordings, both in local wifi connection and via the
web.
Search and download the CLOUDDVR app for Android or iOS from
Google Play or Apple Store.
Once the app is installed, the first thing you need to create an
account to access.
Once you have created your account, you need to link the camera
to your account.
By default, the camera creates its own Wifi network to which you
can connect with your phone. Open the phone's wifi network
management and connect to the camera's wifi network which you
will find among the available networks with an abbreviation FX_--
The factory password of the wifi network of the camera is:
12345678
Page: 2