2gig Technologies 2GIG-STVGRL1-345 Instruções de instalação
Procurar online ou descarregar pdf Instruções de instalação para Acessórios 2gig Technologies 2GIG-STVGRL1-345. 2gig Technologies 2GIG-STVGRL1-345 2 páginas.

2GIG-STVGRL1-345
STOVE & GRILL GUARD
INSTALLATION INSTRUCTIONS
The 2GIG® Stove & Grill Guard is a contact ON/OFF sensor that
alerts your security panel (and op onally the smartphone with
Alarm.com) when the knob on a stove/grill is turned ON. It is
compa ble with 2GIG security panels, including GC2, GC3, and
Vario. The Stove & Grill Guard is also compa ble with select
Honeywell Vista panels.
SENSOR DISC
INNER MARKS
KNOB STEM
Contents
Verify the package contains the following:
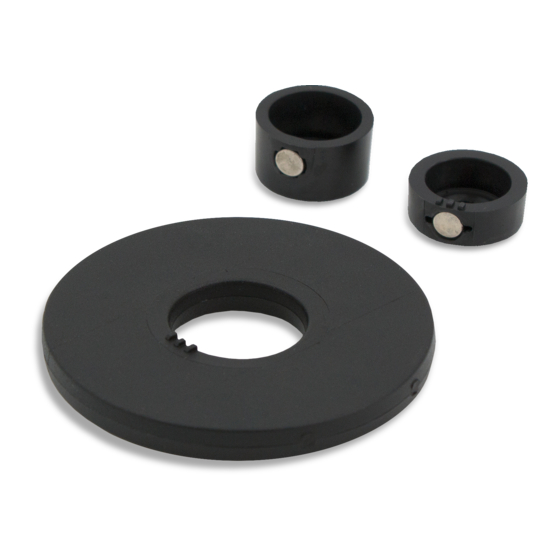
• One (1) sensor disc - with adhesive strips a ached
• Sleeves with magnets – 2 diff erent sizes
Pre-Installation Checks
Perform the following checks to determine whether or not the
product will be a good fi t with your stove/grill:
1. Ensure the stove/grill faceplate surface around the knob is
fl at. If screws are present around the knob stem, ensure the
following:
• The screw head diameter is less than 0.4 inches
• The screw head thickness is less than 0.12 inches
• The sensor disc fi ts over screws and is concentric with the
stem
2. Ensure the hole on the faceplate around the stem is not large
enough for the sleeve to fi t through and go underneath the
faceplate. If possible, use a fi xture (e.g., a rubber grommet,
with adhesives, if needed) that grips ghtly to the stem for
preven ng the sleeve from going underneath the faceplate.
3. If a trim ring (or fl ange) is around the knob, ensure the
• Inner diameter of the ring/fl ange is no smaller than 2.2
inches
• Surface inside the ring is fl at
2.2"
>2.2"
4. Ensure the stem's maximum diameter of the cross sec on is
between 0.25 - 0.38 inches and its length from the faceplate
surface upwards is at least 0.4 inches.
0.25-0.38"
FACEPLATE
SURFACE
>0.4"
5. If the knob post protrudes outside the bo om of the knob,
ensure its thickness is less than 0.4 inches and does not
protrude more than 0.1 inches outside of bo om of the knob.
If < 2.2"
< 0.4"
< 0.1"
6. If the inside diameter of the knob is 2.2 inches or less, posi on
the knob on the knob stem such that the bo om of the knob
sits 0.35 inches above the faceplate. Check whether the knob
has enough engagement with the stem to stay stable and
fi rmly installed. This helps determine if there is enough space
to push the knob down and turn the stove/grill ON or OFF a er
the Stove & Grill Guard is installed.
Check for stability.
If < 2.2"
At least
0.35"
Installation
1. Ensure the device (stove, grill, heater, etc.) is turned OFF. If
possible, also turn OFF the gas valve and/or the power source.
2. Remove the knob from the stove/grill.
3. Ensure the stove/grill surface around the knob area is clean.
4. Iden fy the sleeve that best fi ts your knob stem, from the two
provided. The larger sleeve is for the Weber Genesis series
grills. The addi onal sleeve is for other grills and stoves.
STOVE\GRILL
KNOB
SLEEVE
MAGNET
5. DO NOT PEEL THE PROTECTIVE BACKING MATERIAL FROM THE
ADHESIVE STRIP ON THE SENSOR DISC. Place the sensor disc
on the knob stem area, and determine the ideal orienta on of
the disc (which may be infl uenced by the presence of screws).
Take note of the orienta on of the inner marks on the sensor
(e.g., 12-o'clock with respect to stem), and put a temporary
mark on the faceplate to indicate the orienta on.
6. Remove the sensor disc before installing the sleeve.
SENSOR DISC
7. Install the sleeve onto the knob stem with the cavity side
TRIM RING/FLANGE
facing towards the faceplate. Ensure the marks on the sleeve
(which indicate the loca on of the magnet) align with the mark
on the faceplate from the previous step. Be careful to posi on
the bo om of the sleeve 0.10 inches above the faceplate of
the stove/grill. (The sleeve must not be in contact with the
faceplate during normal opera on.)
Note: For the Weber Genesis grill, there is only one orienta on
for installing the larger sleeve on the stem. Install the sleeve with
cavity facing outward
the
8. Remove the protec ve backing material from each adhesive
strip on the sensor disc.
SENSOR
DISC
9. Align the inner marks on the sensor disc with the magnet
on the sleeve. ENSURE THE SLEEVE IS CENTERED INSIDE
THE HOLE OF THE SENSOR DISC, WITH THE TWO PARTS NOT
TOUCHING EACH OTHER. Mount the sensor disc to the stove/
grill face.
10. Install the grill knob back onto the knob stem. If the inner
diameter of the knob is not bigger than the sensor disc, DO
NOT PUSH THE KNOB all the way in. It is important to leave
a 0.10-inch gap between the sensor disc and the bo om of
the knob. The gap allows the knob to freely turn ON and OFF
following installa on.
11. Use your panel to program the Stove & Grill Guard.
1
Copyright © 2018 Nortek Security & Control LLC
SENSOR DISC
INNER MARKS
TEMPORARY MARK
un l fi rmly seated on the stem.
ADHESIVE
STRIPS
MAGNET
INNER
SLEEVE
MARKS
INNER MARKS
SENSOR DISC
".10"
